Pink geranium flowers. Sweet 50 with 16mm macro converter
Thinking of summer as the flowers start to bloom. A pink geranium that we grew in a pot, close to the porch so it could get the sun and be sheltered from the winds. It rewarded us with beautiful flowers. Shot here with the Lensbaby, which is one of my favourite range of optics. The Sweet 50 optic gives a sharp focus point called the “sweet spot” and a gentle blur surrounding that spot. There’s a whole series of articles here on the Lensbaby optic system On Flickr you can find my Album of Sweet 50 photos
There’s nothing quite as beautiful as the tiny delicate flowers of the Japanese plum tree in March and April. The wind may be cruel and cold, but the fragile blossoms cling to the swaying branches with such determination. Even overnight frost cannot defeat them. Spring will endure! I shot this with my favourite lens. It is an old Russian Helios 44-2 lens, from way back in the 1960s. It creates the most wonderful gentle colours, and a stunningly beautiful bokeh too. There is an album of photographs taken with this lens here on Flickr. The close-ups are with this exact lens; the longer shots with a second LOMO Helios lens (yes – I eventually got two!)
The sense that Spring is here and summer is close behind!
One of my little Kokeshi dolls in the Spring sunshine. Surrounded with flowers, it feels like summer can’t be far behind! Actually the prevailing winds are still blowing down from the Arctic to us here in Scotland, and the wind chill factor is keeping our warm winter coats and hats at the front of the wardrobe …..
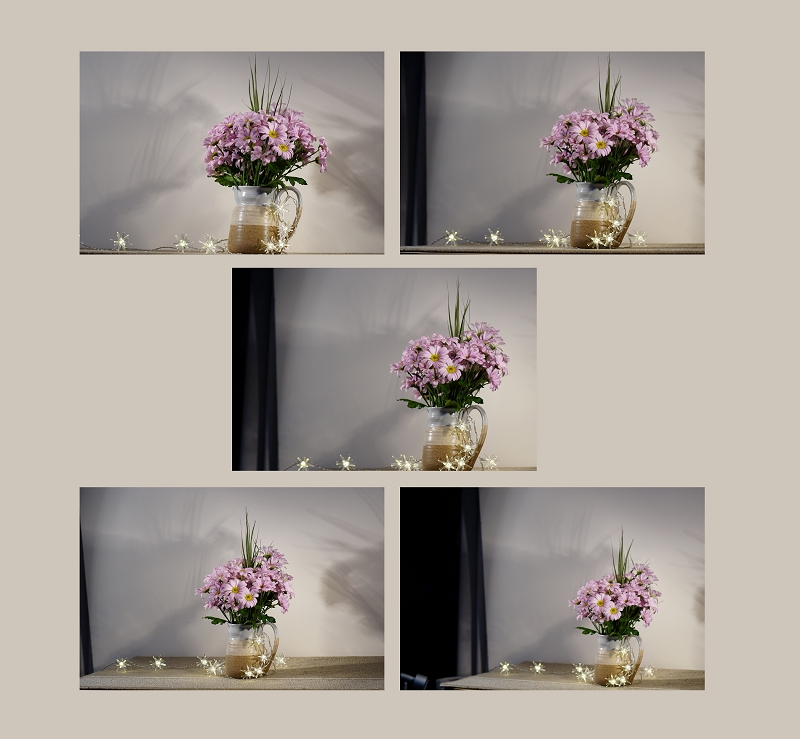
I have so many folders that I mentally label as “Failed shoot”. It’s a product of my habit of taking a few shots ‘just in case’ … just in case I later regret that I didn’t! I came across a folder from January 2018 just called ‘Pinks’. I was curious, it rang no bells, triggered no memories. Inside were just 5 shots. Then I remembered. I was putting away Christmas lights that we hadn’t used. And I thought I’d turn them on and maybe take a few shots before they vanished back into the cupboard for another year. In a hurry to finish the tidying up I put them together with a jug of flowers that was close by – and took a few shots. The results didn’t impress me when I looked at them later on. The lights didn’t sparkle at all, they added nothing. The wall I’d placed the jug against was nicely neutral, but in my haste I’d overlooked the cast shadows. Rather disappointed I mentally stamped the folder “Failed”. Only 5 shots in all, so I didn’t delete them at once.
Later that year I brought the folder out of mothballs, and took another look. I wanted something to play with, to experiment with the newly installed suite of Photoshop plug-ins called NIK. And if I liked the image that emerged, I could use it with my Sunday group that specialises in post-processing to transform a photographic image.
All 5 shots that I took that day, and marked as ‘failed’
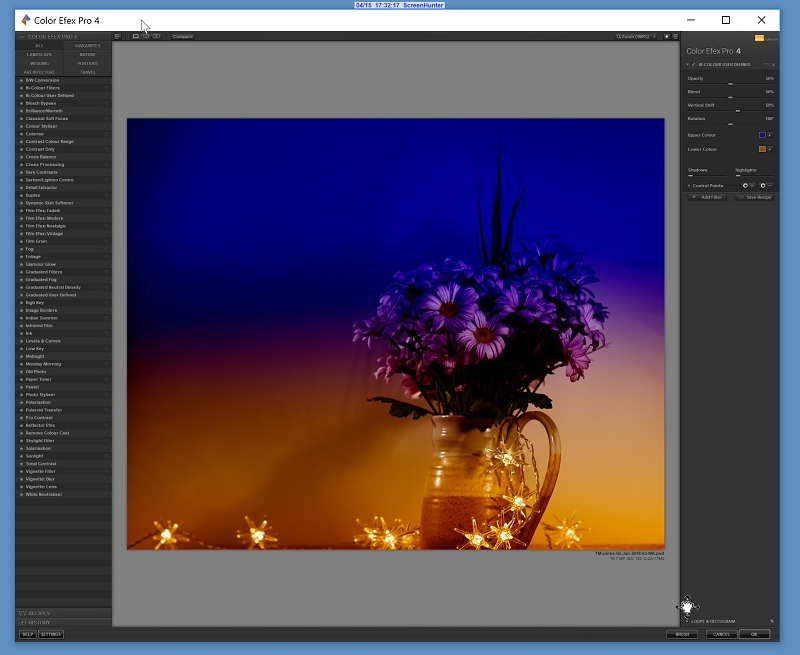
step 1 Looking at the originals, I decided to try number 3. I didn’t want too many cast shadows, and I didn’t want too much of the table surface either … I might want the jug to feel like it was free-floating. step 2 was to take it into Camera RAW, straighten it slightly, lighten it, and crop off the dark band on the left side. Then into Photoshop to play and see what might work to make something visually interesting out of the image! step 3 was to launch the NIK panel. What might work? I selected Color Efex Pro 4 panel and then Bi-colour, as I wanted something to jazz the image up and bring it to life.
Choosing Color Efex Pro 4Bi Color applied in NIK
That looked like a promising start to making something new.
step 4 the top colour looked nice and rich, but it was a solid blue-purple block. Maybe it needed something subtle to break it up? I’ve been collecting texture layers for a long while now. Flickr users are so generous, and make lots of beautiful texture layers available to fellow Flickr members. I also started to look at commercial collections for added effects. Design Cuts was the place that I began, as they offer bundles of discounted graphics and files, and I could try out different suppliers and see what suited me. My big favourite is 2 Lil Owls and from Denise I have some amazing effects, like light flares. So I looked in my 2LO collection called Crazy Flares, which mixes light flares with all manner of textures. And I selected this one
2 Lil Owls Crazy flares
These light flares needed to be overlaid, and then used in Screen mode for the best effect.
2 Lil Owls Crazy flares applied as an overlay
That’s better! beginning to shape up! step 5 was to save that image as a jpeg. I needed a single layer for my next idea. So I saved the PSD file as it is, then saved the layered image to start again. I opened the newly saved image as a Smart Object into a new PSD file as this allowed me to easily play with the Photoshop’s inbuilt filters … I wanted yet more light effects ;o) step 6 was to apply the Filter -> Render -> Lens Flare effects. Because the image is a Smart Object I could access the effects window and adjust it easily to get the intensity, direction and actual lens simulation that looked best.
The final transformation – does it work?
Yes – that looked OK, and better than my starter image! step 7 was to gently wipe out a little of the bleaching effect of the light falling on the petals – a little more intensity for the petals, please! So I highlighted the mask, and removed a little of the glare.
And at last I am happy with the result.
And now I have something that has more interest than the original – there’s more going on visually. Colour-wise there’s an interesting play with the bi-colour division set up in the NIK. The final lens flare has added to the ochre tints in the lower half. The light flares and text texturing has lightened and added interest to the upper blue-purple half. And the flowers in the jug are the vertical that joins the two horizontal planes. Finally, the petals towards the top right of the image are balanced by the lens flare circles in the bottom left. Maybe I’ll post it and see what happens … now I just need a name for it ;o) So I posted it on Flickr to see what people thought – here
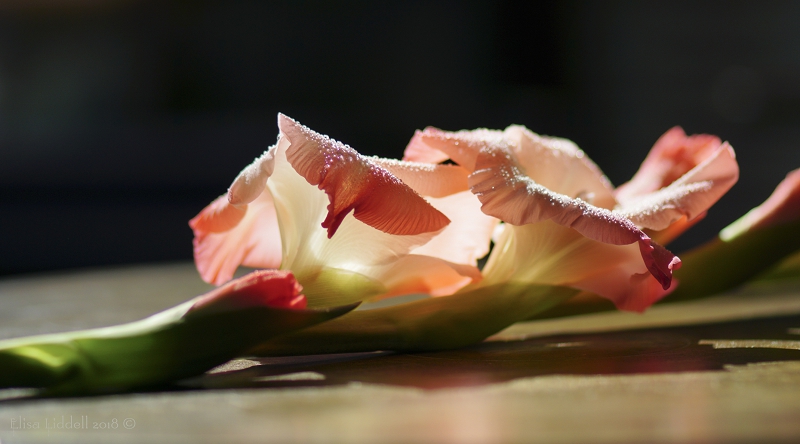
Close-up of a gladiolus flower in the late sunshine
When I was writing this I thought of it as “Chasing the late light at F2.8” or “3 cameras and 1 flower”. But both of these titles were a bit unwieldy as URLs, so I simplified it. But there are three lenses in this playful tale, and all are indeed set at F2.8. So, to begin…
The way my house is laid out, the front gets the sunlight in the morning, often until the early afternoon. A big south-facing bay window makes it the best place to shoot. Then it gets tricky … by late afternoon the sun has moved round to the side of the house; then there is a small window of time, and a small physical side window where I can sometimes catch the light. There are trees in the way – so, especially if it’s windy, there is a constant flickering of light and shadow. Then the sun moves round to the back of the house, and sometimes there is the late light shining through a willow hedge right into the kitchen and onto a dark blue Formica top of the breakfast bar. This the story of chasing the late afternoon light with a lovely salmon pink gladiolus stem, trying to get some photos using just the natural light! And as two of the cameras were already set on F2.8 I shot the third on F2.8 too. Note: I always shoot on full Manual, especially indoors – I’m so used to it I never even think about it. And the White Balance remained constant on ‘cloudy’ or ‘daylight’ on all 3 cameras for this shoot.
The cameras to hand were:
1) Lensbaby Composer Pro with 50mm double glass optic with a +4 macro filter (essentially a fixed focal length)
2) A NEX-6 with my favourite Helios Russian lens (frozen at F2.8 so it is a fixed focus)
3) The Sony A77ii with the tele-macro 100mm lens (a heavy combination, but so versatile in the results it can achieve)
I moved a small round wooden table beside the side window with the swaying trees casting strong light then deep shadow. I laid the gladiolus on the wood and waited to catch the sunshine. The tele-macro allowed me to zoom out and take in both the flowers lying on the table.
Sunlight casting strong light then deep shadow on my gladioli flowers. shutter 1/800 ISO 80 WB “cloudy”
I could catch the sunlight and strong shadow it cast; the graceful curved shape of the stem; and a sense of the wooden surface, with a slight reflection too. And using F2.8 meant that the background was nice and dark due to the shallow DoF.
Next I took the Helios lens. It makes a lovely and soft image, but F2.8 is the only option – which gives me a closer composition but with no flexibility to move in closer, or further away.
The Helios lens is gentle and gives a lovely soft bokeh. shutter 1/80 ISO 100 WB “cloudy”
The light is softer, and there is a background bokeh and definite reflections on the table.
So – could the Lensbaby offer me anything different at F2.8 (the aperture ring was in place from a previous shoot)
Lensbaby Double Glass +4 macro filter catches the light on the flower. shutter 1/2000 ISO 100 WB “daylight”
The light was much harder to control, and focusing took more time as the tree branches gave a strobe effect the table! But I did manage to get the Lensbaby swirl of bokeh around the petals, and the internal glow! Here I used a high shutter speed. I try to keep the ISO as low as possible – I find that my Sony cameras are best with low ISO, and get noticeable ‘noise’ at higher settings.
By now the sun was moving round the house and lower in the sky .. so to complete the process I waited until I could catch the light as it fell across the breakfast bar. I went back to the big tele-macro lens, as it can get closer in to catch the water droplets better than the the other two.
Gladiolus flower on the Formica worktop, shot in the fading evening light. shutter 1/80 ISO 50 WB “cloudy”
Against the dark surface, and with light slanting through the open door I took the final shots. This time the white of the freezer in the background stopped me achieving a matt black background. But there are nice reflections on the work surface, and it looks like liquid – a lens effect I hadn’t expected. And I can get in closer with the tele-macro than I could with either of the other two lenses.
Golden coins (only chocolate!) shot with the Double Glass optic and +4 macro filter
In my first selection of Lensbaby “art” shots I wanted to concentrate on how the Lensbaby can creatively enhance a composition – even transform it. Now I want to add some more flamboyant images! As I said … what I set out to do and what I end up with can be miles apart. Every shoot is a journey into the unexpected! The magic comes when the camera takes you by surprise! So I have compiled a small gallery of shots that have done just that – taken me completely by surprise!
A very early shot from 2013, when I first bought a Lensbaby.
Scarf ring on a bright scarf. Double Glass and +4 macro filter
I took a bright colourful boa scarf and placed a scarf ring on top to help me find the sweet spot, and learn focussing. The result really blew me away! The colours, the bokeh, the swirling and zoom-type movement … wow! OK, I missed on the focus, it landed on the fuzzy wool to the left of the target ring – but what a result. I admit, I was hooked ;o)
Since then I have learned more about the powers and potential of the various optics, and how to control and use them. But they can still take my breath away. One subject that the Lensbaby is especially wonderful with is trees, and foliage.
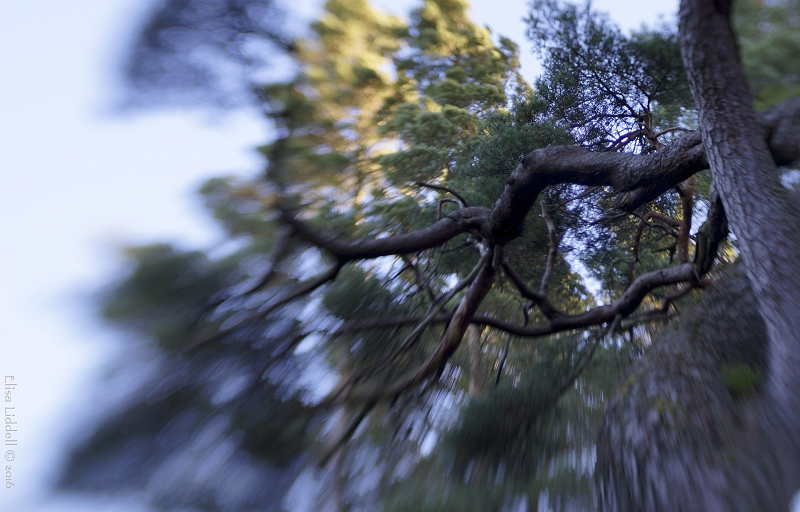
Sunlight through trees. Double Glass at F2.8 with telephoto optic
Simple sunshine through the trees at Leith Hall gardens, with the bokeh movement of the leaves. And next, looking up on a dull day, as the sunshine caught the tops of the fir trees.
Looking up through the tree canopy. Sweet 50
And a magical composition, combining two shots that I have described at the bottom of the page about the Sweet 50 optic here:
Walk into my world. The Sweet 50 composite of a Leith Hall walk.
It seems that handling light is one of the many superb qualities of the Lensbaby range of optics.
Blue hydrangea flowers in bright sunlight. Double Glass and+4 macro filter
Here the way the optic handles bright sunshine makes for a softly melting watercolour effect. The petals become almost translucent. And the effect is achieved in camera, and not by post-processing. Another shot where bright sunlight was handled so well by the Lensbaby
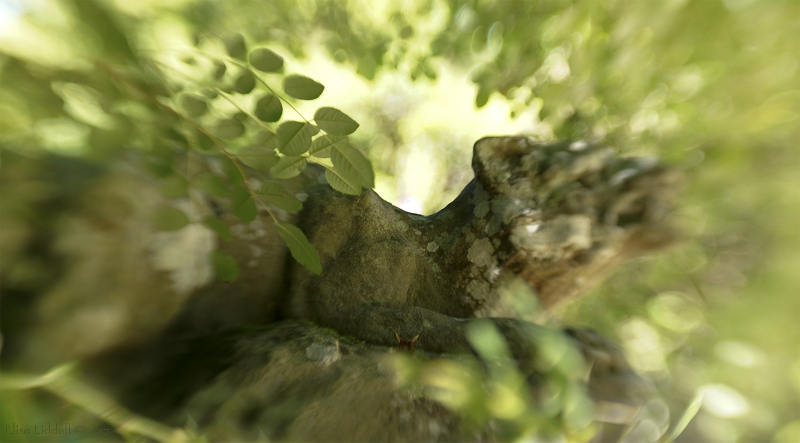
One of the old stone lions that guard the garden gate at Leith Hall. Sweet 50
I was hiding among the branches, and trying to shoot the stone lion gate-post at Leith Hall. I thought the extremes of light and shadow would defeat the camera … but a rather haunting semi-abstract emerged.
An old tree stump, caught in a shaft of sunlight. Sweet 50
Here the sudden sunlight falling on the tree trunk, and the delicate shadow cast by the weed across the stump, caught my eye. Again, it was the contrast of light and shadow – and again the Lensbaby surprised me. No post processing was needed – just a small crop.
In all three of these shots I expected I was asking too much of the camera and lens, that the extremes of bright light and deep shadows would mean failure – but I was taken by surprise at what the Lensbaby could do!
And finally, one of my personal favourites – something the Lensbaby can do as no other lens I have, and no post-processing skills I have can simulate.
A crystal glass sphere lying among some flowers. Sweet 50 optic
A flowering rambler atop a wall, sunshine and a crystal sphere – and the Lensbaby. Unexpected magic ;o)
I hope that you have enjoyed this personal journey through 5+ years of my “living with the Lensbaby”. I have enjoyed looking back, and now look forward to see what new surprises and delights it can offer me ;o)
Pink geranium flowers. Sweet 50 with 16mm macro converter
The magic that Lensbaby have woven with their Composer Pro and optics is to bring art and photography together in a unique way. The “glass” of the optics and the eye of the artist can combine to produce something new, something unexpected, and something beautiful. There is the same feeling you get when painting – that you are striving to express what you see and feel about the subject – but somehow the painting has a life of its own, and you don’t really have a clue what it will look like when you finally put the brush down. Then, when you look at the image a few days later, you think “Ah! So that is what I wanted to say!”
What I set out to do and what I end up with … they can be miles apart. Every shoot is a journey into the unexpected! OK, sometimes it all falls flat – sometimes it is just what you expected it would look like; but the magic comes when the camera takes you by surprise!
In writing this series of articles, one of the biggest surprises for me personally has been to revisit the basic double-glass optic that I started out with in 2013. I love it, and am using it all the time now. So that has been an unexpected bonus for me! The other BIG bonus is that writing things down helps me to collect and organise my own responses to the images I have collected over the years. And that will hopefully feed into my future Lensbaby work. I’ve split this survey of images into two sections: the first is all about the composition; the second is some of the more wild effects that happen along the way.
How Lensbaby can create an artistic composition that is uniquely ‘Lensbaby’.
The shots I’ve selected are using either the double-glass optic or the Sweet 50. And this is no accident, as both of these optics work by creating a ‘sweet spot’ where the focus is really sharp and clear, and then creating an optical blurring effect around that point of focus. The combination can create an immediate drawing of the eye into the heart of the composition.
A simple still life of a cup and a few berries. Shot with the Double Glass and +4 macro filter
One of my very early shots, with the double-glass optic and the +4 macro filter. Here I set up the shot with winter berries from the garden to enhance the holly and mistletoe decoration on the cup. But looking at it I found that the berries I had added were just too big and bright, distracting the eye from the actual cup. But by using the Lensbaby optic, and placing the sweet spot of focus on the cup and holly berries, I could move the eye to look first at the cup, while the gentle blurring of the berries took on the supporting role I had originally intended. And then I could see other elements of the composition more clearly too. I know – it seems odd to see the composition more clearly by blurring much of the image!! But look at the pleasing diagonal that runs from the top right to the bottom left of the image – balancing the handle of the cup with the larger cluster of berries. And complementing that diagonal there is another diagonal running from top centre left (the berries on the actual cup) to the bottom centre right where a smaller cluster of berries lies. Honestly? I hadn’t consciously seen either of these compositional elements when I set my little still life up … it was the Lensbaby optic that brought it all to life.
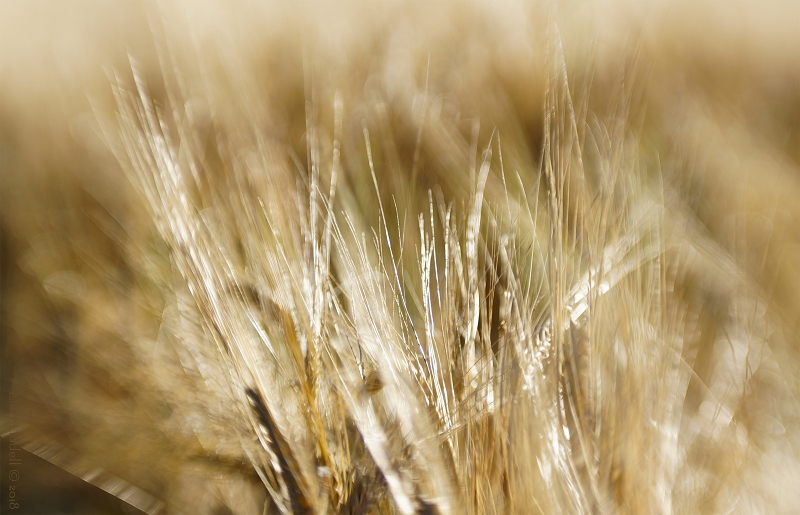
Ripe barley abstract. Shot with the Sweet 50
With the wind blowing the barley, and the early morning sunshine, I wanted to shoot something before the combine came to harvest the crop. The golden field was so lovely, but there was nothing to focus on – there was just so much barley there! I could kneel down and catch the light nicely, but it was still a whole field of waving stems. So I chose the Lensbaby, and took some shots letting it decide how the composition might emerge. And I thought it did the job really well for me here! There’s a silvery focus on the dry stalks, and plenty of movement and bokeh glints. It gives the structure of the barley while being impressionistic too. I felt it captured the experience of being there in a way that I couldn’t plan consciously.
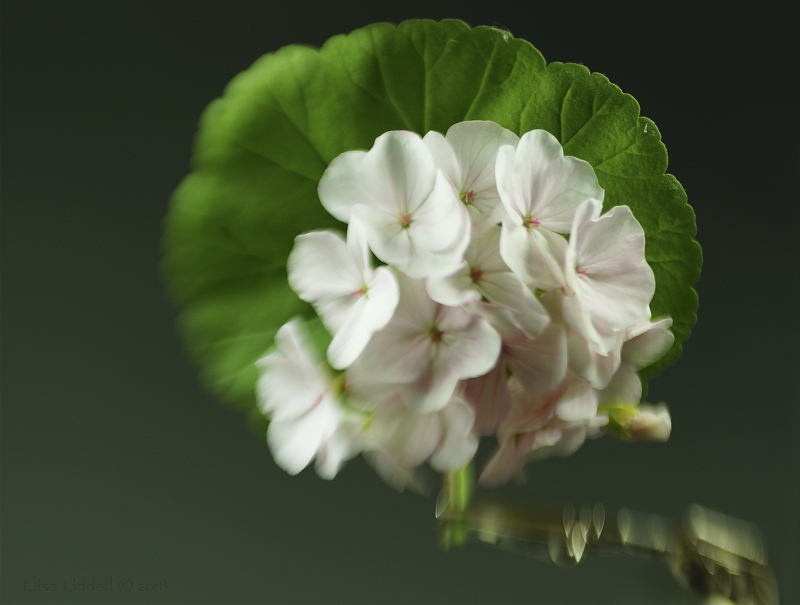
Geraniums with leaf. Sweet 50+8mm macro converter
I know that Lensbaby optics are good with flower photography, the gentle blur can merge petals or leaves into the background very nicely. Here I knew where I wanted the focus to be – quite high and to the right, to centre the sweet spot to cover both flower and a portion of the leaf. I was aware that I would need to crop out the metal tweezers that were holding the flower and leaf stems upright for the shot … so the higher the sweet spot of focus, the better for the crop! Only when I saw the image on the computer monitor I just couldn’t believe what had happened to my metal mechanical ‘arm’. It didn’t detract from the composition, but was an interesting and integral part of it. So once again the Lensbaby made the final image possible in a way I hadn’t expected.
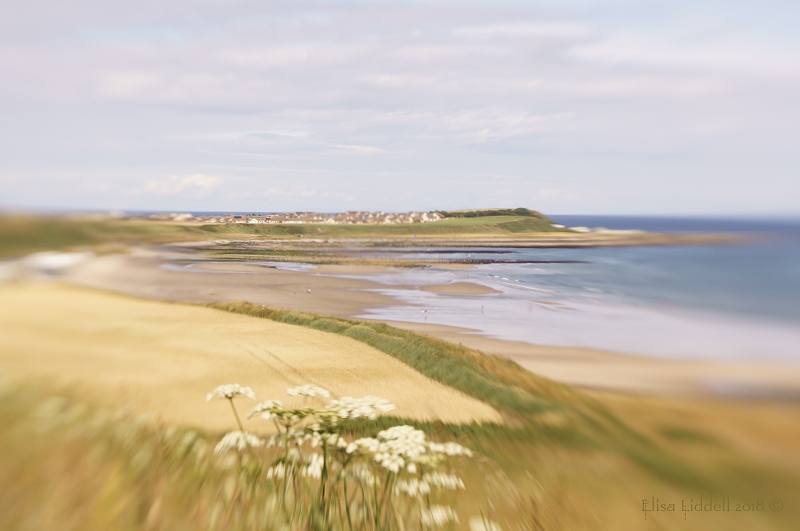
The summer of 2018 I rediscovered the double-glass optic, and took it out on many trips up the Aberdeenshire coast. One particular morning I took 3 experimental cameras with me – my main interest being an Infrared Nikon and the Lensbaby Edge 80. I packed the double-glass optic too, just to play with, not expecting anything much, as I hadn’t used it for landscape work before. I used all 3 for some shots from this vantage point above Banff Bay. I just focused on the far headland and houses, and took a couple of shots.
Looking across Banff Bay, Aberdeenshire, Scotland. Double Glass optic
When I got home and looked at this on the big monitor I was really surprised. A dull day and a fixed lens was tranformed into a lovely composition. I had regretted leaving the RX10 with its powerful zoom at home, and expected nothing much from the double-glass. But the sense of movement, the foreground wild flowers and the balance of colours all worked together to make another Lensbaby surprise!
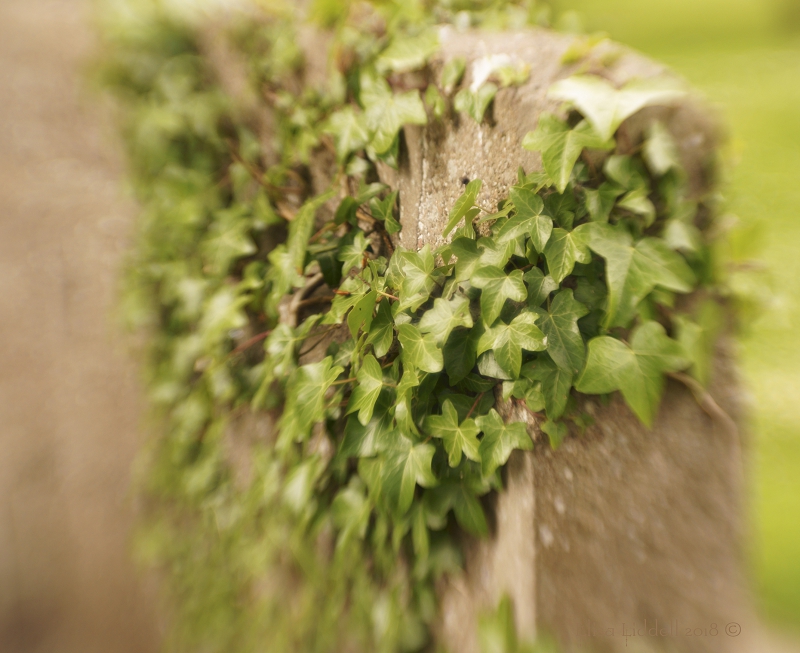
Further up the coast, and on the same day, we stopped at Portsoy where I continued to shoot with the double-glass optic.
Ivy on the wall. Double Glass optic
The light was still poor, but this ivy-covered wall caught my eye, and it was worth a shot! Again, the Lensbaby shaped the composition, with the sweet spot of focus, and the fall-off of focus. And within the blurring the balance of colours between the green of leaves and grass on the one hand, and the light ochres of the wall made such a pleasing symmetry. This one I did crop to a more square shape, to enhance the balance.
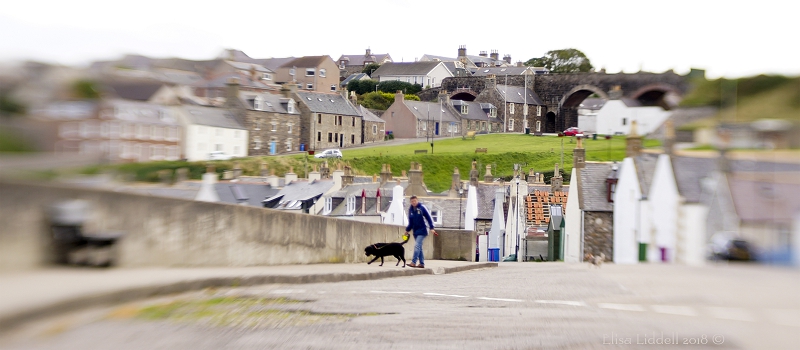
And the final shot I’ve included is of Cullen old village. Taken last year, and yet another occasion when I was shooting experimentally, using the Sweet 50 this time, but again wondering if the optic could handle larger landscape challenges.
Cullen old village. Scotland. Sweet 50 optic
Again I just concentrated on getting the sweet spot focus as sharp as I could, and trusted the Lensbaby to handle the rest! Here I did crop the bottom of the photo to bring the figures closer, and give even more of a wide-angle feel to the image. But the lovely gentle blurring of the sides and rich greens of the park, and most of all the echoes of Lowry in the man and his dog … just wonderful Lensbaby gifts ;o)