
Artificial light – some thoughts on how to use it
Shooting using only artificial light used to be my worst nightmare, but now it is a technique I love to use, as it gives me complete control over the lighting effects I want to achieve.
Basically the nightmare lies in the inability of artificial light sources to reproduce natural light. As I mentioned in the Light cover page ” Each artificial light has a colour cast, a tendency to ‘distort’ the colours, especially noticeable in the whites. The most common colour casts are yellow and blue – just think of sodium street lighting with its orange tone.” Shooting with artificial light sources does mean that you will become very familiar with the White Balance (WB) settings on your camera!
[Note: I use Sony Cameras, so I refer to the Electronic View Finder (EVF) but some digital cameras use an Optical View Finder. My shorthand will be to refer to EVF.
Luckily DSLR cameras are well equipped with an in-camera view finder that can display quite accurately what your shot colours will look like. Even so, some post processing is often needed. I use Camera Raw as my starting point, and then move into Photoshop. These are the places for fine tuning the effects of artificial light.
It sounds like a whole lot of trouble, doesn’t it! But it is well worth sticking with it, as you will learn how to get the joys of lighting that is at your command, and how to make it look ‘natural’ or even spectacular!

I used this image when I was talking about the Frame and how to use it. There I linked it with the poem “A Secret Life” about writing, alone, late at night. Looking again at the image, this time I want to look at the actual lighting in more detail.
I used a black velvet cloth as the background, and a light tablecloth, and shone a light directly from above. I wanted the light to give me the small but deep shadows around the still life objects. Those shadows act as defining, almost underlining the objects. But to add more subtle light effects I also wanted the light to bounce off the tablecloth and reflect upwards to lighten the edges of the notebooks, and especially the coffee cup. Without the light surface I would have had shadows too dark to give a 3-dimensional feel to the objects.
I added a light layer in Photoshop, as a final flourish to emphasise the source of the light, and give a hint of ‘holy light’. It only impacts the top darkness, not the light structure of the table and objects.
I use the term ‘light structure’ here, as that is exactly what light does – it gives structure to what we see. And with artificial light you have total control over the ‘structure’ of the visual image!
So let’s look at some more images ….
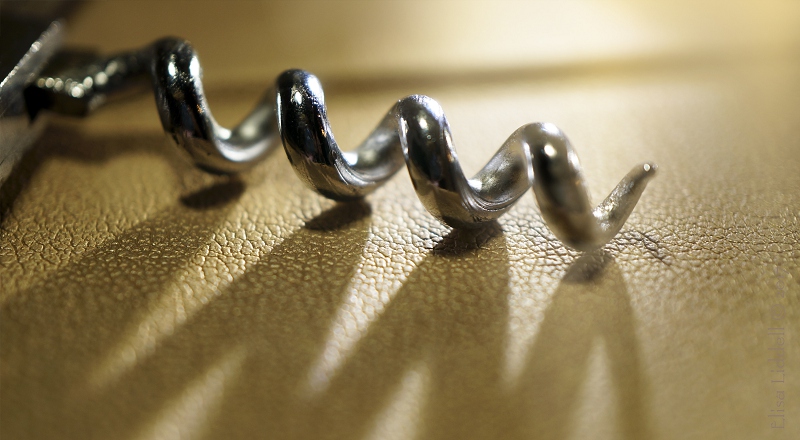
Artificial lighting can be ideal for shooting macro, very close up to the subject. The macro lens needs a lot of light for shots like this, where the corkscrew is only about three inches long. Here I used a strong back-light placed very low to give long shadows reaching out of the frame towards the viewer. The non reflective surface added textural interest while avoiding any glare from the light. I added a gentle top light in order to create a second shadow, which you can see close to the metal, and also reflected as small ‘light points’ in each twist of the corkscrew.
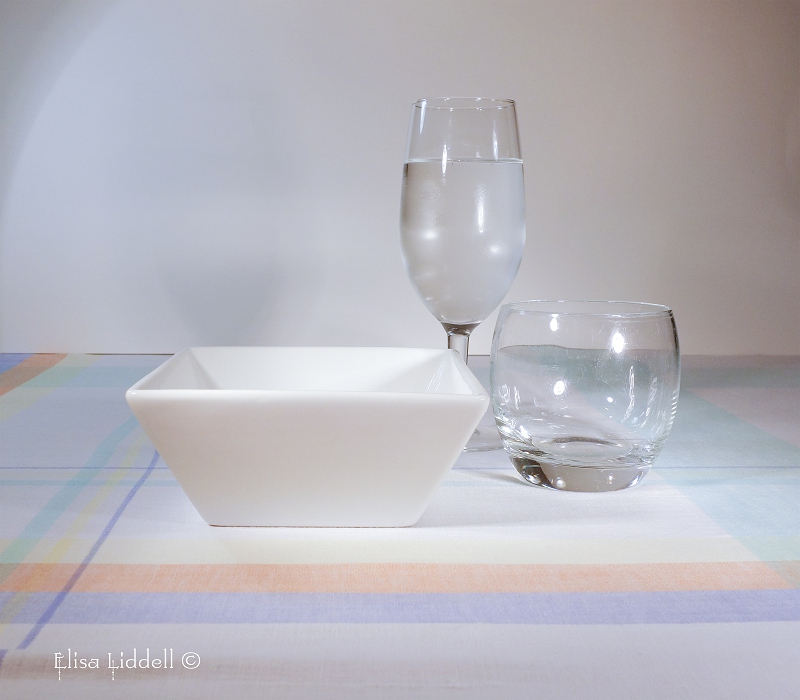
This shot is from back in 2014, and my control of artificial lighting was not so good! But it does illustrate quite a few points. Firstly there is the problem of pointing a light at a shiny, reflective surface like glass. Looking at the empty glass you can see the lights reflected in the glass itself – three bright highlights give the ‘game’ away. The tall wine glass has cold water in it, and that created condensation, which deadened the sharpness of the lights into pleasing shapes that don’t draw the eye away from the composition. There is always a battle between getting the lighting and the shadows you want, and not ‘killing’ the image with visible light points you don’t want!
But on to the whole image, and what the lighting was trying to create. I used the same tablecloth as in the first night scene shot, but here the cloth as well as the lighting create a very different image. This image is all about shapes and lines. The lighting is as gentle and diffuse as I could make it, so the eye is drawn to the straight lines of the cloth and the bowl, and the contrasting rounded shapes of the two glasses. There are no dramatic shadows, and no dramatic colours either. Soft diffuse lighting creates a calm feeling, and together with soft pastel colours there is a lowering of the emotional tone.
Yes – lighting plays a strong role in our emotional responses in all manner of ways. Darkness can feel threatening, while sunlight can feel uplifting. Entering a darkened room feels frightening, as can dark shadows. We all know that colours can affect our mood, with bright and light colours evoking positive emotions, and dark and dull colours creating more negative emotions. Light plays a subtle and complex role in our emotional responses to what we see – and sometimes it isn’t easy to untangle the threads of an image to isolate or highlight the role played by the light itself.
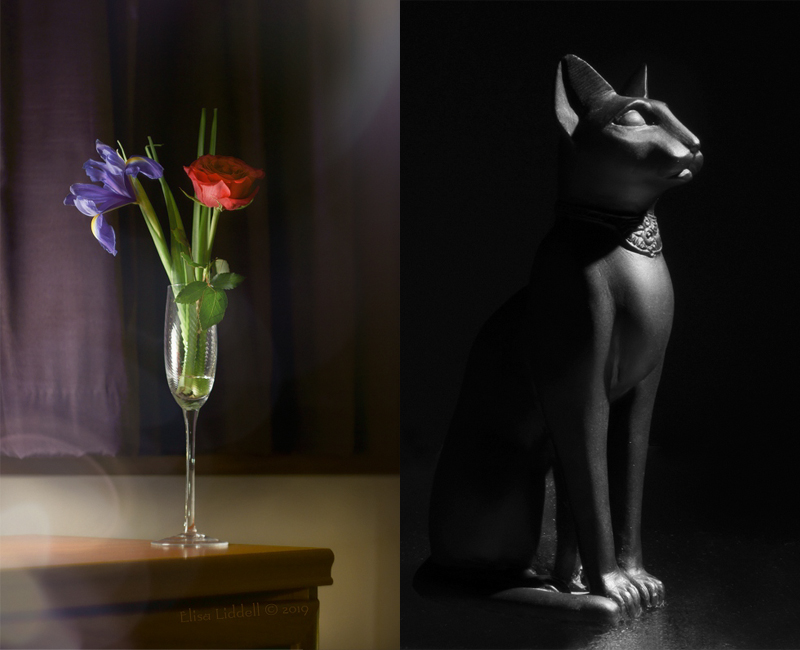
Next we have two images using strong directional light in a dark setting. One was ‘staged’ and one was incidental and ‘spur of the moment’. Not hard to see which is which! The strong down-light on the statuette of Bastet, the Egyptian cat god is all about an imposing, austere presence, and the light is heavenly, flooding down from above and piercing the darkness. The glass of flowers was a sudden moment when my eye was caught by up-light falling on the small flower arrangement against closed curtains. I liked the composition, but the shot was unplanned with no forethought to the lighting. Later – in post processing – I added a small diagonal down-light flare, to bring out the colour of the curtains.
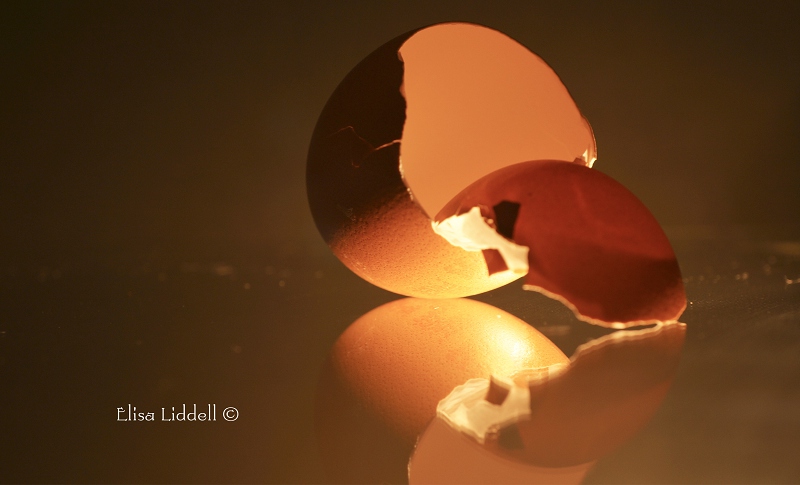
For me a lot of the joy of working with artificial lighting lies in the wonderful effects I can get by unusual lighting. This macro of a small eggshell glows due to the lighting from directly below, shooting through glass in a darkened room. The shell fragments are transformed with a rich golden light. The next shot shows how it was shot. No expensive studio equipment needed!
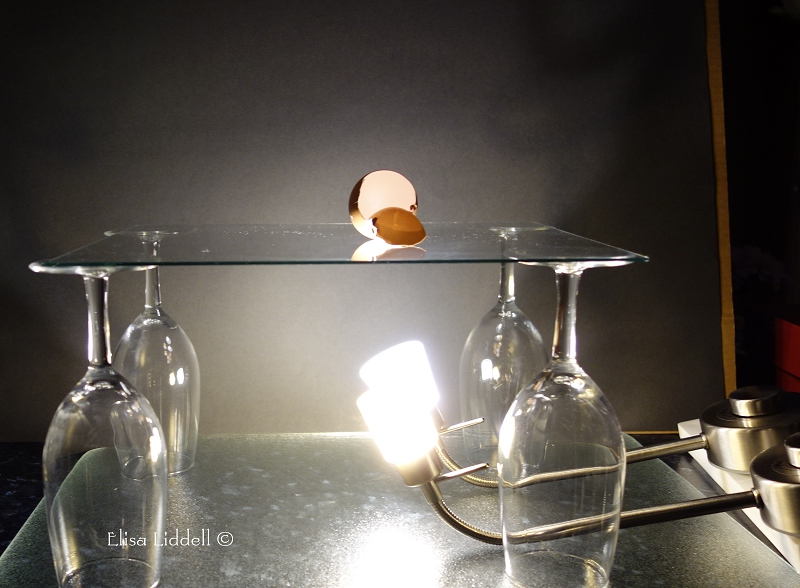
I made a small album on Flickr about improvising lighting for shooting macro: little macro studios. I constantly add different lights, and collect sheets of glass from wherever I can. A lot have come from old fridges, or discarded picture frames. And I have added tiny LED lights in various colours too, as well as all manner of lamp shades that can cast interesting shadows!

This image was inspired by Film Noir, and Rick’s cafe from ‘Casablanca’. I wanted to capture the mood and suggest a story that lies behind these left-over items. I love the effect of shadows cast by Venetian blinds, but we don’t have any! So I improvised by shooting a bamboo sushi mat. By placing the light carefully I could mimic a real Venetian blind, and cast shadows against the wall, and also on the tabletop. Again, it needed complete control of the lights to create the illusion!

Next is this little still life of a Japanese Kokeshi doll, a fan and several paper parasols. I was playing with the idea of ‘Hidden’ to suggest the slightly shy expression on the doll’s face. The background fan needed to be blurred to give shape, colour and texture but not detract from the parasols. So that needed separate, gentle uniform lighting. Then the complex structure of the doll and three parasols needed careful lighting. One light shines from the right, directly onto the parasols, and casts shadow across the doll’s face and hair. A second weaker light shines from the left, to catch that side of the face and highlight the eye especially. Then a further light is cast along the tabletop surface. This is a table lamp with a shade made of glass beads. It makes a lovely gentle texture without distracting the eye. And finally, in post processing, I continues the fan-shape theme by adding a coloured fan-shaped light layer. I think that makes four light sources for the actual shot, with a fifth added afterwards.

In this shot of three Polo mints the lighting is much simpler. A glass surface adds reflections, but the lighting is one simple small torch. It shines through the mints, lighting them brightly enough for the glass surface to reflect light up to illuminate the front of the mints too, to make the POLO lettering visible. But I couldn’t get the back light to make all the imprinted letters clear enough to read. So I added a gentle front light to the mix. It works OK but not perfectly, as the yellow cast of this secondary light source is clearly visible!

This minimal dark on dark shot was quite a difficult one to shoot. Most lights, including natural light were too harsh. They either bounced light off the shiny plastic surface of the curved sun-specs, or they shone right through the plastic reducing the lens to a tinted look. No drama in tinted specs – I wanted full-on black! Finally I had to bounce light around the specs, off dark surfaces, off the walls, off the ceiling. All were far enough away to make for very low (but definite) light and interesting linear patterns in the curved lens.

And not all dark is mysterious, scary or threatening! Shooting against black can be warming and inviting too, with the right lighting combined with the right colours. Here I was shooting using a mirror tile, to have reflections of the Christmas holly and red berries. The green and reds, together with the candle flame all combine to give a warm and festive feel to an image that uses a lot of black and heavily dark shadows. Together the elements combine to suggest hope, warmth and light amid the dark days of winter.
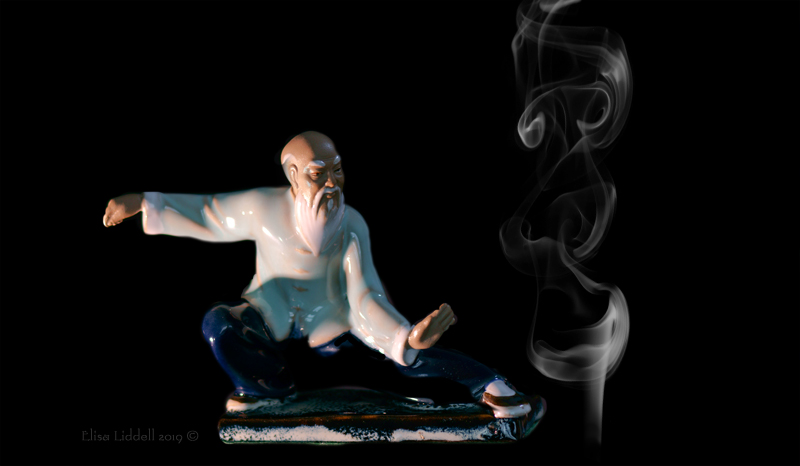
And finally the lighting on this small Tai Chi figure. The lighting needed to sculpt the figure, and give it depth and life by the subtle use of light and shadows. I wanted the figure to be carved out of the darkness, but leaving some areas dark, which we can then fill in mentally, to complete the image. Here there is a gentle second light source that fills in the side of the face, and the left arm. The first strong light from the left side made too many areas too dark, so a second source was needed to help the sculptural effect. The smoke effect was added after in post processing, to suggest meditation.
So that completes a small tour of my adventures in Artificial Light! There are so many ways to use different light sources, and so many ways of combining them. We have the advantage of modern LED lights, we have so many festive string lights, and then the old ways of candle light too. The possibilities are almost endless! With post processing to help with smoothing out the ‘colour cast’ problems, and adding overlays of light sources too, there are so many ways to shoot subjects! I find it makes indoor shooting a most creative experience.
Back to the LIGHT cover page
on to using a mixture of light sources
Back to the Zen Camera cover page
Flickr holds Elisa’s online Photo Gallery
© 2019 Elisa Liddell