
Adventures in IR Wonderland 5 – the Goldie FAUX action
So we have met the new Super Goldie filter, and seen what it can do straight out of the camera. A golden sky and lovely soft blue trees are the hallmarks of the shots you can get. My shots are taken on an old Nikon D80 which has been modified to ONLY shoot in the Super Goldie (590nm) range – there will be variations with different cameras and different ways of applying the filter. I usually shoot in both RAW and Jpeg format across all my cameras. RAW means the NEF format in the Nikon – but the results I have been showing you are all taken from the Jpegs. Working with the NEF throws up some problems that I’ll look at later. I wanted to start as simply as possible – and that meant using the Jpeg shots.
Once I was confident with the results the Goldie filter was giving me, I decided to go looking online for way to transform my original shots into the amazing and colourful shots I saw in Flickr and on the internet. The words that kept coming up was FAUX (or false) colours – so I began to investigate. Colour ‘inversions’ were frequently mentioned, and I struggled to find out what that meant and how to do ‘inversions’. Then I found David Burren’s website Khromagery which has a lot of helpful material – though it was written quite a while ago, and we have more advanced computer-based assistance now! But one gem that you can download from his site page: here is a Photoshop Action that I have found to be invaluable. I use Photoshop CS5 and it is my go-to starting point for playing with my Goldie Jpeg images.
To quote from his page: “A long time ago I wrote a Photoshop action (well, I built upon a technique I saw demonstrated by someone else) to help with this, and apparently, it’s still in use by many folks today. For anyone looking for the FalseColoursAction, a ZIP file can be downloaded here (this article was prompted by a reader searching for the old action). Do note however that the processing in that Photoshop action is purely “by the numbers”, and the visual results will be different depending on the colour space (ProPhoto, AdobeRGB, etc) you’re using.”
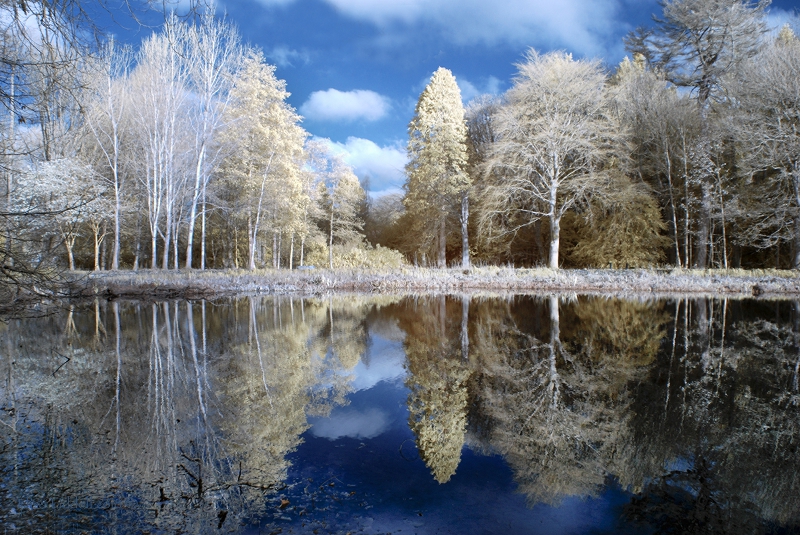
So I installed the action and began to run it on my Goldie Jpegs. I’ll take you through the process with just one shot – the cover shot from the previous page.

Here the image is in Photoshop and ready for the steps in the Action to be applied. I run the action and …

Wow! That is quite a transformation!

If you look at the information that is on-screen the first thing you notice is that the Hue/Saturation window is left open in the middle of the image. This is so you can do a quick adjustment to the overall colour and intensity before you close/complete the action. To start with I just ticked OK. Then down the side panel in PS you see that the action steps are all showing but placed inside a folder. So you can collapse the folder neatly, and simple turn the action on or off – the original image is still there at the bottom of the Layers window. Neat and simple, and quite magical!
Here I was working with the Fine Jpeg, so the pixel size is only 3872×2592 – but the results are so good and so quick that I haven’t ventured into the trickier region of working with the larger NEF version of the shot until quite recently. I’ll be looking at that move later on. For the moment let’s stick with the FAUX action and the Jpeg image. So let’s try a few more conversions using the action on the default settings and see how they turn out.

Larger version here on Flickr.
Lens flares and trying to integrate them and use them.
One additional thing to mention about infrared converted cameras, and maybe infrared filters in general, is the tendency to create lens flares. I find that sometimes the flare can add a special touch to the image. Here it works well, though I did have to tone down the final large flare in Photoshop.

Here the Faux conversion works well, though the lens flare in orange may not be to everyone’s taste. I think I would tone down the brightest one just a little in post-processing!
The next bridge shot was taken from a slightly different angle. It clearly shows the lens flare you can get from the converted cameras IR filter.

The large blue flare in the foreground needs to be damped down, as I did in the previous shot that I posted on Flickr. And the green tint to the sky is stronger in this shot than in the previous one too.
And after the initial Faux conversion …..

I like the tones of the tree and the scene beyond the bridge … but there is some post-processing playing to adjust this. So I copy the original image/layer and place one above and one below the FAUX action. Then I can use a quick mask to reveal the FAUX colours. Then I can choose what to do. Maybe keep the blue lens flares? And I prefer the original orange tones of the actual bridge, so maybe I’ll keep them too. The FAUX is better in handling the acid green of the sky top right of the shot …. and now I can proceed to mix and combine the colours, replacing some, and blending others.

Here you can see the process as it is happening.
I hope that this gives you some idea of how the FAUX action works, and how you can use it to make quite subtle adjustments to the image, and make it a personal result, rather than just what comes out of the camera, or what the FAUX action produces. I admit that I love this ‘messing about’ stage most of all. It really does make it personal.
And of course you can always opt to remove the FAUX effect altogether and have a simple IR black and white image – and again, play with the tonal values in Photoshop too!

So that is the basic range of possibilities that lie in the Super Goldie 590nm filter. And the sheer range of possibilities on offer, the versatility of the filter, is why it is my favourite of the 3 filters that I use.
I had intended to stop at this point, but in my online research for this article, checking facts, and generally scouting out points, I came across a second FAUX action – and I have begun playing about with it. So, on the next page I’ll share what I have discovered so far. But I figure that this is maybe a big enough chunk of information and examples for an introduction to FAUX here. And you might like a pause to digest ;o)
On to the second FAUX action and a look at the 8 ways it can apply to your initial shot.
Back to the start of the IR section
My photography articles Talking Digital Photography
Flickr holds Elisa’s online Photo Gallery
© 2019 Elisa Liddell