
…. or “When the camera can’t quite cope!”
The camera can do a wonderful job, but sometimes it needs a little help to capture what your eye and brain together can see. One of those conditions is when there are extremes of light and dark in the same shot.
I use the amazing Sony RX100 to shoot when we are driving along (maybe at 50 mph) to capture the journey. We’ve a lot of beautiful countryside locally, but with no places to stop and carefully frame shots! In this frame you can see the bonnet of the car in the bottom right corner. Shooting at speed in ever changing conditions I just have to point and click – and set the camera to Auto, and let it make the second-by-second decisions. In this shot the camera has evaluated the extremes of light and shadow, and chosen a middle point as the best compromise.
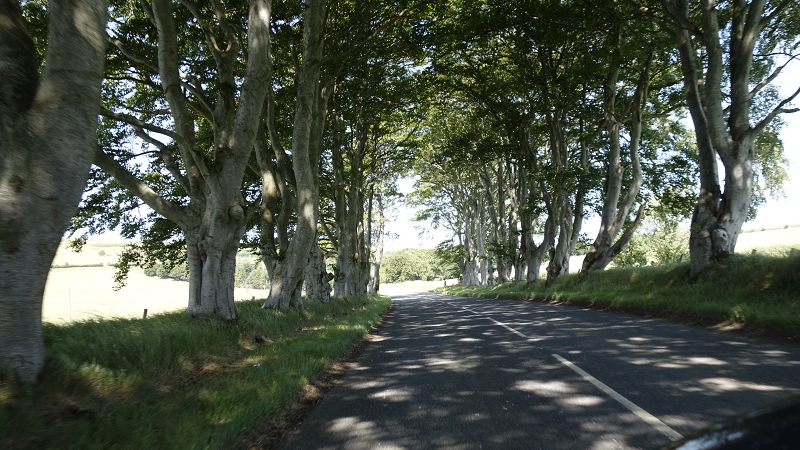
What I wanted to capture was the amazing, bright sunshine shining through the canopy of the trees, and dappling the road. The camera has made a good starting point. I’ve got the essence, and the bones of the image I saw and wanted – but the camera can’t adjust to the brightness of the landscape beyond the avenue of trees and to the shadows under the tree canopy – not at the same time. BUT the information is all in there – it just needs a little help to bring it all together
So I started work on the original image. I don’t crop or straighten at all at this point, as I want to take several versions of the shot and overlay them exactly … The technique I use is one that doesn’t damage the actual image, but places Layer Masks over the image. You can then adjust or delete the mask, and start again with the underlying image intact.
In Photoshop I opened up the image and called it Layer 1 – the original ‘middle value’ shot which will be the base layer.
Next I wanted to add a layer with the exposure lowered, in order to see what has been bleached out in the land beyond the avenue of trees. So I loaded a second version of the original image into Camera Raw, and lowered the exposure and/or brightness levels until I could see the detail in the landscape beyond the avenue. Then I took this 2nd version into Photoshop – where I can then drag the darker version and place it exactly over the original (hold the shift key while dragging).
This layer I called Layer Dark. It sits on top of Layer 1 and completely obscures it.
So then you need to choose from the top menu in Photoshop
Layer -> Layer Mask -> Hide All .
The layer disappears from view. But you can then gently paint in the darker values of the far bushes and trees

These are the areas in the distance that have been bleached out in the shot. The information is there in the shot the camera took, but it needs a lower exposure level to bring it out! You can adjust how dark you want them to be, so that they seem natural, as what the eye might see.
Then I usually save the PSD file; so my next step was to name and save the PSD file. This means I can return and adjust this first step at any time. The alternative would be to flatten the image and continue. I prefer to save the changes as a new Jpeg or Tiff and use it as the new base layer in another PSD file.
So in my new PSD file the next step was to deal with the dark area of the image. So I took a second version of image-2 into Camera Raw. This time I over-exposed the image in Camera Raw, looking for the lighter tones and shades that I wanted to use to highlight the luminosity that there was under the canopy. Again I imported this lightened image, and placed it exactly over the image-2 base layer. Again I chose a Hide All layer mask. and again painted in the areas that I wanted to lighten
I used this stage to brighten and lighten the tree trunks and some of the leaves
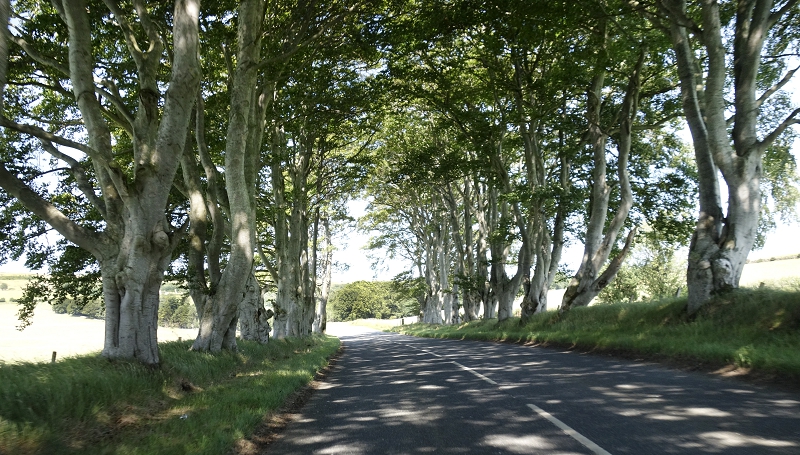
Now I had the adjusted version, with both darks and lights added to the original ‘compromise image’. This image was much closer to what I saw as we drove along.
Again, I saved the PSD file and then saved the complete, edited image.

Then all that remained was to do some cropping, and straightening to give the composition I wanted.
I wanted to remove the large tree-trunk at the extreme left of the shot – it unbalances the picture. And of course I wanted to remove the car bonnet too. I could just clone stamp it out, but I preferred to crop it out, as that crop brought the avenue closer. And finally there was a small strip down the right side that was bleached out and empty, so a small slice was cut down that side too.
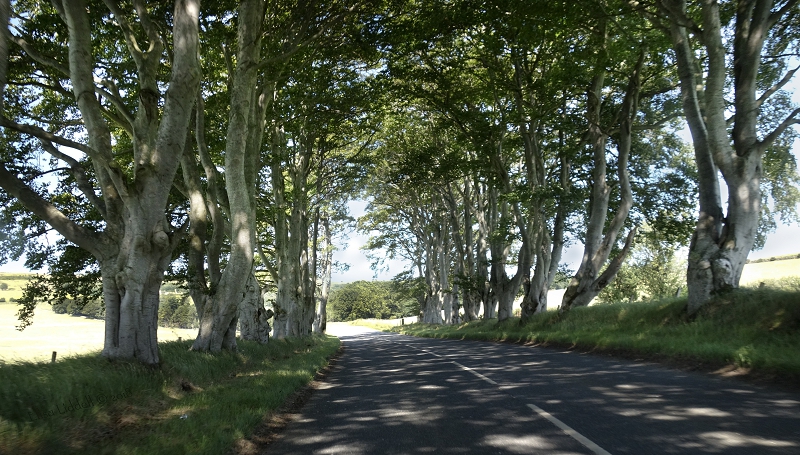
Now we have the final image. Or is it?
Now I could see the composition and the balance of elements. Yes – that’s what I wanted. But there was something still niggling at me, and it had become clearer now.
There were areas around some of the tree canopy where the camera has been able to capture the blue of the sky – and the areas away from the leaves were still pretty bleached out. Could I somehow paint in a blue tint to soften the sky a bit?
This was a bit of an experiment – but I created a new layer and made a diagonal gradient fill based on the blue tints in the photograph. I placed the layer above the image, chose a Hide All layer mask and gently tried to paint in some blue…. just to hint to the eye that the sky WAS blue! Looked at now, the blue halo effect that the camera had created was not so noticeable. But somehow the tree trunks seemed a bit too bright … so as a final touch I darkened a few of the tree trunks.
It was a minor after-thought, and I often make two or more slight variations on the final image, so I can set them aside and come back to them before making a final selection.
Note: I always struggle, and try to view the ‘finished’ image through several monitors and screens (iPad, laptop, desktop). It’s an area where painting is much simpler, as colour values shift from monitor to monitor.
Hopefully the end result will be ‘true to life’ and closer to what the eye actually saw in that fleeting moment – but there has been extensive post-production to create the nuances, details, shades and tones that the human eye can see, and the camera cannot duplicate (yet!)
I posted the original image on Flickr with a little more about taking the shot here
Flickr holds Elisa’s online Photo Gallery
© 2019 Elisa Liddell