
Lens Flare and Bokeh – some thoughts on how to use them
Both bokeh and lens flare have become very popular in modern digital photography, so much so that lenses are now advertised as having the ability to produce wonderful bokeh effects. I confess to loving both effects, and using them regularly – but I do wonder if they are becoming over-used!
The key to both bokeh and lens flare is that both are produced “in camera” as part of the shooting process. Ideally both are produced by the actual lens, and not applied later in post-processing. That is the ideal that I try to adhere to, but I do sometimes fall by the wayside, and ‘cheat’.
The Lens Flare
Lens flare was (and sometimes still is) seen as a mistake, an unfortunate side effect of the lens and the light source: see this article on the Wiki – but now it is often sought out for intentional use in a photograph. There are situations where I know I will encounter lens flare, and try to use it, others where I try to minimise its impact.
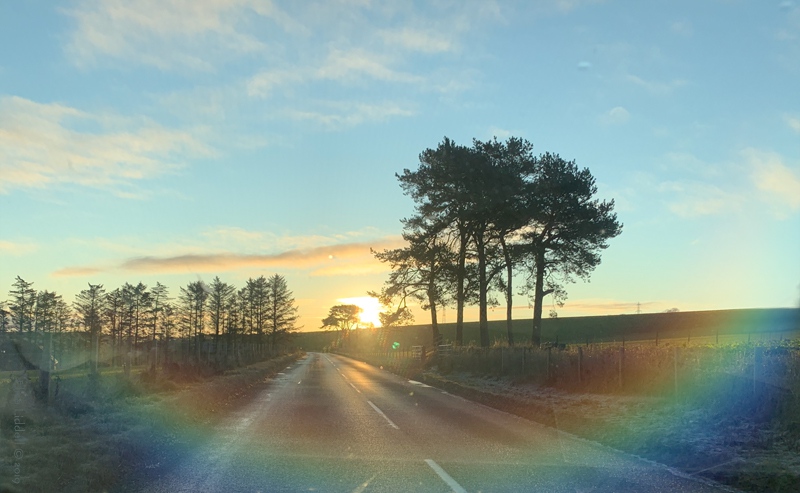
Shooting straight at the sun is a familiar situation….

Low winter sun is a common problem in northern Scotland, where I live. So I either have to use the lens flare, as here, or try to position the camera so that some obstacle, (such as a tree trunk here) can block the direct sun. It took a bit of manoeuvring to get this balance right!
The technique of shooting straight at the light is called Contre-jour: from the French, literally: against day(light). It “is a photographic technique in which the camera is pointing directly toward a source of light and an equivalent technique of painting. … The sun, or other light source, is often seen as either a bright spot or as a strong glare behind the subject.” from Wiki
In the shot above, the position of the sun partially ‘blinds’ part of the tree trunk, and splits the shadows, casting the left-hand shadows to the left of centre, and the right-hand shadows to the right.
Another common lens flare situation that I find is shooting in Infrared.
I use converted digital cameras, that have been modified to only shoot in the infrared spectrum…. but whether using an external filter or a converted camera, lens flaring does seem to be a problem associated with shooting in the infrared spectrum.

At its best the lens flare can add some lovely effects – at worst it can completely swamp the image. Here the effect is lovely, but only after I removed a larger flare from the foreground!
Adding glass to the mix.
Another regular practice of mine is shooting through glass, either indoors with the sun shining through the window, or, as here, through the car windscreen as we drive along. Here the contre-jour effect is added to by the effect of the sunlight striking the car windscreen.
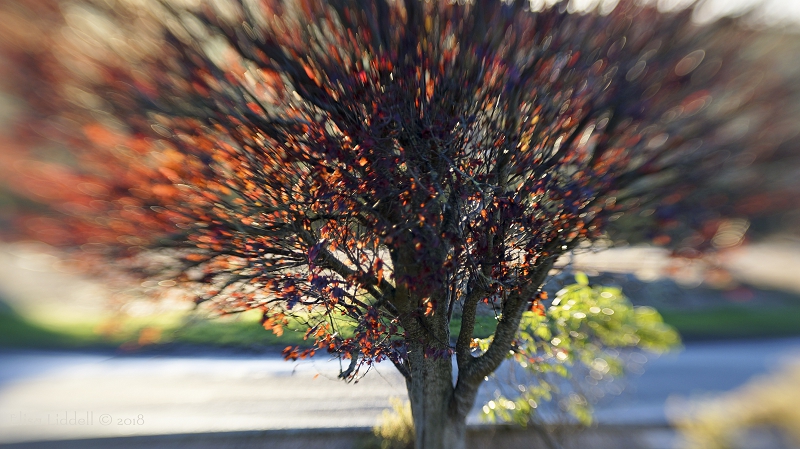
The Lensbaby special effects.
And one reason I am passionate about the Lensbaby optical system is that it can produce the most amazing array of optical effects “in camera” using the construction of the optics. Quite where to place them between lens flare and bokeh is difficult to say, as the effects can be close to both – and at the same time!
The sometimes elusive Bokeh
The term ‘Bokeh’ comes from the Japanese meaning ‘haze’ or ‘blur’, and it has become one of the most sought-after effects in photography.
“In photography, bokeh is the aesthetic quality of the blur produced in the out-of-focus parts of an image produced by a lens. Bokeh has been defined as “the way the lens renders out-of-focus points of light.”
The article here Wiki gives a good starting point to explore the technical side of the bokeh. What bokeh effect you can achieve will depend on the lens you are using and the F-stop you choose. Telephoto and macro lenses are both good in creating bokeh, especially with a shallow Depth of Field (typically F-stop 2.8 or lower) .
All manner of bokeh types, shapes and effects can be produced by camera lenses – the essence of the process is to get distance between the focal point of the shot, and the background. That produces the out-of-focus ‘blur’ which can become a bokeh effect.
The smooth, silky bokeh.
This bokeh effect is one that I treasure! I often have to shoot with a background that is ‘busy’, visually intrusive and distracting. But with a good macro lens and a 2.8 F-stop it can disappear into a lovely blur!

My main go-to macro lens is the Sony 100mm f/2.8 Macro Lens which I have mounted on the Sony 77m2 body. It is a bulky and heavy combination. I usually work with the small and light NEX-6 and NEX-7 series, but this lens is too big and heavy to use with them. It is a superb lens, and I find it is worth its weight!

Here other flowers in the background provide the colours, and we are half way between the indistinct blur of the dying chrysanthemum above, and the familiar bokeh. There are hints of the other flowers, but they enhance the primroses rather than taking the eye away from them.
Both of these silky bokeh effects are smooth, with none of the signature light circles that we usually associate with bokeh. For the light circles, points or blobs to appear we need to add a distinct light source to the mix.
The more recognisable bokeh – in macro, close-up shooting.

Here we have a definite light source shining through a cube of glass, and forming at least 3 different bokeh types! I used a Sony Macro E 30mm F/3.5 which produces a distinctive 7 sided bokeh ‘ball’. The aquamarine blue split bokeh effect is rounder and has lots of lines inside it. And in the foreground there are many tiny round light blobs. Light and glass together can do magical things! Here the tiny 8mm glass cube was resting on a glass surface as well – to enhance the range of light effects possible.
This 30mm macro lens gives me the closest I can get for real macro work.
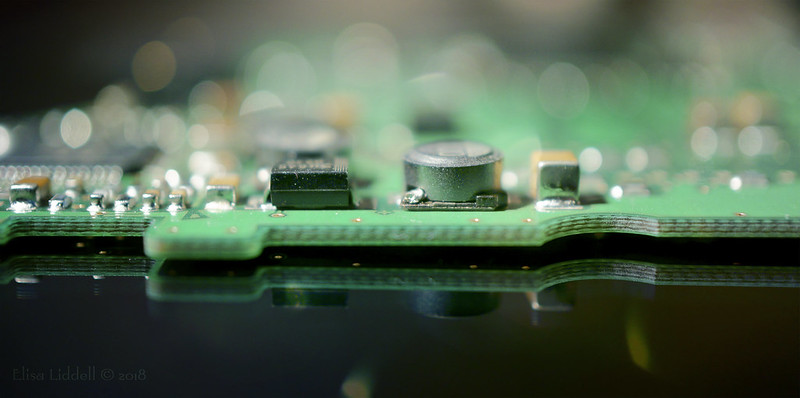
Another 30mm macro lens shot here. A few centimetres of a computer circuit board, again resting on glass. Here the more diffuse and single-colour light source gives a more expected bokeh effect with the round blobs, and the colours being dictated by the colours on the circuit board itself.
I have a 50mm Zeiss lens and the 100mm Sony too – so 3 differing lenses offering 3 different focal lengths for up-close shooting.
Bokeh anywhere and with any lens
Bokeh is not restricted to macro lenses and tight close-up shooting. There can be bokeh opportunities anywhere. Given a focal point quite close, and a background far enough away, and a light source … then you are in bokeh business!
Old vintage lenses are especially good for creating bokeh backgrounds. The Russian Helios 44-2 and 44-M are excellent, as is the so-called ‘Bokeh Monster’ Meyer-Optik Görlitz Orestor 2.8 135mm. Yes, there are plenty of lenses out there if you are a bokeh lover like me!

Make your own bokeh
And where there is a background that you can control, there are opportunities to make your own bokeh too. I shoot indoors a lot, using natural sunlight, backing against a big window that looks out into the garden. So there can be a lot of background- both inside and outside – that I might not want to include in the shot. But with careful positioning, and using some props, you can make the perfect bokeh ….

Here I had the sun shining brightly, and a small table that I could move and position to catch that perfect combination of light and background bokeh. The shot is exactly as it was taken … no messing! But how did I get that bokeh?
Well here is what made it …
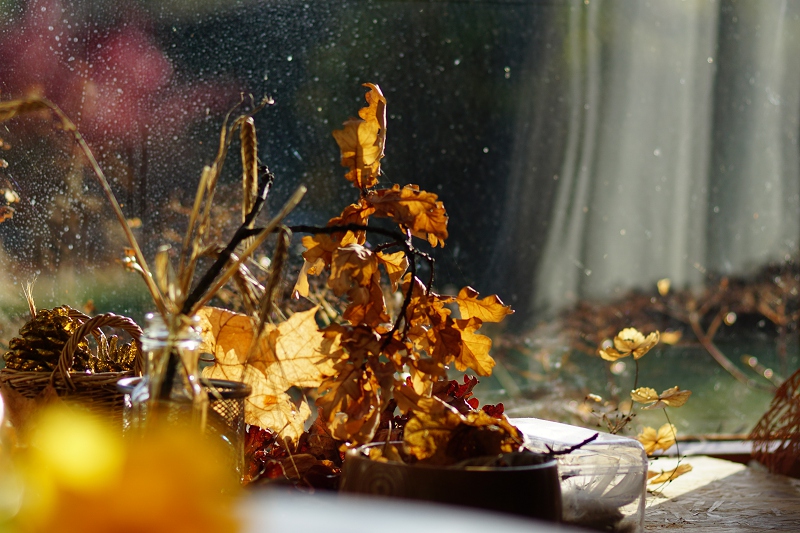
A jumble of objects on the window ledge, a window badly in need of cleaning … and you can see the yellow rose in the bottom left corner! Twist the lens to focus on the flower and this becomes the bokeh.
Another useful thing to do is to photograph the bokeh first. This means that if you want to adjust the bokeh in post-processing you can do it easily and keep the integrity of the original shot. It might be that the sunshine fades … like here

I liked the cool background which matches the cool colour palette of the subject. But I had two brown areas, created by the wooden window frames – and not movable! So I took a bokeh shot that was a quite a bit lighter …

And then I could bring some of this bokeh through to improve the original shot …..

… and keep it essentially the same.
These are just a few ideas and thoughts on bokeh and lens flare – two powerful ways of enhancing an image. I prefer to use both in-camera if possible – but that’s just me! I love the Lensbaby because it is creating in-camera too. I happily embellish, but prefer not to interfere too much in the shots I take.
Converting to monochrome, de-saturating intense colours, straightening and cropping, clone-stamping out some elements – yes I do these too! I think of them as tidying up! I guess it is just a personal thing – adding a layer of pre-made bokeh? I’d rather not when I can create them in camera.
Flickr holds Elisa’s online Photo Gallery
there’s an album of bokeh shots on Flickr too
Back to the Light Section
Back to the Zen Camera cover page
© 2020 Elisa Liddell