
“So, what’s so special about the Lensbaby? What’s all the fuss about it? Indeed, just what IS Lensbaby?”
If these are questions that you have, or are interested in, then read on. Hopefully I can answer them, at least in part, and maybe communicate some of the passion that I feel about Lensbaby ;o)
What IS Lensbaby?
The Lensbaby has been around since 2004, but it can still seem a little daunting when you try to find out about it. I guess that’s because it is a radically different camera lens system to any other we are all used to. I discovered it in 2013, through Flickr – I’d never even heard the name before. I jumped in and bought a big bundle through B&H in the US [still the first place I go to to read up on a new camera or lens] The bundle arrived in October and I started out on the long voyage … and I am still discovering new things 5 years later. I guess that you can tell that I really love my Lensbaby!
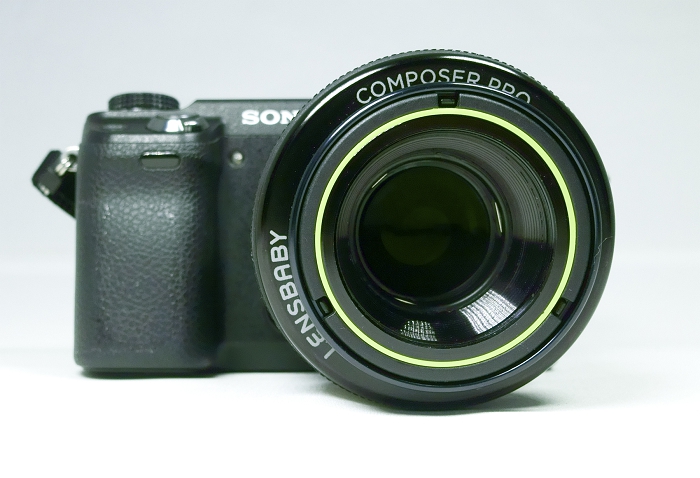
But to dial way back to the basics of what Lensbaby is all about. The system is in two distinct parts
1) the Composer Pro ‘body’
2) the optic or lens.
The Composer Pro/Pro 2 is the big bit that fits onto your camera. And the small optic slips into the Composer Pro. Note: I think you buy the Composer Pro 2 now, but it is essentially the same structure. as the original Composer Pro
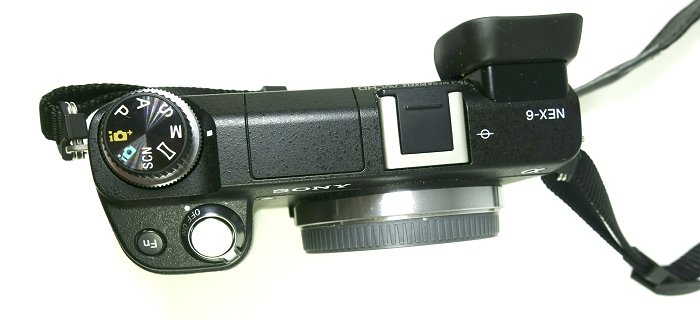
I have mine on a Sony NEX-6 body. It’s a light, small camera, and easy to carry around. The full weight with the Composer Pro and basic “double glass” optic is 570 grams, though with the heaviest optic I have (the Edge 80) it is 685 grams.
Lensbaby website info: “We make lenses that fit the following DSLR and mirrorless camera bodies: Canon EF, Nikon F, Sony E, Sony A, Fuji X, Micro 4/3, Pentax K, & Samsung NX”. Lensbaby.com
I bought my Composer Pro body in 2013, and it is still working just fine.

The Composer Pro with caps.
The Composer Pro with protective caps each end.
This is the heart of the system. It has a ‘ball’ socket in the middle. You can get lots of different angles as you rotate the ball – and each will give you a different effect – in camera. Moving the ball around is easy, as there is a tightening ring, so you can loosen it, find the angle and then fix the angle by tightening.
The next step is to insert the optic . This shot is looking straight down the barrel of the Composer Pro – with the “double glass” optic in place. There is a focus ring which gives you the forward/back usual focus movement ….
Once you have the Composer Pro body you can collect as many optics as you want (or can afford) and swap them out, using the same ‘body’ on your camera. And swapping them out is quite easy and quick. I take a second optic out shooting regularly, and swap them out for different shooting conditions and subjects.
What’s so special about the Lensbaby?
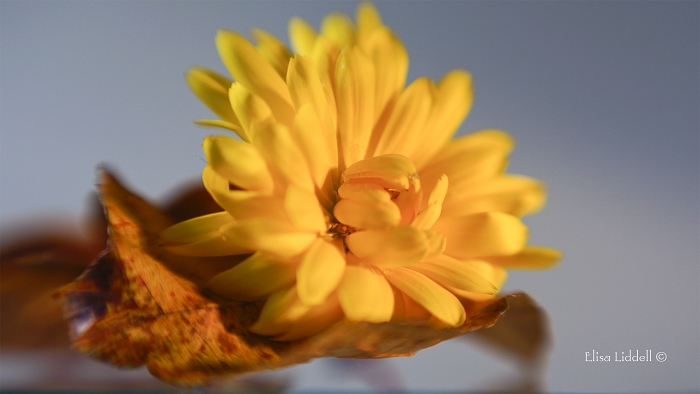
The folks at Lensbaby describe their system as “DSLR and mirrorless creative effect camera lenses”. And that is the essence: creative effect camera lenses. The creative effects all happen ‘in camera’ not by post-processing on a computer. And that makes for a whole different feel to the shot that you produce with your camera. It’s a special kind of magic that can always take you by surprise, as you are never quite sure how the final shot will look when you see it on the computer screen. If you want to get creative, and want to feel excited about shooting …. Lensbaby is a great place to start.
Today there’s a wide and growing array of optics to fit into your Composer Pro ‘body’. The Lensbaby website will show you what is available.
A few general points before we dive in:
- If you are used to having the EXIF information in each shot you take, you’ll find that where the lens info usually is there is a blank space. If you already use vintage lenses, then you’ll be used to this. You can find the shutter speed and the ISO but nothing more. So, as I like to know as much about the shot as possible, I usually name the shots on the computer with the missing info: like “Lensbaby-F2.8-4+” (my shorthand for Aperture and the use of a macro filter)
- I’m not sure about this point, but I always shoot on full Manual. It might be fine to use other settings, but personally I haven’t experimented with them. I set White Balance, shutter speed, ISO and Aperture using the EVF, and of course the focus too is always manual.
- On the topic of focus: this is possibly the most difficult aspect, to find the Lensbaby “sweet spot” where the lens is fully in focus. My Sony cameras all have “Peaking Levels” inbuilt in the on-board computer. I know that the one Canon I occasionally use doesn’t have this invaluable focusing aid. But the Peaking Level will highlight in a colour (red/yellow/white) the points of sharp clear focus. Especially helpful with the Lensbaby.
- I did go looking for online help. The best I found was on YouTube. A set of 3 videos by Mike Browne. The first one is on YouTube here
- I also found a Kindle eBook by Doug Sahlin “Mastering the Lensbaby”. It looks like it has been updated from my 2013 version.
What I want to do now is to take you on the journey that I’ve been on, working with the bundle I first got, and then adding the two more specialised optics. Looking back, it happened in neat 2 year steps (completely unintentional). So I’ll write about them separately … so coming next!
2013: “Double Glass” Optic – the first bundle of 3 optics and optic accessories (they’ve revived and updated part of this recently, calling it “Creative Bokeh Optic”)
2015: The Sweet 50 optic
2017: The Edge 80 optic (now replaced with the Edge 50 I think) and the Macro Converters.
After that I have added a couple of pages with some shots I’ve taken over the years, to showcase the in-camera effects you can achieve. I’ve called these pages Art and Glass, as it is the truly artistic aspect of the Lensbaby that has me hooked!
Art and Glass 1
Art and Glass 2
And finally, if you’d like to see a version of this introductory page, with more explanatory images – then our sister website Universal Theorist has a page here.
Flickr holds Elisa’s online Photo Gallery Photo Gallery
© 2019 Elisa Liddell