
Natural and artificial – some thoughts on mixing light sources
I use a mix of light sources almost all the time when shooting indoors. The physical opportunities and constraints of the environment you have available set your boundaries. And within those constraints you have to figure out how best to shoot what you want, and how to then work on it after the shoot, in order to achieve the final image that you want. It is an on-going process, as you refine and refine the variables. My variables are:
1) several window and door options for natural light.
2) a growing number of spotlights, torches, lamps etc. to give additional illumination to a shot.
3) assorted ‘props’ such as net curtains and scarves that can affect the strength of the light (especially natural light)
4) an ongoing and developing use of post-processing (for me Camera Raw 6 and Photoshop CS5)
I do have both NIK and Topaz Studio, but they are mainly used to completely transform an image, and most of the time I want to enhance rather than transform the original subject I am shooting.
I began my journey in photography believing that the ideal was to produce the perfect image “straight out of camera” (SOOC) but the more I read about the whole subject, especially early photography, the more I realised that the the shots you take, whether on a roll of film or on a digital camera, are only the beginning of the journey! The real creative magic often begins when you enter the digital darkroom! So my focus is always on “What do I want to say with this shot? Why do I want to take it?” That is what will determine my decisions about how to shoot a subject, and how I process it on the computer.

For me, the aim of post-processing is usually to make the ‘process’ (both shooting and editing) as invisible as possible. I want the viewer to see what it was I wanted to ‘say’ when I took the shot. Here it was the close harmony of the colours of the flower and the glass. They match each other so well. The shapes and textures are very different, between man-made and natural sources, yet they seem to belong together! So I wanted a background that wouldn’t distract the eye, but allow the glass ornament and the flower to shine. I was shooting in the south facing bay window, so there would be a back light of strong natural sunlight, with a green background from the garden. I draped a white net curtain over the window, to cut out the view of the garden, and rested the subjects on a white tile base. Shooting at F2.8 with a 100mm macro lens I knew the background didn’t need to be distant to achieve a soft blur/bokeh effect to neutralise the weave of the net curtain. That was the basic set up.
The result was sunlight that lit up the glass sphere from the top right and cast shadows diagonally across the entire group. The ribbon on the glass looked very dark, the shadows on the sphere were pronounced, and the flower was quite dark, with most of the petals losing some of their detail. A second light source was needed to counterbalance the sunshine. So I placed a spotlight almost straight on, angled a little top-down. You can see the red ribbon now catches the light better and glows red, as it should! But there was still a problem. This artificial light had a yellowish cast that can still be seen in the petals, and reflected in some of the red spots on the white glass. I did the minimum of adjustments in camera (to try and balance the two light sources) as the sunlight was fading, so I took the shot, trusting that later, in Camera Raw and Photoshop I could complete the process.

I knew that the lens I was using always gives me a yellow tint when set to accommodate artificial light – and I also try to shoot a little on the dark side of the exposure range. So the SOOC shot seen here was much as I expected. Now I needed to do my ‘darkroom’ work.

There’s a range of adjustments possible in Camera Raw. My version is no.6, which goes together with my Photoshop CS5.
First in Camera Raw I adjusted the Exposure, then White Balance (WB) and Temperature until I got the best whites I could. The adjustment made the background tint more blue than green, but I rather liked that. That gave me the basic image, then I could remove or damp down the spots where the artificial light source shone on the glass, and used the Brightness slider to lighten the flower.
Then I opened the image from Camera Raw into Photoshop itself. Here I could continue to adjust and experiment with effects. I was happy with the basic shot – but I decided to add a third ‘light’ source – an overlay layer designed to add light to an image. You can find all manner of overlays online and from Flickr. I have collected a whole range of ‘special effects’ over the years, so I have a lot to choose from! I decided on one from MixPixBox ‘Natural sun light’ collection. It added a lightness to the dull right edges of the image, and a very faint bokeh effect too.
And finally I decided to add a border, something I rarely do (see the Frame page where I look at ways to open out and close in the viewer’s eye). Usually I avoid framing in this way, as the lines do serve to close down the focus of the image. But here the focus is already on the two subjects, and there is little to imagine beyond the ‘frame’.
So that is the complete ‘behind the scenes’ look at one image from camera shoot through post processing to the final image. I’ve done one in detail, but I have a few more examples, to give some more ideas on how I use and mix light sources in making my images ….

Shooting in the same bay window space, but playing with a quite different range of colours. I wanted to explore the colour harmony between the brown wooden table-top, the dried autumn leaves, and the brown Kokeshi doll. Here I could use the yellow cast of the artificial lighting, rather than counteracting it. I also let the garden outside the window form the backdrop – the colours added to the image, and suggested maybe the leaves had blown in from the garden! The sunlight gave me reflections onto the polished wood of the surface, as well as introducing blue tints on the surface, hinting at the blue sky outside. Incidentally this is a shot I would never add a frame to – I wanted the eye (and the mind) of the viewer to stray to the background and beyond, and imagine the garden and the sunshine beyond the image.
So all I needed to do in post-processing was to deaden a couple of highlights from the artificial lighting that were bouncing off the varnished surface of the doll’s hair and kimono.
Then I tried another MixPixBox overlay, again from the ‘Natural sun light’ collection. This one has a yellow tint to it already, which is just what I wanted.

The result is to bathe the scene with rich, warm autumnal light.
Next is a completely different lighting challenge …..

Here I was shooting in the hallway, using the reeded glass of the front door. I love the vertical stripes it gives to the background – but it is a dark area, as there is a porch, which cuts both the angle and the strength of the natural light. The shot was one I used as an experiment, as we have a bamboo growing in the garden, but I almost never shoot the leaves, and they are so interesting! I planned to use the green background (again the garden through the glass) and I used a glass table-top to try for as much reflected light as possible, both to lighten the shot and to reflected the vertical stripes.
Needless to say, without a strong artificial light the dried hydrangea flower and the bamboo leaves were just silhouettes! So the shot called for some powerful illumination. I concentrated a single spotlight on the hydrangea petals, trying not to bleach out the details. Happily the light also reflected the petals down nicely into the glass surface.
So what post-processing did I decide to do with this shot?

Well, as it was an experiment I hadn’t checked the bamboo leaves before shooting. On the computer you could clearly see the frost damage to the edges, so the Clone Stamp in Photoshop was called on to help a little. And the green background was rather oppressive, closing in the flowers and leaves. So again I chose a directional light flare (from PhotoSpirit on Creative Market) to follow where the sun was falling (diagonally across the frame). It did three things. It softened the green background, it masked some of the remaining brown edges of the bamboo leaves, and it opened the frame up for the viewer to imagine light coming into the confined space I had available.
And a final sample …. shooting bubbles in sunlight!
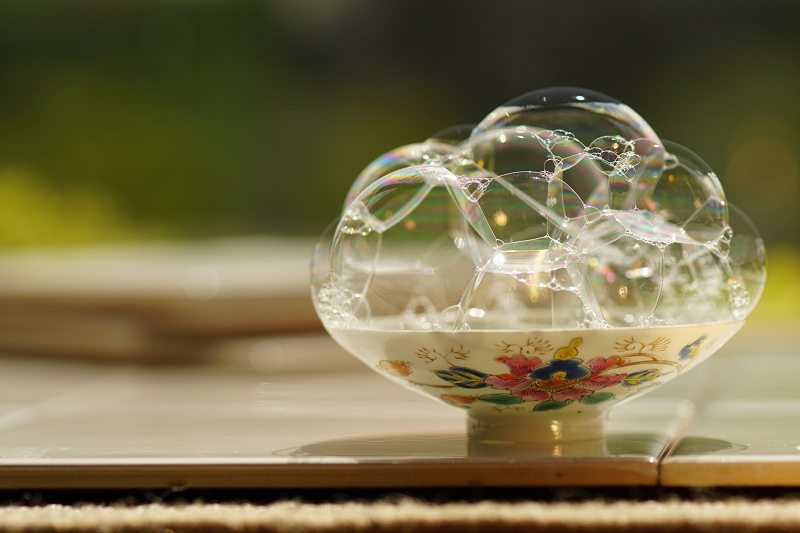
This shot is from some years ago, before I developed ways of removing the green garden background before shooting! I liked the composition, with the horizontal layers of ceramic tiles contrasting with the round bubbles – and the pretty design on the saucer to set against a plain background and tiles. But the sunlight didn’t give me any nice rainbow colours in the bubbles. They were dull and rather flat. So – call out the spotlight again! It worked well, but the yellow cast fell on the tiles and reflected up on the white porcelain, and little yellow light spots were in every bubble too!
Post processing was going to be a must!

Quite a transformation! A slight foreground crop was all it needed before I began. The trusty WB and Temperature adjustments in Camera Raw took a lot of the yellow cast away without removing the rainbow/prism effects. Then the Clone Stamp removed the little yellow highlights. I couldn’t damp down the dark green background without taking out the bubble rainbows … so once again I called on a third light source, the light overlay. It kept the whites nice and clear, while cutting some of the severity of the dark green background.
This is just a glimpse into the world of mixing light sources – a few examples that might strike a chord with you, that might confirm what you already know, that might give you a few ideas on how to use light – natural, artificial, or any mixture of physical and computer-based light sources. From the earliest days of photography it has been ‘all about the light’. And now more than ever there are so many ways to pursue and use light.
As a final postscript to the section on Light, I’d like to look at the use of Light Flare and Bokeh. Bokeh especially has become prominent recently. It has become such a phenomenon that it deserves some space as a separate aspect of the use of light in photography!
On to the elusive Bokeh and Light Flare
Back to the Light Section
Back to Zen Camera cover page
Flickr holds Elisa’s online Photo Gallery
© 2020 Elisa Liddell