The heatwave that has been dominating the summer across the Mediterranean bringing record-breaking temperatures, drought and wildfires has spread north throughout Europe and finally arrived in the UK. August saw our local Aberdeenshire area feeling just a little effect in comparison, but it was enough for me! according the Wiki
“The 2022 United Kingdom heatwaves were part of several heatwaves across Europe and North Africa. The United Kingdom experienced three heatwaves; the first was for three days in June, the second for three days in July, and the third for six days in August. These were periods of unusually hot weather caused by rising high pressure up from the European continent. There were also more grass fires and wildfires than average, and in August a drought was declared in many regions”.
We found our daily pattern was to move our planters from the overnight shelter of the porch to the patio each morning to catch the shade at the back of the house … and then by late afternoon they were all moved back to the porch as the sun blazed down on the back garden. Chasing the shade cast by the house itself was the name of the game! Every drop of water we could collect from indoors was used for the planters too. Trying to keep little water pans scattered across the garden for the birds, and putting out apples each day was the best we could do to help the birds. We had to move the cars to catch a little shade, and open their windows too … as the metal baked. Temperatures outdoors were in the high 30s at some point each day, and overnight didn’t dip below 20c.
Every window and door was open to the max. trying to get some circulation of cooler air. Not very successful as our houses are built and designed with heat retention in mind, not heat dispersal. I slept with just a cotton duvet cover (no duvet inside) and windows as wide open as possible … but sleep was difficult. We ate less, cooked very little and drank lots of water! As August passed and the temperatures moderated we were so grateful … just a taste of what most of Europe was enduring …. but enough for us!
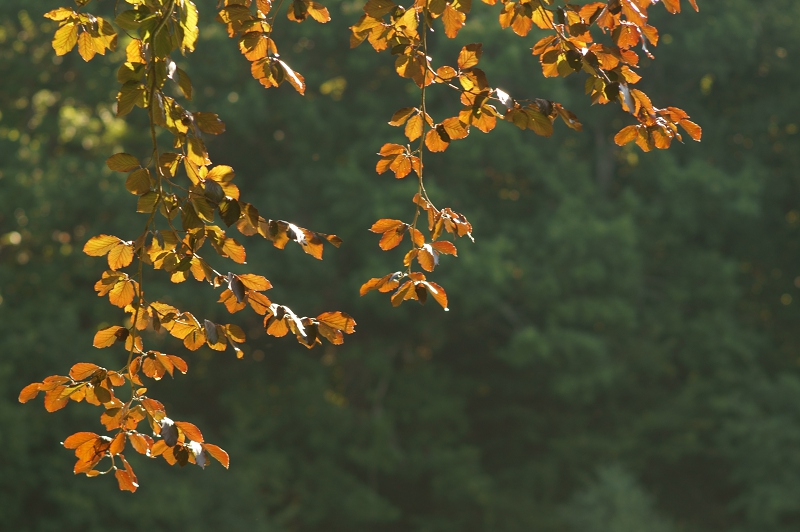
It all meant that at least half the month was spent on dealing with the heat, and little else was accomplished. And we emerged from our brush with the heatwave feeling exhausted and low on sleep! So there wasn’t a great deal of interest to report! I tried to keep my photography going, with different lenses recording the local scenes.
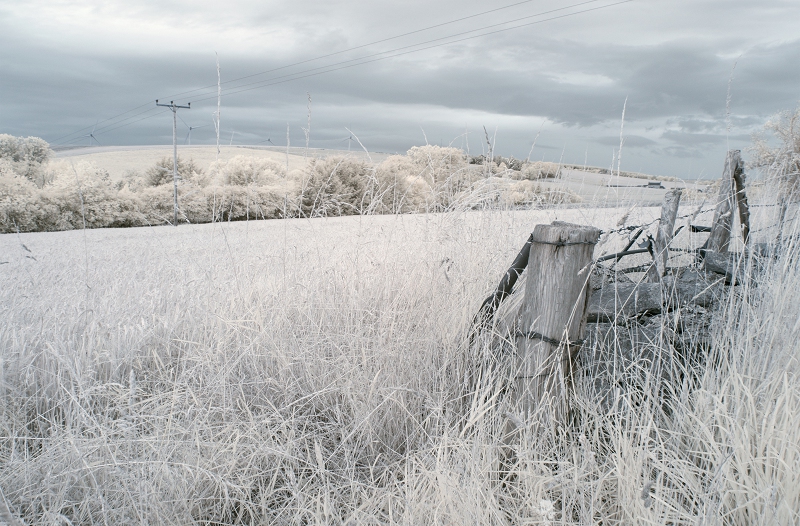
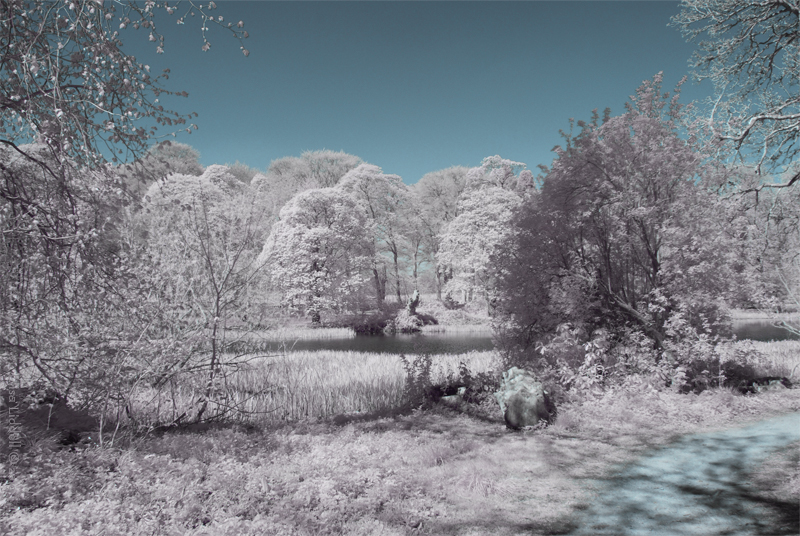
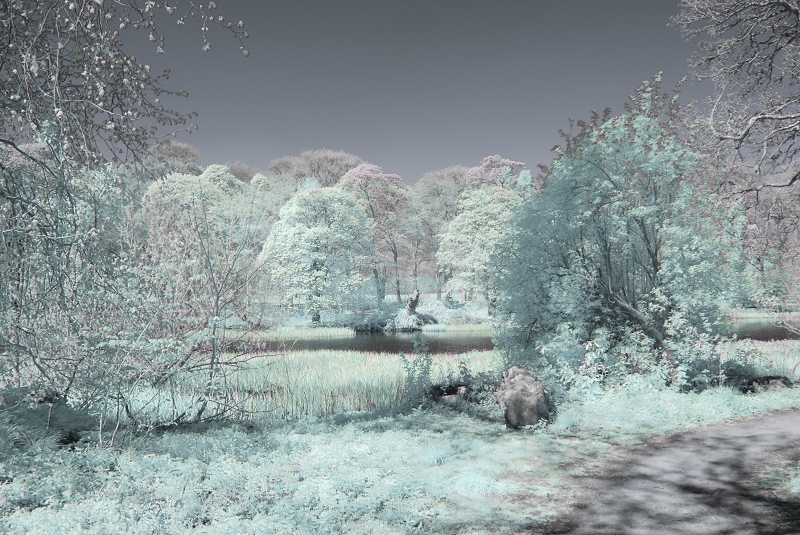
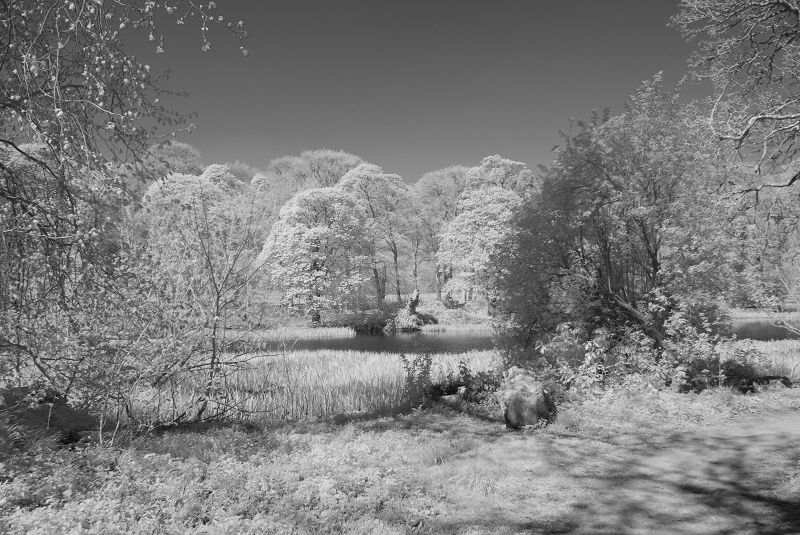
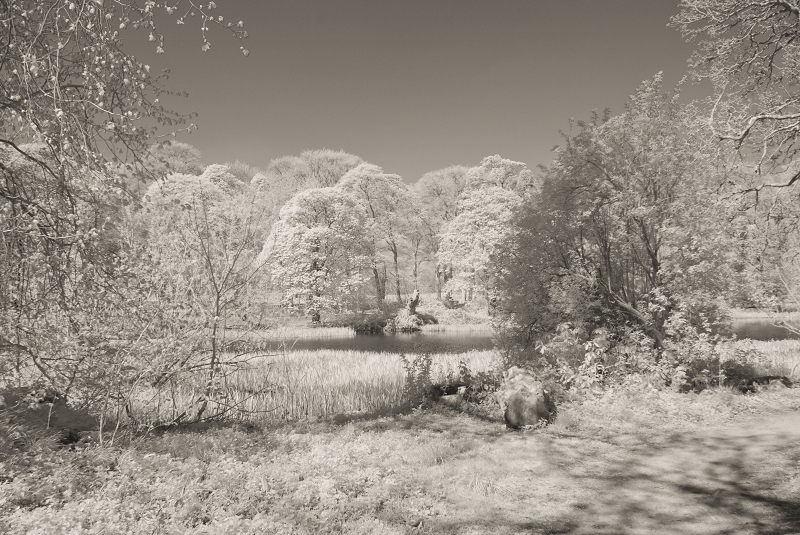
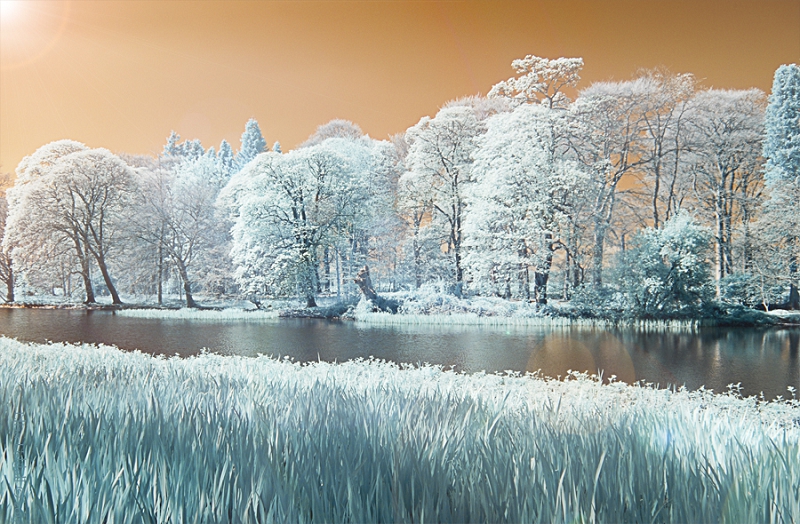
Using my infrared camera here to record the barley field across the road from us. I use infrared mainly for landscape shooting, and like my other landscape lenses it has been little used since the pandemic began!
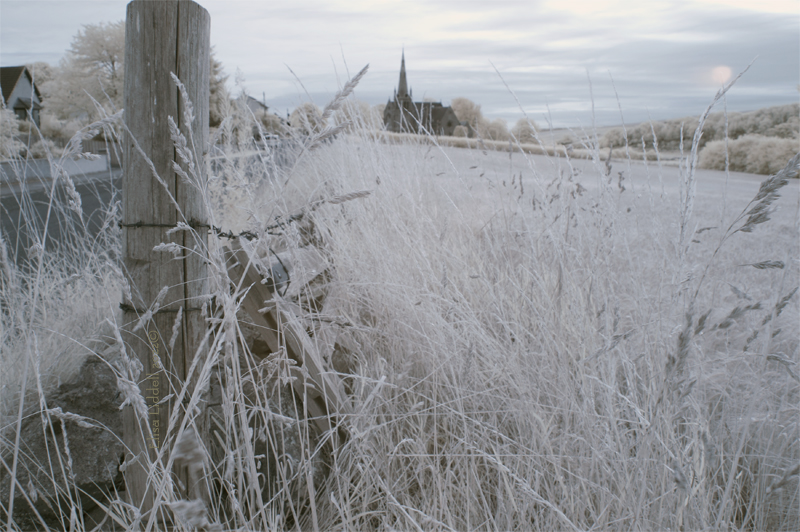
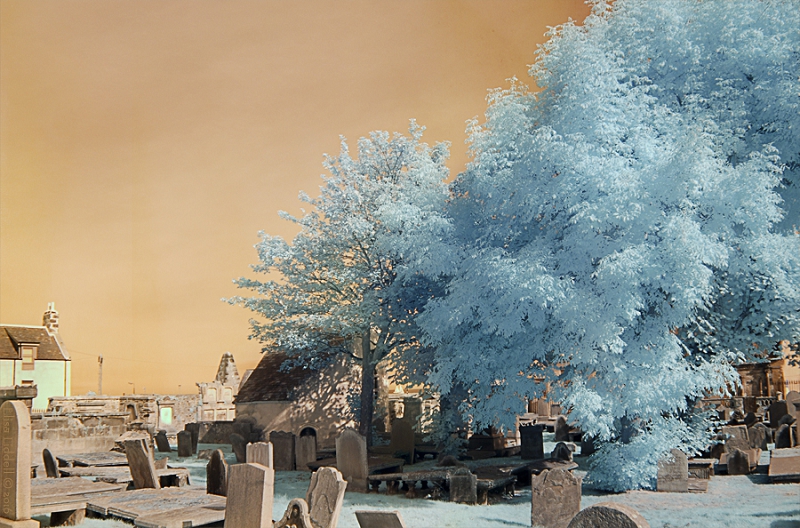
Looking the other way from the farm gate, back up to the Kirk. The IR filter here is the 720nm, which gives a soft, gentle effect, and allows a little colour to enter the image.
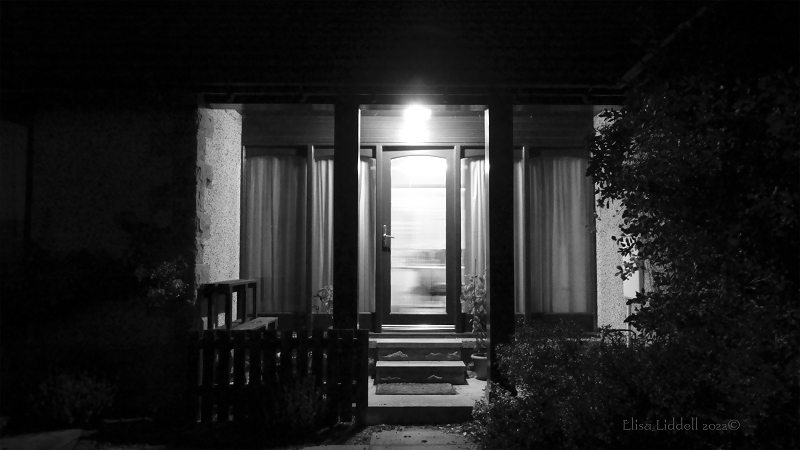
Another way to combat the heat was to shoot at night when things are cooler! Still too hot for comfort, as our windows don’t open very wide. But the front door looks inviting!
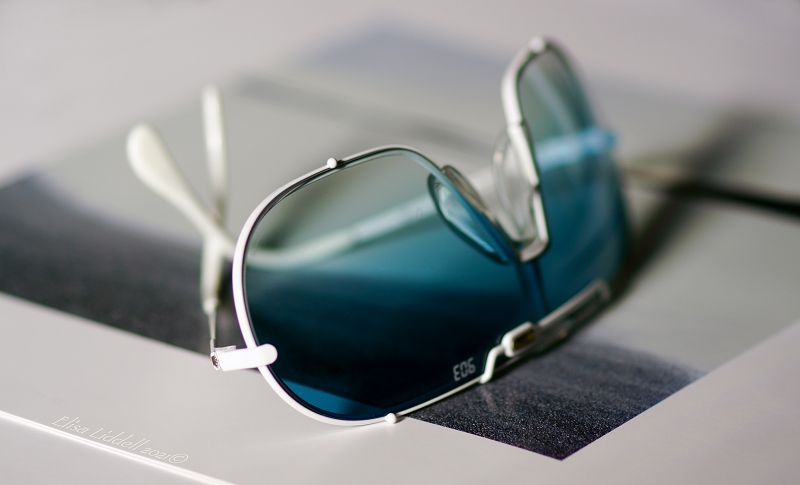
One thing I miss is my collection of sun-specs. When my eyesight was 20/20 I had some elegant and unusual sun specs. Now it is one pair of varifocals with light-sensitive lenses. Not quite the same!
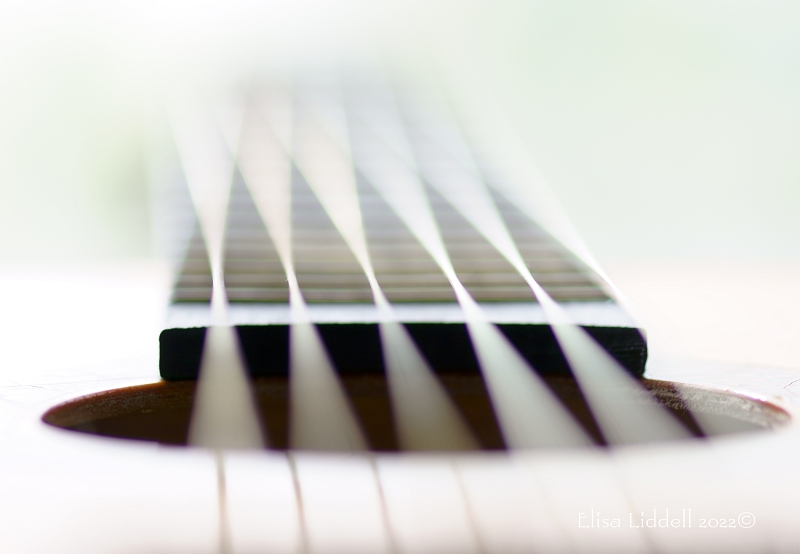
My Flickr groups keep me alert with weekly challenges. Here a macro group asked us to shoot ‘sound’. This is guitar strings in the bright sunlight, seen up close from an unusual perspective.
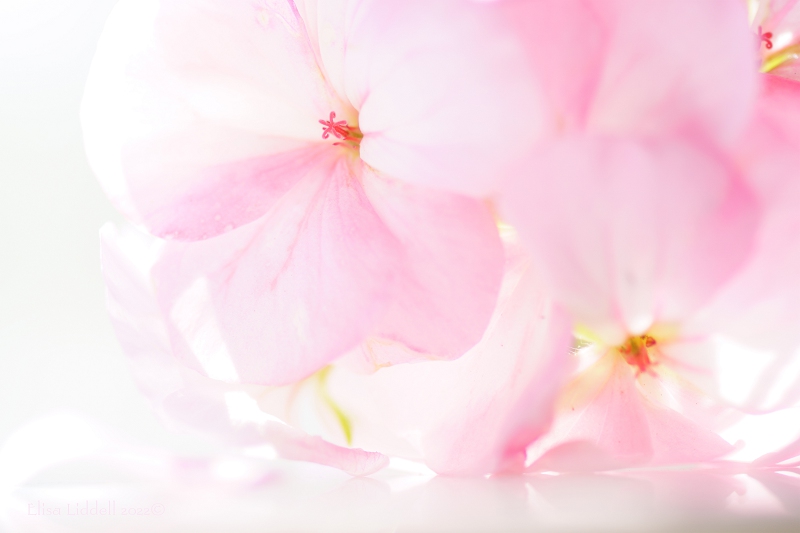
And another macro shoot brought me close-up to my pink geraniums. As well as keeping them well watered and in the shade, they are also beautiful photography subjects!
It’s not often I can find agapanthus flowers – these ones came from the supermarket. shooting them is a real challenge, as they have such an amazing flower-head!
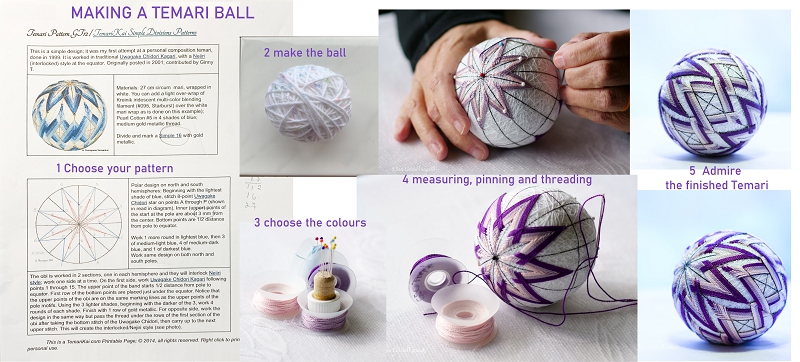
One thing that I wanted to do was to celebrate my friend Laurie’s wonderful creative work with Japanese temari balls. While she was here in May she made me two new balls, and the making of one of them is described briefly here. It gives just the smallest hint of the skill and complexity of the art form.
making a temari ball
And so on to September, when the world here cools down!
My collage of all the photos and images I uploaded to Flickr during September 2020
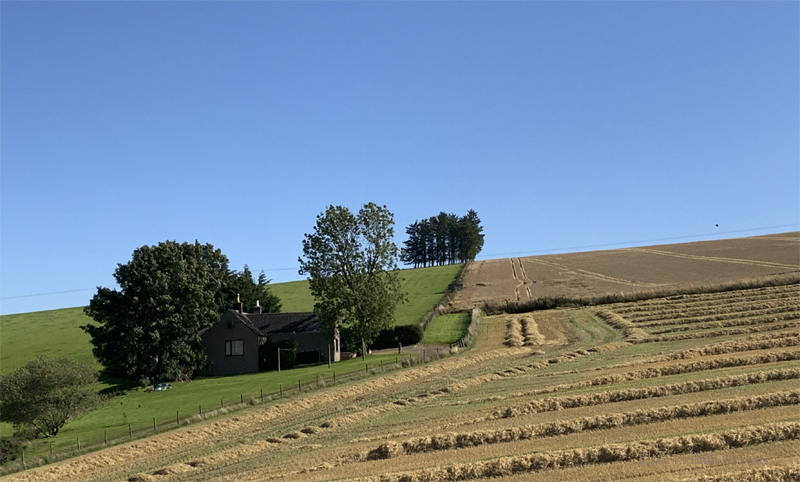
We started month 7 of our pandemic experience with bright sunshine and the determination to get out and about as much as possible! So September 1st saw us driving to Fyvie Castle grounds for fresh air and photo opportunities. When Mike is driving I usually shoot my ‘drive-bys’ of the countryside as we pass. With today’s smartphones taking such good qualty shots, I often use mine rather than an actual camera! Here we are climbing up the steep hillside out of the howe of the Ythan. The barley has been harvested, and the fields are ready for hay baling. This croft and the trees on the horizon are a feature of the landscape we see from our house. But I rarely get to catch such a goood, close-up shot! And yes, that angle really is accurate, the hillside is steep!
climbing the hillside out of the howe
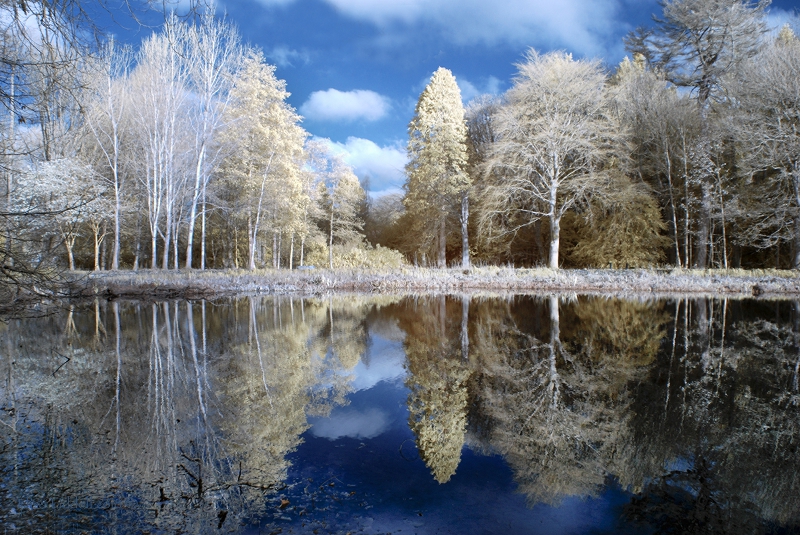
I took an unusual combination of cameras and lenses – an old Eastern European lens, the Meyer Optik (known now as the ‘bokeh monster’) and an old Nikon D90 which has been converted to shoot only in the infrared range. This one has the gentle 720nm filter, and was my very first infrared converted camera, and my way into the whole IR world! [more about my adventures in IR here] Trees are a special subject for me, and together with catching the play of light, a great obsession when I am photographing outdoors.
Sunshine and trees at Fyvie Castle, caught in infrared.
The infrared light range turns the greens of the grass and leaves white, which makes the foliage very delicate, and also makes for a scene that looks like winter!
Fyvie castle walk, and driveway, caught in infrared
Branches, tree trunks and tarmac give wonderfully contrasting dark tones. We can walk down this driveway, listening to the pigeons cooing, and the leaves rustling, and the cares of the world seem far away.
Autumn leaves caught in the sunshine
This time in colour, with the heavy Meyer Optik lens. It can really capture the rich colours of the autumn leaves. As September began the autumn colours were just beginning to appear. We had fingers crossed that there would be a sunny dry month ahead, to give us the best of the flaming reds and rich golds as the leaves turned. And a week later we were back to see how the colours were progressing …
Across the loch at Fyvie Castle, Aberdeenshire
This time with a Canon 70D and another old lens attached – a Russian Helios 44-2. The Canon is not my usual camera – I use mainly Sony. So I struggle with this 70D! But the views of the loch and the trees are always beautiful and so calming. I think this year, more than before, we value the therapeutic effect of our trips out. Instead of thinking only in terms of exercise and photography, we now find the added value of reducing the stress levels, and refreshing our spirits.
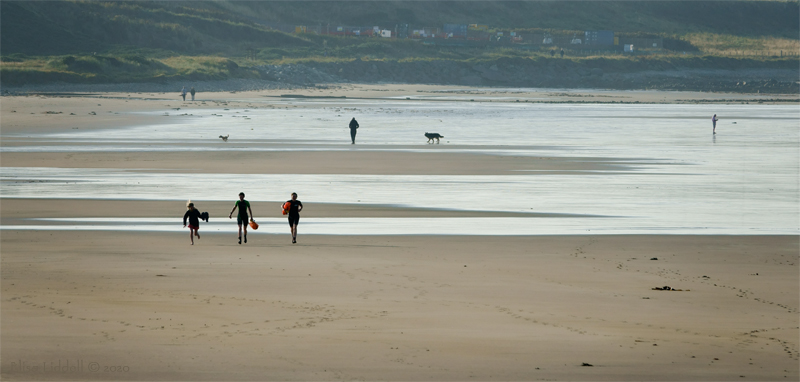
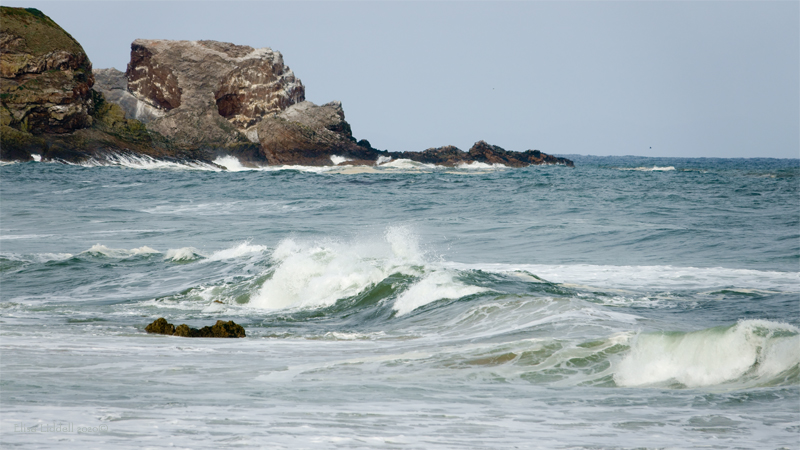
As we picked out more calm days with the promise of sunshine, we went adventuring up the coast twice during September – once to Banff Bay, and then further up the coast to Cullen, both favourite haunts we had missed through the long lock-down months! We rarely have the luxury of choosing times when the tide is in or out … we need to go in the morning when our energy is ‘in’. By lunch-time it is most definitely ‘out’ and we need to head home for a siesta! Banff Bay found us enjoying the sand as the sea retreated ……
The beach at Banff Bay on a chilly September day
while Cullen found a wild (and very noisy) sea delighting us with crashing waves.
Cullen Bay with the waves crashing. Wild and noisy!
We kept true to our plan, and visited the grounds of Leith Hall twice in September too. It was exactly a year since we were last there! This time entering the Walled Garden we met our first sign of Covid changes, with a one-way system to walk around and a reminder to ‘social distance’. On our second visit we found some of the gates we often use to access the top levels of the gardens were locked. We met almost no other people as we wandered around with our cameras … glad at least, and at last to be able to enjoy the fresh air and the gardens.
Leith Hall nestling among the trees
The Hall looks as majestic as ever. I’m not sure if it is open to the public again, but our main delight lies in the tree walks, the flower gardens and the wonderful views.
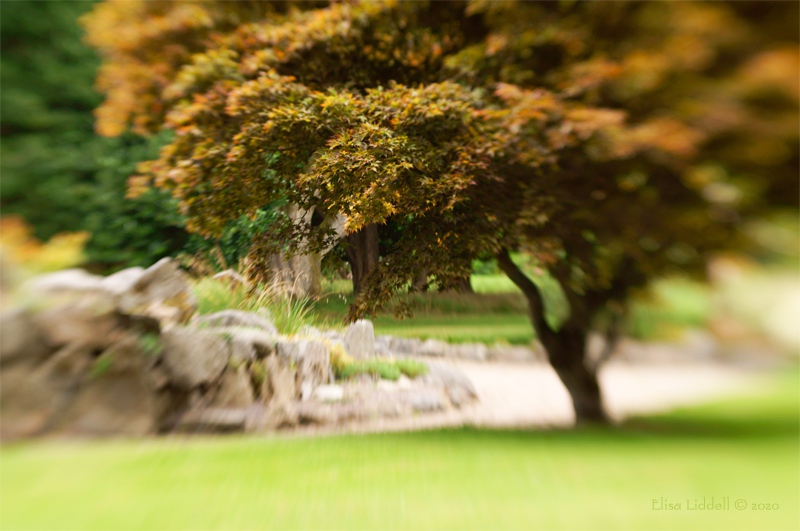
The autumn colours at Leith Hall. Shot with the Lensbaby
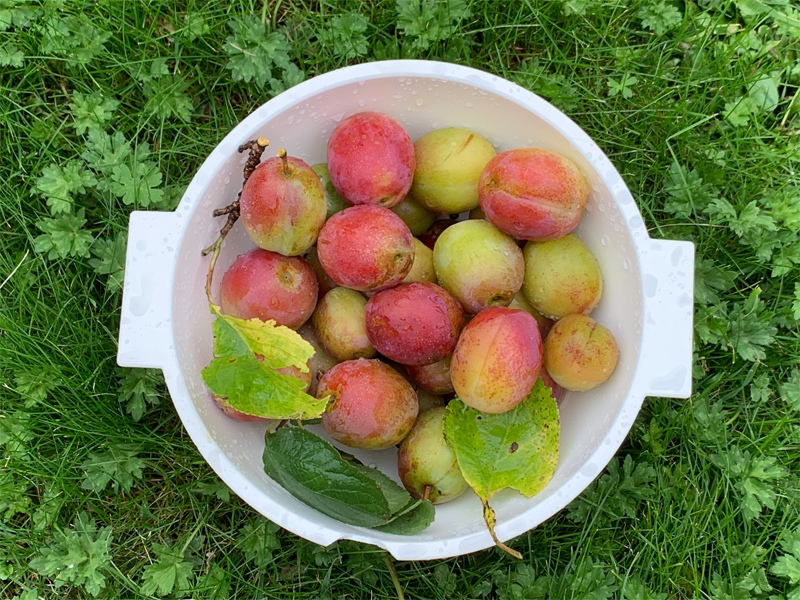
The autumn colours were showing in some of the trees. This one is close to the huge rock garden, which is being rescued, rebuilt and re-planted according to original plans recently found at the Hall. So September had the feel of sunshine, the outdoors, visits to favourite haunts, and a whole lot of photographs! But that was not all. At home we had a surprise with the best harvest of plums we’ve had for years.
2020 has been a bumper year for our plums!
We are aware that the single Victoria plum tree we have is now over 20 years old, and maybe past its best in producing plums. Some years the frosts kill the flowers in Spring, some years there is not enough rain, or too much – not enough sun or too much. So a sudden bumper harvest was a great surprise and delight. Home grown plums, fresh from the tree, taste so good! We collected a bowl like this every day or two for about two weeks.
But of course I can’t look back on September without reference to the pandemic!
This month saw the biggest gamble, as it was decided that schools, colleges and universities had to open again. It began with schools. Here in Scotland we start the school year a few weeks before the rest of the UK, so we were the first to try out opening up our schools, both Primary and Secondary. Personally we looked on with sinking hearts, as young children are notorious spreaders of infections. Is coronavirus so different? And teenagers and college students are the least likely groups to follow the guidelines on social distancing and avoiding crowds! But the ‘science’ said differently … at least in September! But as the month ended there were signs of infection rates picking up. October might prove to be a difficult month!
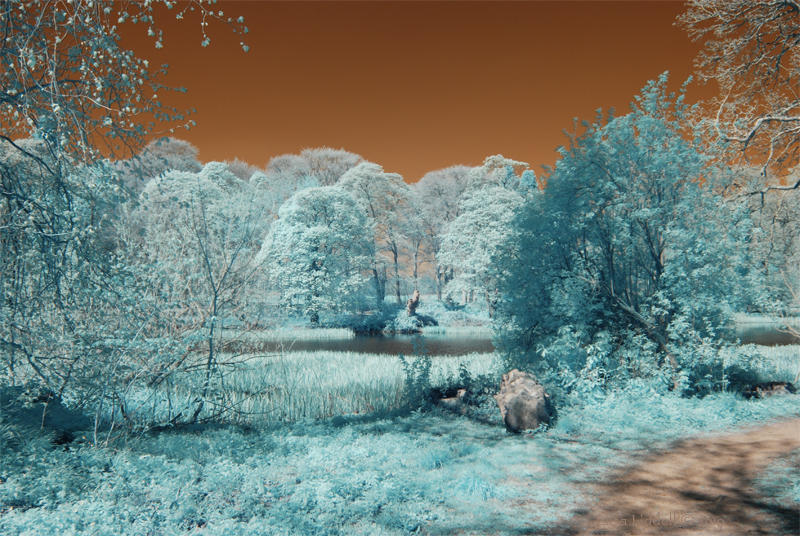
Trees reflected in the loch at Fyvie Castle. Infrared FAUX
My Adventures in the IR Wonderland
Infrared (IR) photography first really caught my attention in 2015, through looking at IR groups on Flickr. I loved the different ‘view’ it offered, making even familiar places and subjects fresh and new to my eyes. I began by using Photoshop, and trying the B+W adjustment layer, which offered infrared as an option. Disappointed I turned to the internet, and found a wealth of information, most of it too technical to help a complete beginner. I though about using a screw-on filter as the simplest way to experiment, but soon learned that Sony cameras were the least successful for IR shooting. I’m a Sony fan, so I had an additional problem!
Then in 2016 I learned about IR converted cameras. These are usually old cameras that have been modified to shoot ONLY in IR. I found an old Nikon D90 on eBay, and the adventure began.
The pages here follow roughly the stages or steps that I have followed as I gradually learned more, and experimented. The first 6 pages cover the 2 converted Nikons – a D90 with a 720nm filter, and a D80 with a Super Goldie 580nm
Infrared first steps The start of my adventure, from Photoshop disappointment to Nikon delight. First experimental shots.
Infrared second steps The next step in the adventure, learning what IR does to the colours we see with our eyes. A still life experiment with colour, B+W and IR versions of the same set-up.
Infrared third steps Taking my ‘new’ Nikon and its 720nm filter out and about shooting landscape, sky, trees and water. And comparing full colour, B+W and infrared shots of the same scene.
Infrared fourth steps Enter the Super Goldie! I buy a second Nikon, a D80 with the 590nm Super Goldie filter. This allows more of the colour spectrum in, and moves from the B+W realm into a fantasy land of surreal colour.
Infrared fifth steps FAUX post processing. Moving from the SOOC shots with a little Photoshop to tweak the shot to using a Photoshop Action (free to download) to apply colour inversions, and refinements to Goldie shots. I use the Khromagery action.
Infrared sixth steps FAUX processing taken even further with the Photoshop Supply action (free to download) which includes 9 separate action that you can use, mix and experiment with to create a range of surreal effects.
The next pages will be about using converted Sony A5000 cameras.
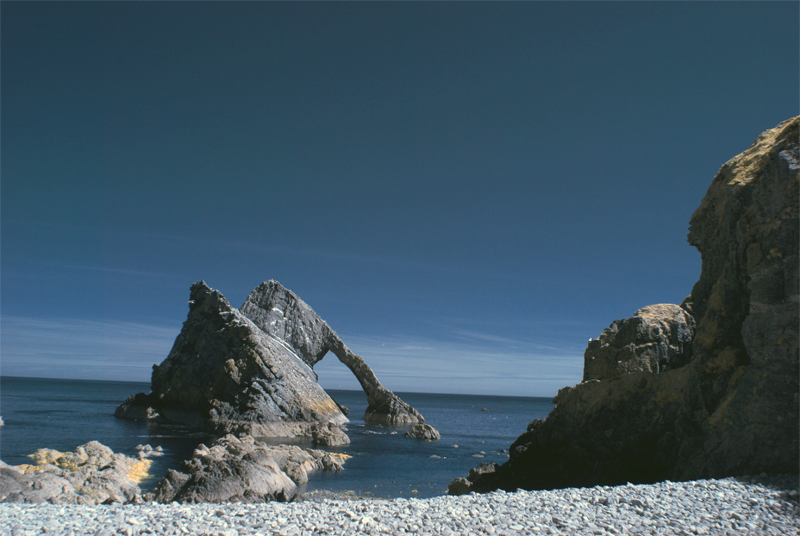
The Bow Fiddle rock shot in Infrared, with a FAUX action applied in Photoshop
Adventures in IR Wonderland 6 – the Goldie 8 FAUX
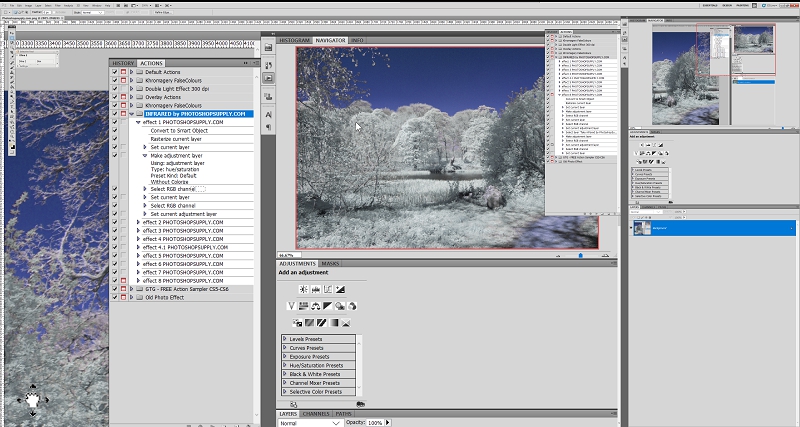
As I mentioned at the end of the previous section, I have recently found a second FAUX action for Photoshop. I couldn’t leave the subject of how to handle your Super Goldie shots at the post-processing stage without taking a look at this option. The action is free, and you can download it from the Photoshop Supply website. The actual page where you’ll find the zip download is here . There’s lots of information on installing an .atn file, colour channels, inversions, and what you can do with your IR shots. I thought I would experiment with the action and see what it could add to the range of processing that I currently use with my Goldie IR shots.
Photoshopsupply 8-action loaded and ready to run
This shows the range of FAUX processing options inside this single .atn file. There are 9 options as number 4 has two options. You can import your image (for me a Nikon D80 Jpeg here) and then run each action. You end up with a file containing each action as a separate file. The original is there at the bottom, unchanged. I quickly found it was most useful to name each action to avoid confusion! Then you can turn them on and off and use the opacity slide to mix colours and effects.
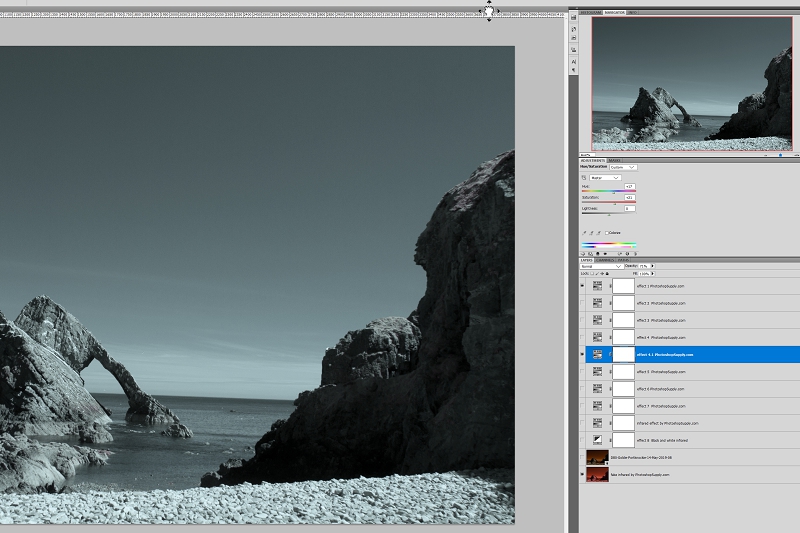
The FAUX 8-action with all 8 actions run
This shows the complete range of FAUX actions once they have all been run and numbered. Here I wanted to try both the NEF (RAW file) and Jpeg versions of a shot of the Bow Fiddle rock at Portknockie. I chose actions 1 and 4.1 and lessened the opacity of 4.1 to 71%. Each action has a layer mask, which means you can remove portions of that layer effect too, just as you would with a Quick Mask. It makes for an impressive array of tools to create an original and exciting image! So back to the Fyvie walk shot. Here is the original shot converted into FAUX using the Khromagery action I demonstrated on the previous page.
The cover shot of page 4 with the FAUX action applied
And here is the same conversion using the Photoshop Supply action.
The same shot processed using the Photoshopsupply FAUX action
Here the sky is darker and slightly more purple. But the big difference is in the treatment of the trees. Instead of white and gold/ochre tints, you have a blue/grey range of tints. I like them both, so this action is a definite addition to my processing tool kit! Note: All of these shots are just as they look when applied. I would most probably brighten them before completing .. as I did with the Khromagery image.
Select another Photoshop Supply action and …. how about a pink sky?
A pink effect using one of the 8-action choices
Again you have the sky colour reflected in the path and the rock. Maybe it’s the visual effect of the pink sky, but there seems to be a slight green tone to the foliage now.
Next you have another choice, a more turquoise tint to the sky ….
A turquoise effect using one of the 8-action choices
And here there is a definite pink tint to the grass and the near trees.
Or how about duck egg blue to the trees, and a grey sky …..
Blue tree effect mixing 2 of the 8-action choices
That particular effect was created by combining 2 effects – using numbers 5 +6. But you can play with the options and make your own mix.
The final action is a straight B+W
Black and White effect using the final of the 8-action choices
I wondered if there was any difference if I chose to desaturate rather than choose B+W
Choose to desaturate the colour. Is the effect different?
Here I’ve used that technique to the max, and apart from being a little darker it seems the same, though I haven’t studied both versions closely. With the desaturating route you can simply slide move the desaturate slider and fade the colours rather than remove them. Again there is a whole range of options!
Apply a sepia tint to the Black and White version of the infrared shot
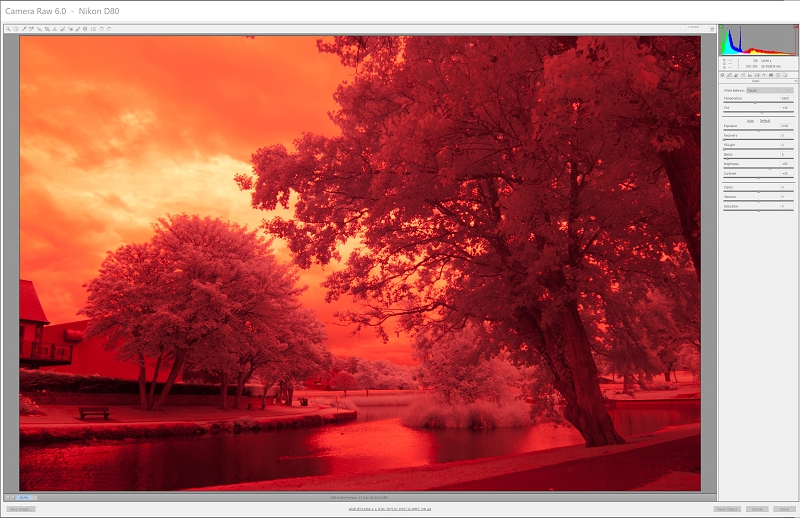
Once you are into B+W it is easy to work a sepia version as well, as my final take on this one shot. These are just a handful of ways that you can develop the image using this single action. I have found it a great addition to the post processing. It is particularly helpful with handling the NEF files, which are the Nikon version of RAW. When you bring a NEF file into Camera Raw there is a disconcerting effect – the images all turn red
Nikon NEF file from my infrared converted camera displays as red
And the effect can be even more intense if you try to adjust the colour using the White Balance – here is the effect of choosing ‘Cloudy’
Nikon NEF file from my infrared converted camera displays as intense red
It needs to be a problem to adjust in Photoshop itself, and not Camera RAW!
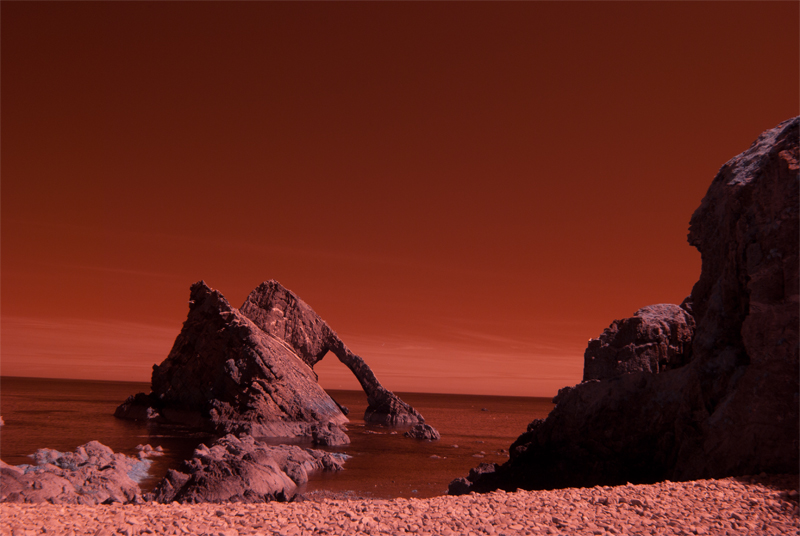
The whole point of shooting in NEF (or any RAW format) is that the file in not compressed, so you have the maximum file size to work with. Any post processing will inevitably remove some pixels, and the image will gradually degrade each time you affect it. So using my Jpeg I start with a file size between 4.5-5 MB – if I work with the NEF of the same image I will have between 9-9.5MB of data. That difference in file size really matters. So, returning to the image of the Bow Fiddle rock.
The original Nikon NEF of Bow Fiddle rock
This is the NEF file, giving my the biggest file size to work with, but also the problem of a whole lot of red to contend with.
If I use the Khromagery FAUX conversion I get a pleasing image
The simpler single action Khromagery FAUX conversion
But essentially it looks almost like a normal colour photo.
If I use the versatility of the Photoshop Supply FAUX and run all nine options and simply mix and match the results, I can get something quite different!
The Bow Fiddle rock shot in Infrared, with a FAUX action applied in Photoshop
So I think that the Photoshop Supply FAUX action is a definite for my processing of Nikon Goldie shots … and I guess for a whole lot more besides.
Trees reflected in the loch at Fyvie Castle. Infrared FAUX
Adventures in IR Wonderland 5 – the Goldie FAUX action
So we have met the new Super Goldie filter, and seen what it can do straight out of the camera. A golden sky and lovely soft blue trees are the hallmarks of the shots you can get. My shots are taken on an old Nikon D80 which has been modified to ONLY shoot in the Super Goldie (590nm) range – there will be variations with different cameras and different ways of applying the filter. I usually shoot in both RAW and Jpeg format across all my cameras. RAW means the NEF format in the Nikon – but the results I have been showing you are all taken from the Jpegs. Working with the NEF throws up some problems that I’ll look at later. I wanted to start as simply as possible – and that meant using the Jpeg shots. Once I was confident with the results the Goldie filter was giving me, I decided to go looking online for way to transform my original shots into the amazing and colourful shots I saw in Flickr and on the internet. The words that kept coming up was FAUX (or false) colours – so I began to investigate. Colour ‘inversions’ were frequently mentioned, and I struggled to find out what that meant and how to do ‘inversions’. Then I found David Burren’s website Khromagery which has a lot of helpful material – though it was written quite a while ago, and we have more advanced computer-based assistance now! But one gem that you can download from his site page: here is a Photoshop Action that I have found to be invaluable. I use Photoshop CS5 and it is my go-to starting point for playing with my Goldie Jpeg images. To quote from his page: “A long time ago I wrote a Photoshop action (well, I built upon a technique I saw demonstrated by someone else) to help with this, and apparently, it’s still in use by many folks today. For anyone looking for the FalseColoursAction, a ZIP file can be downloaded here (this article was prompted by a reader searching for the old action). Do note however that the processing in that Photoshop action is purely “by the numbers”, and the visual results will be different depending on the colour space (ProPhoto, AdobeRGB, etc) you’re using.” So I installed the action and began to run it on my Goldie Jpegs. I’ll take you through the process with just one shot – the cover shot from the previous page.
Running the FAUX action in Photoshop
Here the image is in Photoshop and ready for the steps in the Action to be applied. I run the action and …
The cover shot of page 4 with the FAUX action applied
Wow! That is quite a transformation!
The IR FAUX conversion, the final stage
If you look at the information that is on-screen the first thing you notice is that the Hue/Saturation window is left open in the middle of the image. This is so you can do a quick adjustment to the overall colour and intensity before you close/complete the action. To start with I just ticked OK. Then down the side panel in PS you see that the action steps are all showing but placed inside a folder. So you can collapse the folder neatly, and simple turn the action on or off – the original image is still there at the bottom of the Layers window. Neat and simple, and quite magical!
Here I was working with the Fine Jpeg, so the pixel size is only 3872×2592 – but the results are so good and so quick that I haven’t ventured into the trickier region of working with the larger NEF version of the shot until quite recently. I’ll be looking at that move later on. For the moment let’s stick with the FAUX action and the Jpeg image. So let’s try a few more conversions using the action on the default settings and see how they turn out.
The bridge across the Deveron estuary at Banff, Aberdeenshire, Scotland.
Lens flares and trying to integrate them and use them.
One additional thing to mention about infrared converted cameras, and maybe infrared filters in general, is the tendency to create lens flares. I find that sometimes the flare can add a special touch to the image. Here it works well, though I did have to tone down the final large flare in Photoshop.
The bridge at Banff with the FAUX action applied
Here the Faux conversion works well, though the lens flare in orange may not be to everyone’s taste. I think I would tone down the brightest one just a little in post-processing!
The next bridge shot was taken from a slightly different angle. It clearly shows the lens flare you can get from the converted cameras IR filter.
A second shot of the bridge at Banff using the Super Goldie filter
The large blue flare in the foreground needs to be damped down, as I did in the previous shot that I posted on Flickr. And the green tint to the sky is stronger in this shot than in the previous one too.
And after the initial Faux conversion …..
The bridge at Banff shot with the Super Goldie IR filter with a FAUX conversion.
I like the tones of the tree and the scene beyond the bridge … but there is some post-processing playing to adjust this. So I copy the original image/layer and place one above and one below the FAUX action. Then I can use a quick mask to reveal the FAUX colours. Then I can choose what to do. Maybe keep the blue lens flares? And I prefer the original orange tones of the actual bridge, so maybe I’ll keep them too. The FAUX is better in handling the acid green of the sky top right of the shot …. and now I can proceed to mix and combine the colours, replacing some, and blending others.
Using two versions of the IR bridge capture and merging the colours.
Here you can see the process as it is happening. I hope that this gives you some idea of how the FAUX action works, and how you can use it to make quite subtle adjustments to the image, and make it a personal result, rather than just what comes out of the camera, or what the FAUX action produces. I admit that I love this ‘messing about’ stage most of all. It really does make it personal.
And of course you can always opt to remove the FAUX effect altogether and have a simple IR black and white image – and again, play with the tonal values in Photoshop too!
The bridge at Banff. Super Goldie IR filter processed in B+W
So that is the basic range of possibilities that lie in the Super Goldie 590nm filter. And the sheer range of possibilities on offer, the versatility of the filter, is why it is my favourite of the 3 filters that I use. I had intended to stop at this point, but in my online research for this article, checking facts, and generally scouting out points, I came across a second FAUX action – and I have begun playing about with it. So, on the next page I’ll share what I have discovered so far. But I figure that this is maybe a big enough chunk of information and examples for an introduction to FAUX here. And you might like a pause to digest ;o)
On to the second FAUX action and a look at the 8 ways it can apply to your initial shot.
Walking beside the loch at Fyvie Castle, shot with the Super Goldie filter
Adventures in the IR Wonderland 4 – Enter the Goldie!
My adventures in the photographic and visual ‘Wonderland’ that is Infrared (IR) had begun. As I have described in the previous articles, the very first converted camera I found on eBay was an old Nikon D90 and the IR filter was the gentle 720nm. I had jumped in without knowing much about the range of filters that are available, and how wide the spectrum of infrared light is. It didn’t stop me taking some lovely shots, and thoroughly enjoying the results. So don’t be dismayed, you don’t need to study a whole lot to have immense fun with IR; and like me, you can pick up what you need to know as you go along!
I discovered with the 720nm filter that some slight colour did appear in the photos I took, and I learned how to use Photoshop to manipulate the colour casts to produce images that I really enjoyed. But my adventures were only just beginning! As I posted shots to IR Flickr groups, and looked at images online I saw that there was a whole range of colours represented. They were definitely shot in the infrared spectrum, but how did the photographers achieve such dazzling results? I saw red trees, blue trees, orange skies – I wanted to discover how to get such wonderful colour combinations! Folks on Flickr are often very kind and will post the EXIF details of the shots they take and add in text or tags what filters and settings they use. It is a wonderful resource!
I began to collect the knowledge I needed to take the next step. I decided that the filter I wanted next was the 590nm IR Filter (Super Colour or Goldie). I call it my Goldie for short! The lower the nm number, the more colour is let in to the camera sensor. 590 is very low so there’s plenty of colour coming in. Once again I decided to go with a dedicated camera that had been converted to only shoot in the IR range – this time I was after the 590nm part of the IR spectrum. The Nikon I found was even older – a D80. But this time I had some experience with the converted D90, so I was reasonably confident that I was on the right track to find that elusive and magical shot that would take my breath away ;o)
I guess that the Goldie filter is named after the way it renders the sky – which is a deep golden colour. The trees, instead of being white (like the 720nm filter) are blue – reminiscent of the blue-rinse hair colour that used to be so popular with older women!
The loch-side at Fyvie Castle, with the water iris beds in the foreground and the trees across the loch
I was not disappointed. The shimmering golden sky and blue trees were so beautiful! And the blues were nicely graded in tone. I had added another complete ‘world’ to my Adventures in Wonderland! As with the 720nm I found that there was a way to compose the shots that helped a whole lot. Include something that is going to show up as dark – natural stone, tree trunks, and water can do the job perfectly. In this shot the tree trunks and the water of the loch help to define and frame the pale blues that edge into white. Shadows can do the same job, just as they did with the 720nm. Shooting from shade into light can be very helpful. Here the shadows in the foreground come from the water irises and their leaves. And there’s a nice dark shadowy patch on the right side across the water, caused by the strong sunshine coming in from top left. The golden sky also deepens towards the top of the frame. So I started taking my new Goldie out and about and shooting more of the familiar local places that I visit regularly. I found it helped to know the locations, as there was plenty to learn about the camera and how the filter responded to the light etc. Here is the medieval kirkyard at Banff Aberdeenshire.
The medieval kirkyard at Banff Aberdeenshire – Super Goldie filter
Here the light has caught the towering mass of trees well, showing many tints and tones, shadows and detail. Again the golden sky (not so bright as the sun was not so strong) and the more ‘natural’ colours of the gravestones and buildings. Next is the bridge between Banff and Macduff, Aberdeenshire, Scotland.
The bridge across the Deveron estuary at Banff, Aberdeenshire, Scotland.
The bridge across the river Deveron estuary at Banff, Aberdeenshire, Scotland. Shooting here I tried to use the stonework of the bridge to frame the image. The sun was high and bright, and the lens caught a sun flare. I hoped that the stone of the bridge together with the shadows it cast would balance the bright background, that otherwise could be bleached out! See a larger-pixel version here on Flickr, where you can look much closer: Deveron Bridge Now back to Fyvie loch – this time showing more of the water.
Fyvie loch where a small burn feeds into the loch
Here I have a clearer view of the water, and the reflections of the sky and the trees are lovely and clear. A golden sky, and ‘on golden pond’ too, with gold water! The foreground offered some good tree shade to frame the scene, which is almost completely surrounded by the light blue of the grass and foliage. And again there is a light flare, pale blue, coming in almost like a double moon in the sky! And finally the ducks, geese and swans that congregate where the burn opens into the loch add a sense of scale. Again, you can see a larger-pixel version here on Flickr: Golden Pond
It soon became a firm favourite and I took it everywhere! If I could only have one IR camera (and I now have 5!) it would be this old Nikon with its Super Goldie 590nm filter. It is so versatile. As I’m about to show, with a computer you can manipulate the shots you take to produce a whole range from B+W infrared through a range of colour effects. There’s more scope for experimenting and refining stunning images using this Goldie filter than the other filters I have.
So, on the next page I’ll explore just what you can do with Photoshop and a brilliant FAUX free action. On to the FAUX adventure Some more information on the the Goldie: “”The Super Color IR filter is our most colorful filter, its 50% pass frequency is 590nm and its closest equivalent would be the Wratten 29 filter. This filter passes the most visible red light along with IR and therefore the resulting images have the most saturated colors. Which can further be manipulated in Photoshop to produce a dizzying array of effects.” [thanks: https://www.lifepixel.com]
Infrared shot of Fyvie loch with bench. Nikon D90 with 720nm filter
No, it’s not red! And it’s not winter here either! It is summertime at Fyvie loch, and I used a custom converted camera to take this shot. I’m writing a series of articles about my adventures in the ‘Wonderland’ of Infrared (IR) photography – quite as exciting a world as Alice found through the looking-glass! It starts here, and covers the three infrared filters that I have; the 720nm the 850nm and the 590nm (Super-Goldie) I’ve not finished it all yet, but the gentle 720nm was my very first infrared filter, and my way into the whole IR world. So I wrote about it first. It taught me about how the colours can be completely different and quite unexpected too. I looked at using it shooting still-life compositions, as well as the more familiar landscape shots. This is the section I have already completed. My first ever landscape shoot is followed back into the ‘studio’, with the post-processing here. I have a gallery of all the infrared photographs I’ve posted online on Flickr
Infrared shot of Fyvie loch with bench. Nikon D90 with 720nm filter
“Adventures in the Infrared wonderland – part 3”
The best way to learn what any camera can do for you is, needless to say, to get out there and start shooting. And thanks to digital cameras that doesn’t have to be an expensive undertaking. Shoot as much as you can, and then ponder the results and see what works and what doesn’t. Then you can start figuring out how and why some things work and others don’t. You may waste a few shooting sessions – but only in discarded shots – they will be invaluable learning experiences!
So here’s a taste of my own first outing. I’d only managed a few shots of the house and garden and the field across the road with my converted Nikon D90 – nothing more daring! So this morning in July 2016 I set off to shoot one of my favourite local haunts – Fyvie Castle and the loch-side walk. Plenty of trees, water and sky – a place I am familiar with. That day I also had my little Sony RX100 in my pocket, taking a few shots of the lush greenery with it as I walked along. So here is the loch-side walk in full colour that July morning in 2016. The sky was bright, but overcast, with little or no blue at all.
Fyvie loch shot in full colour with the Sony RX100
And if I was to do a B+W conversion of the same shot, it would look something like this. (processed in Photoshop)
Fyvie loch full colour – converted to B+W in Photoshop
I like both versions, they both work for me. Here the lush eye-catching greens have gone, and the shapes of the trees and water irises are clearer. And the green algae floating on the surface is now an elegant white. There’s plenty of ‘punch’ to this B+W version – it is maybe even more dramatic than the colour version.
Now let’s have a look at how Infrared can give us a different view, a different landscape, a different visual world. I happened to take one shot quite close to where I stood when I took the RX100 one I’ve used. It is essentially the same scene but taken from a slightly different point along the walk.
Fyvie loch shot with the Nikon D90 Infrared converted camera. 720nm
The first impression is of a much softer and gentler image than either the full colour or the B+W version. Different things catch the eye. The trees blend into the overall image, as the tones are close to those of the sky and the water. The tonal progress through the image is simplified, it moves from a dark foreground to a white background sky. Look closer and the subtle gradations of grey begin to emerge. From this position there is more of the loch in the frame, so we can see the way the trees darken as the far point of the water is reached. There’s even a strip of the distant hills many miles beyond – and, look the infrared camera has caught the slight hint of clouds in the sky! In the foreground the reflections are much more prominent, while the left-hand mass of water irises is less distinct. Now let’s take a step back and look at how this infrared image has reached this final state.
After 3 years I still find that shooting in infrared has the hit-and miss qualities that I found at the start. So let’s take a peek at some of the original infrared shots in their folder. A strange and bewildering mix of effects – some are blue, some have a distinctly yellow, slightly gold cast to the sky, and the final one is recognisably grey.
Photoshop Bridge showing part of the folder of Infrared shots
The very pale blue shots are pretty well blown out, and most probably destined for the bin! The others are all possible, with the slightly yellow sky, and white trees with a tinge of blue. Something I discovered during that first photoshoot is that it helps the composition and the shot a lot if you can: a) shoot from shade towards light b) have some darker areas such a stone, tree trunks and pathways in your scene. These help define the scene, especially when there is a whole lot of green in the landscape you are shooting! As you can see there will be work to do in Photoshop – post-processing is definitely an integral part of the Infrared experience! Let’s start with the shot I’ve selected in the preview pane. It looks promising. I think it will look good if I used a B+W treatment to remove those tints. So into Camera Raw first.
Infrared shot imported into Camera Raw
Here I can straighten the shot if needed and check the exposure. I can also try out options like de-saturating or converting to B+W. Personally I like to save everything except exposure and straightening until I’m in Photoshop. But if I open the photo into Photoshop as an ‘object’ rather than an ‘image’ it does mean that I can return to Camera Raw and make extra adjustments at any time. So on to Photoshop ….
Infrared shot imported into Photoshop CS5
And here is where the real magic of post-processing happens. I want the image to be in pure B+W – to give me a range of tones that take me from deep black to almost pure white. The reflections of the trees in the water will be my guide for the blacks, together with the bottom left corner. If I get them correct I should also see more definition in the tree branches top left, and the near tree across the water. I finally choose B+W Neutral Density from the B+W options. The sky and the leaves are not as white as some other options, but there is a lovely range of greys in those branches and foliage.
Fyvie loch shot with the Nikon D90 Infrared converted camera. 720nm
So that is the final Infrared composition, that you saw alongside the colour and B+W versions. That is quite different to both the full colour shot and the B+W conversion. It and makes for a very different visual and emotional experience. I find that this camera and filter combination can give me the most delicate and ethereal images. And it definitely hooked me that day.
A few general observations before I continue looking into the folder of shots from that first outing. The first thing you realise is that what is green will turn out white with this Nikon + 720nm filter. Add to that anything that is already white and the effect of bright sunshine – and you have a heady mix of light in your shot. The blown-out shots in my folder show this! I had the Nikon set as it came, with Aperture Priority, and the ISO set at 200 and the White Balance pre-set for the filter. I’ve mainly left the settings that way, as they produce some wonderful effects, and I am no expert on how the camera sensors have been altered and adjusted. I admit I haven’t messed with the setting much at all – just to change the ISO a little on really bright days. I know I’ll have some dud shots, especially as the EVF shows me the full colour version as I take the shot. But for every dud I can find a shot that works like magic – so it can balance out.
The old cabin in the woods. One of the shots showing in the folder is of an old storage shed that looks like it might be used as a wood store. The original shot looked really promising, with plenty of ‘dark’ objects – the path, tree trunks, gate, fence and the shed itself. After I had done the basic conversion to B+W in Photoshop I decided to try out a sepia effect, as it did already look like an old and abandoned shed. I sharpened the contrast, to give me deeper darks, and bring out the lovely definition in the trees, The full version is on my Flickr site: the log cabin in sepia
Fyvie Castle grounds. Cabin in the woods Infrared and added sepia tint
And now one that I have not worked on before. I recall thinking that the two strong tree trunks would frame the shot nicely – giving me a contrast between the shade and the bright sunlight beyond. I have used four stages or versions to show more of the process, and more of the options that are possible in post processing. Looking at the first shot here there is the original, which has a slight light blue tint to the sky, and a yellow tint to the water. There is a good strong variation of dark tones with the two trees, the branches arching over the top of the shot, and the actual bank at the bottom of the screen. When I took the shot into Camera Raw and applied ‘auto exposure’ there was almost no difference. The shot had not been either over or under exposed.
Fyvie loch through the trees. Two versions
I rather like the yellow tint to the water, it emphasises its difference – makes it stand out against both the shore and the trees. But I always like to see what effects I can achieve, before I settle on one interpretation of the image. My next stop was to apply a B+W conversion. Now the sky is whiter, which makes the branches and leaves clearer and a little darker against the new sky.
Fyvie loch through the trees. Two more versions
And as a final twist I applied a Faux colour action, which swaps some colour channels. I use this action mainly for the Goldie filter camera that I’ll be exploring next – but I thought I’d see what happened applying it to the original shot here. As I thought, the water is now a more ‘natural’ blue, and the pale blue tint is gone from the sky. I hope that this has given you a taste of what choices there are when it comes to processing your IR shots from the 720nm converted camera. Lots to play with!
I said earlier on “The very pale blue shots are pretty well blown out, and most probably destined for the bin!” But sometimes it is worth playing around and experimenting with the failed and blown out shots, before you finally give up on them. It’s always worth trying…
Here’s another shot from the folder
A blown out Infrared shot reclaimed
What I wanted to catch was the diagonal sweep of the leaves. The strong uprights of the trunks and the downwards diagonal sweep of the foliage really caught my attention. So I was disappointed that the result seemed past rescuing. I left it alone, reluctant to discard it completely. So I tried again with the knowledge I acquired over the last 3 years – and I think it was worth the effort and the wait. I first applied the FAUX action in Photoshop and was delighted at the increased definition it has uncovered. There are brown tints in some of the tree trunks, and gentle ‘blue rinse’ across the foliage that I really like. I then went on to take the FAUX version and convert that into B+W. It has kept the improved definition in the foliage nicely. Personally, I think there is more interest in the FAUX version, a greater sense of depth in the scene too. So – that is a brief look into one folder – one morning spent with the IR converted old Nikon D90 – warts and all! I hope that it has been an interesting adventure for you, as it was for me.
The next article will take a look at the second IR converted Nikon I bought that year, which can produce quite amazing images that show that ‘infrared’ doesn’t necessarily mean B+W. On to the Super Goldie