2022 January

calendar January 2022
My Calendar cover for January 2022

Yes. Year three of the Covid-19 pandemic begins. It has been such a long journey since November/December 2019 when we first read about a virulent new virus causing concern in Wuhan, China …. then January 2020 when we found it was here in Aberdeenshire, brought back from Italy by someone returning from a ski holiday in the Italian Alps.
It is hard to recall just how innocent, how ignorant we were of what might lie ahead as the new decade began! So how does the world look as 2022 begins?

In pandemic terms the Westminster government is yet again trying to suggest that the pandemic is over … well NEARLY. Desperate for some ‘good news’ it is repeating the mistakes of last year by trumpeting the next “Freedom Day” of no face masks and back to work in the office.
The reason for this (looked at with a cynical eye) is to divert the populace away from the ocean of lies, corruption and sleaze that is engulfing Boris Johnson and his government. It is difficult to find a way to summarise this … Partygate, lying (both to the Commons and the people), bullying and intimidation of MPs … just a tiny taste of the sewer that the ‘national’ government has become. It is being revealed day after day. Desperate attempts to shore up the government mean that throwing vulnerable citizens under the Covid bus is just one plan to divert attention away from the mess they are in. Declare the pandemic over – compare it to a winter ‘flu once again.

And where am I personally as the year begins? Well my energy seems to have shrunk to the size of a walnut! I guess 2 years of constant stress and anxiety would be enough of a problem for the ME/PVS (Post Viral Syndrome) my body has had to live with over the past 30 years. I used to avoid the annual ‘flu jab because it took months to recover from the after-effects. But Covid has redrawn the map! Now I have had 2 ‘flu jabs and 3 Covid jabs. I guess the answer is right there! And since the booster jab of Pfizer I have had some strange side-effects such as alterations to my sense of taste. Nori, which I love, became quite horrible. This winter’s ‘flu jab was administered at the same time as the booster shot, and the arm muscle involved has remained painful – even now – 3+ months after the jab.

So I find very little energy for my creative drive. Even back-pedalling on the housework, and neglecting the garden, I find myself sinking into watching DVDs or recorded TV programmes rather than beginning my painting for the year! And endless card games on my iPhone take the time I used to spend reading poetry, or books on Cezanne, or my only magazine on B+W photography. My eating is chaotic, with far too much sweet (cakes and chocolates) and little salad and fresh fruit! So I have a mountain to climb to get myself back on track!

It is only slowly, as the end of the month approaches, that I feel able to take some tentative steps towards what was ‘normal’ in 2021, or further back in 2020, and even pre-pandemic times. I sourced a ‘new’ vintage lens on eBay, and now have a second Meyer Optik Gorlitz lens – this time a closer Domiplan 50mm. Not expensive, and very like the Helios range, but giving an hexagonal bokeh light ball. And I am beginning the year by brushing up on my photographic skills.
Something I can do every day, especially in the early morning, is to step outside and shoot the dawn from the garden. It is often the most interesting and colourful time of the day.

morning sunrise

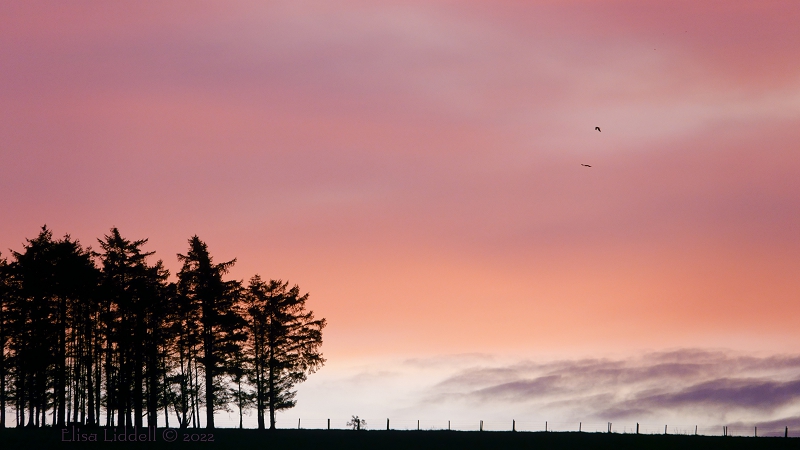
In winter a stunning dawn like this can resolve into a grey, overcast day. So the zoom of my RX10m3 is by the door, to catch the ‘lightshow’ that welcomes the morning!

Misty winter world

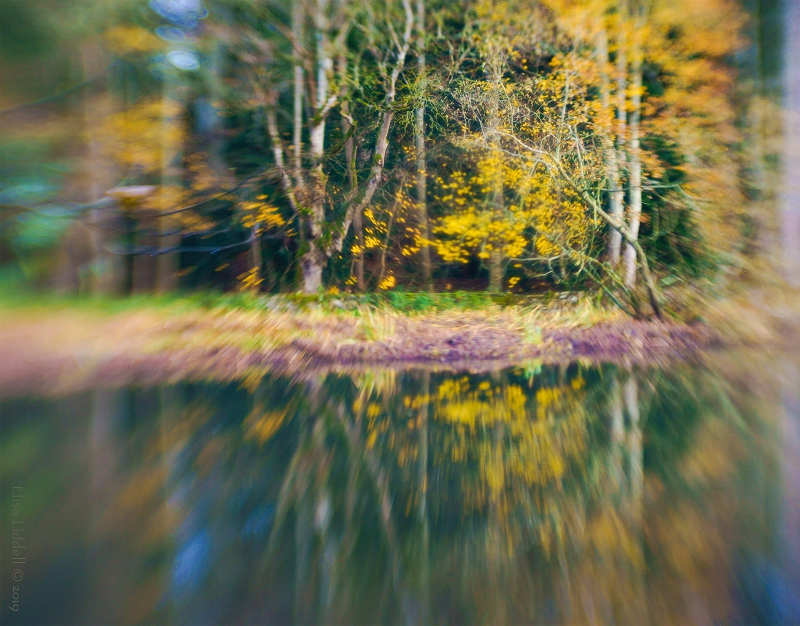
The other photogenic morning offering is the early mist. Here I tried out the new Domiplan 50 lens outdoors. Focusing on something as insubstantial as the mist across the howe is quite demanding of any lens!

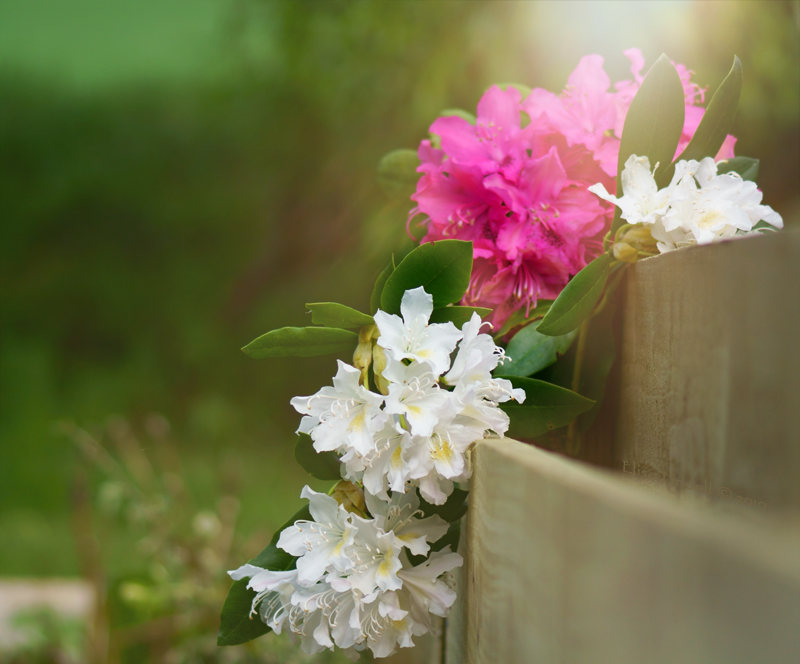
And indoors I’ve been using the Domiplan 50mm as my ‘go-to’ lens. I find it’s the best way to learn a new lens, to have it to hand as much as possible, and shoot anything and everything that catches my eye. Looking at the results later on the PC monitor I can discard disappointing shots, but all of them build up my knowledge of what are the strengths and weaknesses of a lens.

fading yellow tulip

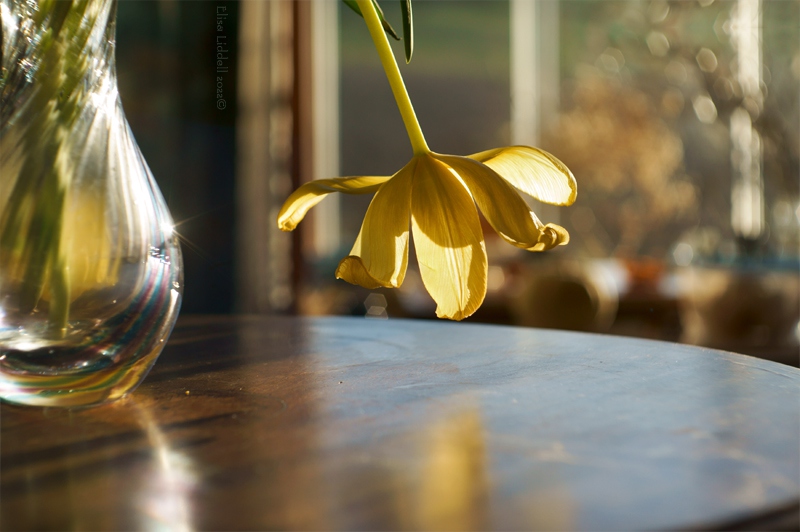
The remnants of a vase of yellow tulips, caught in the sunshine and reflected on the wooden table surface.
The hexagonal bokeh in the window was a delight.

glass and light

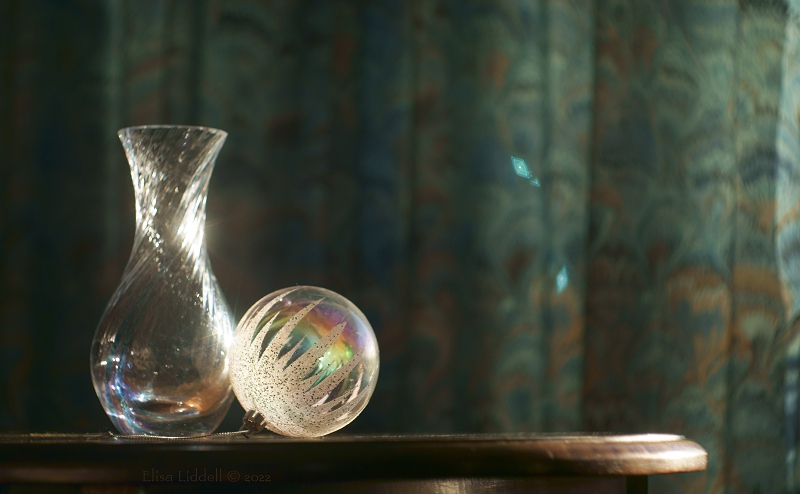
A ‘grab the camera’ moment as the sun caught some glass photo props before I put them away! I was about to finish for the day … and prepare some lunch.

One of the few remaining ‘normal’ activities we have is the weekly shopping trip to Inverurie. The range of shops we visit is reduced to just two, and has been since the early days of the pandemic. It makes for a quick ‘exposure’ with masks and sanitiser …. early in the day before the shops are crowded. But there is a bonus to the early start, especially in the winter, as it means we drive through the dawn! We drive into the sunrise as we go, and the sun is behind us as we return. Both effects can create beautiful photographs!

January dawn

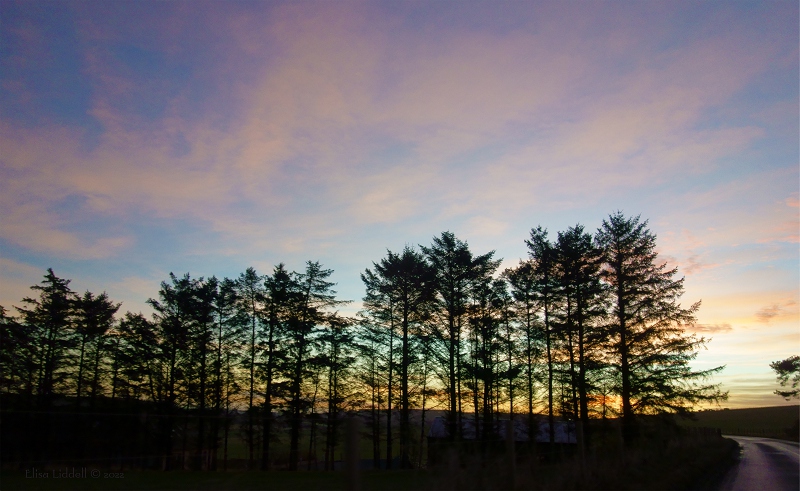
As the daily ‘light show’ of the dawn unfolds before our eyes, there is the chance of the sky silhouetting the trees by the roadside. Irresistible for me with my Sony RX100 – which is perfect for such ‘drive by’ shots.

On the road with lenticular clouds

By the time the shopping is done, the day has opened up, and with the low winter sun at our backs we can take in the full glory of the world we live in. I’ve recently learned that the clouds we often see here are called Lenticular and can look like rolls of cotton wool.

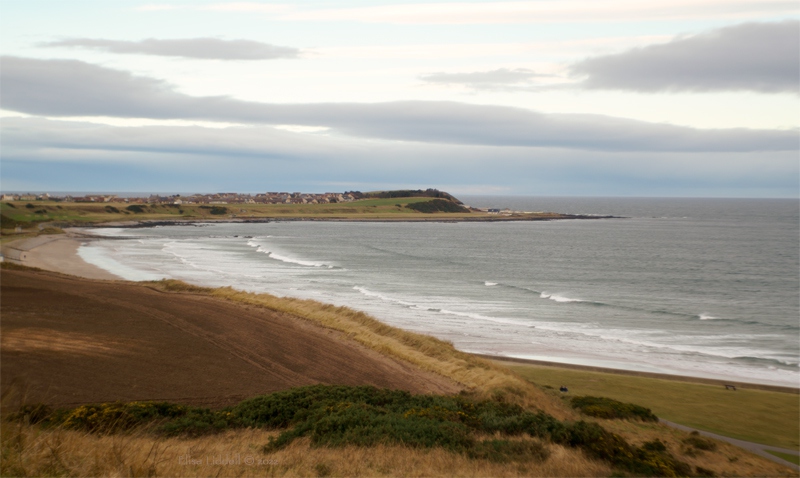
By the middle of January we made our first (short) trip to the coast – the first since last April! The day was grey and cold, but we missed being able to walk by the sea and enjoy the freedom to exercise in fresh air, walk on the sand, and feel the power of the sea as it meets the shore. The damage inflicted by Storm Arwen has closed our local exercise places, Fyvie Castle and Leith Hall, so the sea is the only space that is open to us.
As it turned out we found that Storm Arwen has robbed us of our usual seaside spots too! The road to Banff Scotstown was closed off, with nowhere to park. so we couldn’t even park and investigate on foot!

Banff Bay January 2022

I had to shoot Banff Bay from above, fighting a gale as I tried to catch the sea with my new lens! It was beautiful, but I couldn’t stay long, as standing upright was a battle in itself!

We decided to try Portsoy, further up the coast. If the sea was too wild and windy, then the shelter of Little Loch Soy might be a place we could stretch our legs and get some exercise. We discovered that Storm Arwen had marked even Little Loch Soy, with trees destroyed, and only freshly cut tree stumps remaining in some places.
I had decided to take my Lensbaby Double Glass lens with me, as it too had been languishing over the past few months. At least I could try for some interesting lens effects, if the day was grey and the lochside walk was dull!

Little Loch Soy with Lensbaby

As it happened the Lensbaby did transform the dull day into something more magical! Back home I took 3 Lensbaby shots and wove them into a wintery wonderland. It is amazing what the Lensbaby can create!

tulip petal

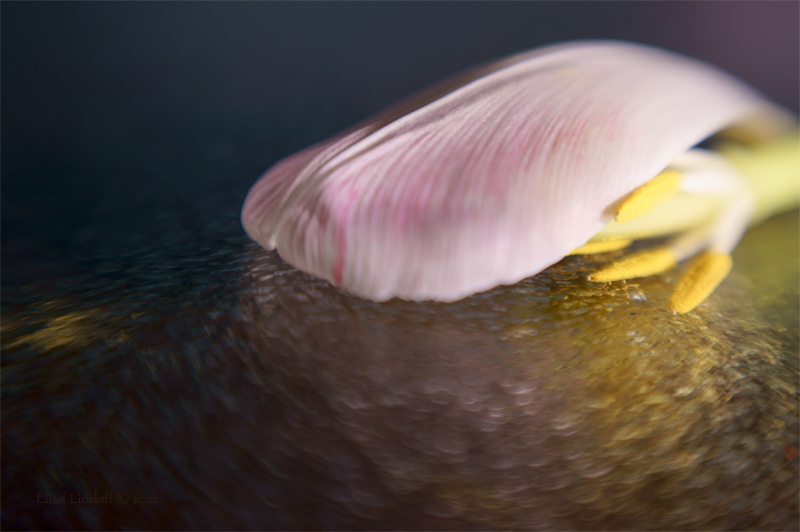
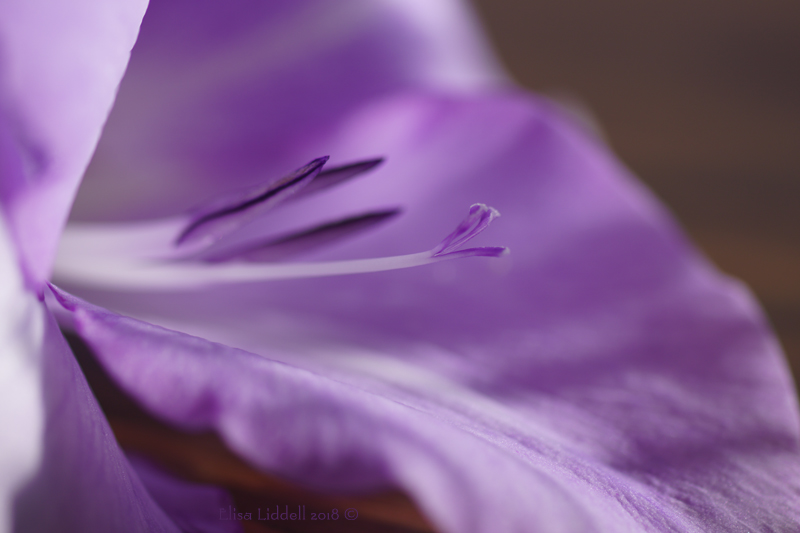
Back home I played with the Lensbaby indoors. With macro rings I can get in really close. There are lovely swirling patterns the lens can create with a fallen tulip petal and stamens, on pebble glass.

As the month progressed we continued to slowly clear up the damage from Storm Arwen. So many branches brought down in the garden, and debris together with leaves needing to be hauled up to the recycling centre in Turriff. As the month drew to a close we were warned of another severe storm arriving. The closing weekend was going to be graced with not one but two storms – Storm Malik and Storm Corrie. So before the worst began to hit Aberdeenshire we returned to the coast and treated ourselves to fish and chips by the sea at Whitehills.

Banff from across the Bay

The weather was already becoming wild and stormy, so we ate in the comfort of the car before venturing out to catch the surf breaking on the rocks. As it happened this was the quiet before the real storm arrived!

Storm Malik

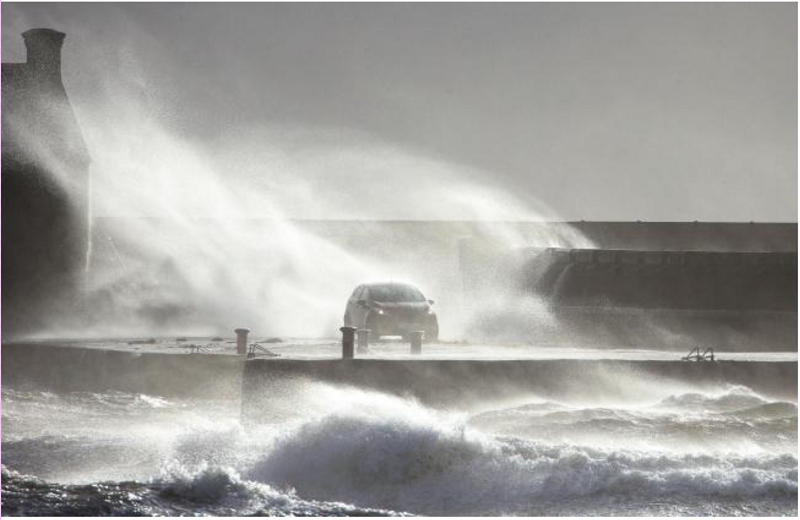
An online capture of the two storms! We waited for power cuts, and for trees in the garden to be brought down, but we were lucky and survived with just more debris to clear away!

And so the month draws to a close with us feeling battered and bruised and very tired! Anxiously waiting for both storms to pass, and wondering how we could run our generator with 70+ mph gales battering us. We look forward to a more peaceful February, and are in need of time to rest and recover!

On to February, and the hope of calmer weather!
Back to the 2022 Cover page
Back to Notebooks cover

Flickr holds Elisa’s online Photo Gallery
© 2022 Elisa Liddell

Lensbaby section

Lensbaby Double Glass trees
Lensbaby Double Glass optic shooting trees and reflections

The Lensbaby is a system of optics that you can screw on to your DSLR camera body in the same way as you add or remove any lens. And that, more or less, is where the similarity ends! Stepping into the world of the Lensbaby is rather like stepping inside a kaleidoscope. The optics can create the most wonderful effects inside the camera. It is a whole new ‘take’ on what you see normally through your own eyes, and through the view-finder of your camera. Prepare to be enchanted.
The Lensbaby system has been around since 2004. To quote their own words: “In 2004, Lensbaby was born out of a photographer’s frustration with flat, sterile, digital images. Since then, we’ve been helping photographers gain creative control and inject emotion into their images.” Lensbaby.com
And that is indeed what I get from my Lensbaby optics, a way to transform ordinary shots into something special, something that I have created rather than just recorded, and sometimes I create something that takes me quite by surprise!

The pages that I’ve made here roughly follow my own journey into Lensbaby land, from my very first bundle in 2013 through to today.

Meet the Lensbaby
I start with a little about the ‘base unit’ called the Composer Pro, and how you drop in the ‘optics’

The Double Glass optic
Then I look at this first optic, and what I could do with it right from day 1.

The Sweet 50 optic
In 2015 I bought my next optic, the Sweet 50. This added a new range of effects, and a simpler focusing system.

The Edge 80
In 2017 I added a third optic to my range, this time with landscape especially in mind. This optic has range of subtle effects, and a sharpness of focus that is quite remarkable.

As I suggested, the results that you can get straight out of the camera can be truly artistic – and I like to think my Lensbabys are for ‘Art Photography’. I really love that I don’t have to manipulate imaged on my computer in Photoshop.

Lensbaby Art 1
Looks at how the Lensbaby can help to compose a shot.

Lensbaby Art 2
Some of the ways in which the Lensbaby can take me by surprise.

I seem to work in 2 year cycles, as in 2019 I have just added a Twist 60 to my Lensbaby range. I haven’t used it enough yet to add it to this section.
I’ve got more Lensbaby shots on Flickr. I’ve divided them into the 3 lenses I use
On Flickr you can find my Album of Sweet 50 photos
On Flickr you can find my Album of Double Glass photos
On Flickr you can find my Album of Edge 80 photos

Note: the range of camera bases that Lensbaby support, Taken from their website July 2019: “We make creative effects lenses, tools, and accessories that fit the following DSLR and mirrorless camera bodies: Canon EF, Nikon F, Sony E, Fuji X, Micro 4/3”.

Flickr holds Elisa’s online Photo Gallery
© 2019 Elisa Liddell

Don’t fence me in!

The new fence and rhododendrons
The new ranch fence adorned with rhododendrons

We’ve had a small wooden ranch-style fence in the garden for years – and this year we have replaced it.
Work completed yesterday, and the smell of new wood, and wood shavings, fills the garden! I’ve planted clematis to grow up and over the fence, but at the moment it is bare, pale wood. I wanted to celebrate the new fence, so I took some rhododendrons from the front garden to adorn it.
Shot with the Sony A77ii and the Sony 100mm F2.8 Macro.

Flickr holds Elisa’s online Photo Gallery
© 2019 Elisa Liddell

Such a simple pleasure!

A white rose with raindrops.
A white rose with raindrops. Shot with the Lensbaby Edge 80 optic on the Sony NEX-6

A simple single white rose, shot against a black velvet cloth. I used the Lensbaby Edge 80 optic, which means shooting in Manual Mode. This optic is a favourite of mine, as it can produce amazing clarity and detail. I’ve written more about it here
And ‘Flying Solo is all about using full Manual Mode on your camera.

Flickr holds Elisa’s online Photo Gallery
© 2019 Elisa Liddell


Apple blossom time!

The apple blossom
The apple blossom sways in the gentle Spring breeze. Shot with the Helios 44-2 lens

May starts, and the apple blossom is in full swing. We have a large crab apple tree – no use for apples in the autumn (even the bird and insects avoid the fruit)
But in the Spring the garden is full of the almond scent of the flowers, and the tree is a mass of pink buds and white flowers. A true joy!
My album of apple blossom shots is on Flickr
Flickr holds Elisa’s online Photo Gallery
© 2019 Elisa Liddell

Flying Solo

Male Common Redpoll (Acanthis flammea)
Male Common Redpoll (Acanthis flammea) in flight. Alaska. Nikon D4, Sigma 150-500mm f/5-6.3 lens Manual 1/8000 sec; f/6.3; ISO 1600

Flying Solo is how I think about using the full Manual setting on my digital cameras. There is a freedom that is so well expressed in this photo. It was taken by my good Flickr friend Jan Timmons; her Flickr photo gallery is here and a larger version of this photograph is here. Like learning to fly there is a learning process, but it is well worth it to be able to have your camera do what you want, rather than cruising along on Auto-pilot!

That’s how I thought about it when I wanted to use my new DSLR camera on Manual rather than letting the camera computer make all the decisions for me. After all, I’d paid a lot of money for my new Sony NEX-6 – I didn’t want to use it as a glorified ‘point-and-shoot’. So I bought a magazine, and then a book – and started trying to figure it out. I wanted to be sure of what I was doing; I had a sneaking suspicion that maybe I wouldn’t be able to undo it all if I got the settings wrong!

I looked at the charts, I read the explanations, I tried to learn the settings. I wasn’t very successful! Somehow the charts seemed to make sense until I tried to take a shot. I had the books beside me when I tried to shoot on Manual. Which button did what? Where were the buttons? It was all a mystery and a confusion to me. I felt it wasn’t going to make much more sense to read the magazine sections yet again!

That’s when I joined Flickr. I was scared by all those knowledgeable people who would doubtless laugh at this ignorant newbie – but I so wanted to be in control of my camera, and I needed help and advice. A lot of serious Flickr members will post the technical information that goes with the shot (called EXIF data) so I could see a photo and the EXIF to help me learn. And for me DOING is always the only way to really learn. READING will only take me a little of the way! I did find some very handy little charts online, and gradually picked up important pieces of information that have stuck in my memory and that I use all the time.

So this article is all about the extremely simplified way that I devised to start taking off on my Solo flights. I’ve found or devised the most simplified charts and visual aids, to make sense of it all. I hope that it can help you if you are in the position that I found myself in :o)

The bits that really matter for taking control of your camera are:
White Balance
ISO
Aperture (F stop)
Shutter speed
Manual Focus

The EVF
The ‘how-to bit? Well, I rely heavily on the electronic view finder (EVF), which is much, much better than the LED screen at the back of your camera. That is unreadable in sunlight. The EVF can be adjusted for your eyesight; it has an eye-cup to help shade from the sun; it gives you a colour view of what you are shooting; and what you see is pretty close to what you will end up with. Every element of your Manual settings can be seen in action and that makes a HUGE difference! So get a camera with an EVF, and even look online for opinions as to whether it is a good EVF. You can get one as an accessory for some cameras too.
So – to get practical :o)
If you are indoors and can see the LED screen clearly, use that to start with – the screen is that bit bigger. Select your LED/EVF display setting to show the settings you want – you can scroll through the display options. You want to have ISO, F-stop/Aperture and Shutter-speed – White balance if possible too. That way you can get used to the settings, how to get to the buttons you need, and how to read what the settings are that you have chosen. My references mainly refer to my small Sony NEX-6.

White Balance (WB)
This is where the camera decides what the lighting is like. There are several settings:
Natural light – daylight, shade, cloudy
Artificial light – incandescent fluorescent, Flour warm white, Flour cool white, Flour day white, Flour daylight, Flash

The camera on auto will judge for you which setting will give you the closest colour values to ‘natural’. So if you look at something, and then look again through the EVF you can judge whether the green leaf is the same both times – and your White Balance is right. Quite a lot will depend on your camera and your lens. I find that sometimes a ‘Cloudy’ or ‘Shade’ setting works better even in bright sunlight … let your own eyes become your guide. If something proves to be wrong you can always adjust it on your computer later!
I’ve written about playing with the WB here You can have fun playing with this setting, and get some quite different colour effects. But for starters just get used to looking to see if the colours look right to you.

Now the BIG THREE
ISO, Aperture and Shutter Speed. I put them together because they all work together and influence each other – so it helped me to thing of them as one system. The camera, like the whole of photography, is all about the light. And these three together affect how much light gets into the camera when you shoot.

ISO settings are usually in 100 steps from 100 to about 25,600 – the range varies. Put your camera on, and look for the ISO button and try moving it up and down as you look through the EVF. The bottom of the range (100) should be the darkest (some cameras go lower) and as you move up the numbers you will get lighter and lighter. That’s what ISO will do.

F-Stop settings actually open up the aperture (hole) in the camera to let more light in. Just to be awkward the numbers are the exact opposite of ISO. Here the smallest number lets in MOST light, and as the numbers get higher the aperture closes, and less light gets in!
F-Stop numbers usually range from 1.2 to 22.

The 8 Aperture F-stops on your camera

Other things are affected by the F-Stop, but for the moment just find the Aperture/F-stop button or dial and get used to moving it and seeing how it too will let in more or less light.

Shutter Speed is the final one of the ‘big three’. At the lowest setting it is on ‘Bulb’ which allows you to time a Long Exposure shot, then timed from 30 seconds up to 1/3 where the +ve seconds begin. The speed is now in fractions of a second going faster right up to 1/4,000th of a second. Needless to say the Long exposure shots will need a tripod! Round about 1/10 handheld is quite easy with today’s image stabilising software. Shutter speed is another one where the lower the number the more light is let in – the higher the number the darker the image through the view-finder.

These are the BIG THREE because when you put them together you can work out a balance between them.
This is how they affect light entering the camera

Light entering the camera sensor
More light to less light entering your camera sensor

And this is how they interact. Move one of them and you can get the same light by sliding one of the others to compensate.

ISO, Aperture and Shutter speed
The Big Three together and their relationship

It sounds complex, but in fact it isn’t as bad as it sounds at first! Just remember that moving one stop of any of the Big Three can be compensated for by adjusting one of the others.

Rue of 3 regarding exposure
The photographic ‘rule of 3’ regarding exposure – that 1 stop of each of the 3 are equal

It sounds complex, but in fact it isn’t as bad as it sounds at first!
To take an example with my NEX-6. It works best when the ISO is low. A high ISO always gives ‘noise’ – a grainy speckled look to the shot. So for me my first thought will be that the lowest ISO I can manage will be my best choice. But what if the lighting is low and I can’t change it? To get a good shot I might need to slow down the shutter speed so far I’ll need a tripod.
Or if I am shooting a bird in flight I might need speedier shutter speed. So I have to balance and make the best combination I can. I have one lens that is frozen at F2.8. That means I have to work with both shutter speed and ISO when I use that lens!

There are other things that you’ll think about when you get used to the Manual system. But first of all I would suggest that you stick with your kit lens that came with the camera body (usually it has a modest zoom of 18-55mm) and just play around and get happy with flying solo!

The final element you need to fly completely solo is Manual Focus.

Manual Focus is just as much a part of flying solo as as the other three elements. You are in charge of making the shot, and where you want to focus is part of that decision process. Most cameras will have some visual aid to help you, that can be seen through the EVF. It might be just a sound or a small square that lights up green when the point of focus is achieved. My Sony NEX-6 has a very useful additional aid called Peaking Level. This shows the point(s) of best focus highlighted in colour. You can set the colour (red, yellow, white) according to what you are shooting, so it can be clear. You can also set it to low, medium or high intensity.
The example here is not the best example – I took it using one Sony RX100 hand-held to shoot the LED screen on another RX100 (also hand-held) but hopefully it will give you the general idea! You can find a whole lot more about Peaking if you search online.

Sony RX100 showing peaking areas in red

This is so helpful! It gives that added aid to precision focusing. The second additional focus assistance that Sony offer is Manual Focus Assist. This automatically zooms in on your image between 5x and 11x to help you achieve maximum sharpness. It is wonderful for Macro photography . When I start to rotate the ring on my macro lenses (I have three!) the MF-Assist jumps to attention, and I can find my point of perfect focus easily. Then a second or two later it will return to the ‘normal’ view in the EVF.

Sony α77 II A-mount Camera with Sony 100mm F2.8 Macro (tele-macro) lens
Settings – Manual – F2.8 -shutter 1/164 – ISO 50 – WB daylight

Here’s an example of the combined result of using manual focus. Firstly, if I had left this shot to the in-camera auto-focus it would focus on the closest object – which would be the parts of the petal to the extreme left of the shot. But I wanted the focus to be on the delicate stamens and stigma – those elements are also centrally placed. So I can adjust the focus Manually to concentrate on the stamens – and as soon as I start to adjust, the M-F Assist takes me in much closer so I can have pinpoint accuracy. When the Peaking colour lights up the elements I want, then I can take the shot with confidence.
An additional point to notice is that shooting at F2.8 means that I can get in really close, and the areas that are out of focus are gently blurred. One of the pleasures of shooting with a Macro lens ;o)

So now you have total control of your camera, and you can use it in whatever way you want. The Auto settings are designed to take the ‘best’ possible shot, balancing all the elements the camera sensor can judge. But there are so many ways in which you can use the power of the camera to create something quite different from the ‘balancing act’ that the on-board computer is set to judge as a ‘perfect’ shot.

Here is one example of how you can stretch the possibilities of your camera and lens. I was shooting a small hydrangea in bright sunshine. I loved how the sun was bleaching the flowers, melting the petals into bright white background. I didn’t want the camera to try to compensate for the brightness of the light – I wanted to use that brightness.

Blue hydrangea flowers in bright sunlight
Blue hydrangea flowers in bright sunlight. Double Glass and+4 macro filter

And that is just one small example – another is explored in Playing with the White Balance, which looks at what you can do when you take control of the WB and ignore the rules.

And finally – what is to me the wonderful reward of getting to grips with full manual mode – the range of vintage lenses that you can now use with modern digital cameras. Some of them are from the 1960s or before, and are wonderful lenses producing lovely images. And not expensive either. But you need to be able to use your camera in manual mode as they were produced before cameras had on-board computers. So far I have collected 4 such lenses, and rate them as among my greatest favourites. So have a go – get flying solo and take to the skies.

Flickr holds Elisa’s online Photo Gallery
© 2019 Elisa Liddell