2020 September

September 2020 collage
My collage of all the photos and images I uploaded to Flickr during September 2020

We started month 7 of our pandemic experience with bright sunshine and the determination to get out and about as much as possible! So September 1st saw us driving to Fyvie Castle grounds for fresh air and photo opportunities.
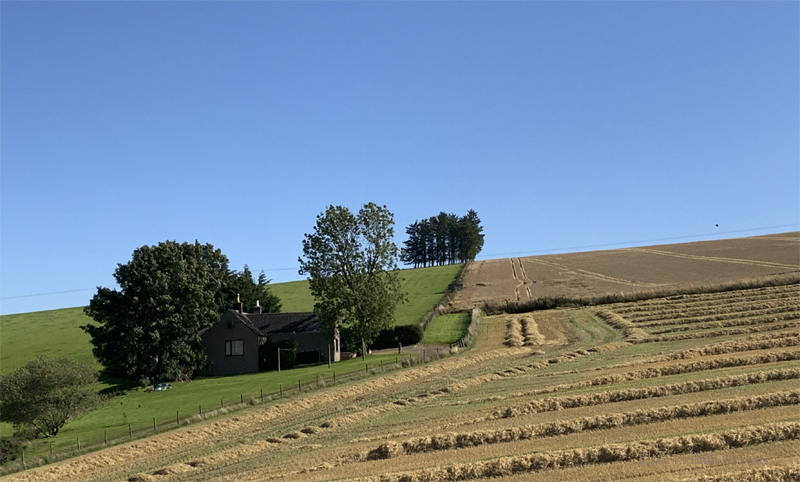
When Mike is driving I usually shoot my ‘drive-bys’ of the countryside as we pass. With today’s smartphones taking such good qualty shots, I often use mine rather than an actual camera! Here we are climbing up the steep hillside out of the howe of the Ythan.
The barley has been harvested, and the fields are ready for hay baling. This croft and the trees on the horizon are a feature of the landscape we see from our house. But I rarely get to catch such a goood, close-up shot! And yes, that angle really is accurate, the hillside is steep!

hillside croft
climbing the hillside out of the howe

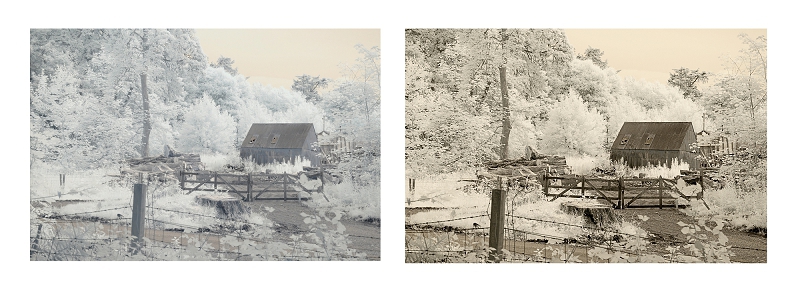
I took an unusual combination of cameras and lenses – an old Eastern European lens, the Meyer Optik (known now as the ‘bokeh monster’) and an old Nikon D90 which has been converted to shoot only in the infrared range. This one has the gentle 720nm filter, and was my very first infrared converted camera, and my way into the whole IR world!
[more about my adventures in IR here]
Trees are a special subject for me, and together with catching the play of light, a great obsession when I am photographing outdoors.

Infrared sunshine and trees
Sunshine and trees at Fyvie Castle, caught in infrared.

The infrared light range turns the greens of the grass and leaves white, which makes the foliage very delicate, and also makes for a scene that looks like winter!

Fyvie castle walk in infrared
Fyvie castle walk, and driveway, caught in infrared

Branches, tree trunks and tarmac give wonderfully contrasting dark tones. We can walk down this driveway, listening to the pigeons cooing, and the leaves rustling, and the cares of the world seem far away.

Autumn leaves in the sunshine
Autumn leaves caught in the sunshine

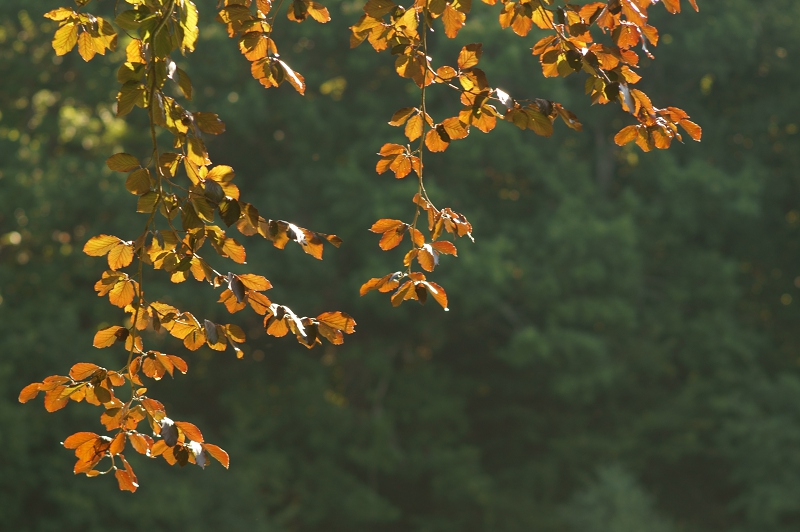
This time in colour, with the heavy Meyer Optik lens. It can really capture the rich colours of the autumn leaves. As September began the autumn colours were just beginning to appear. We had fingers crossed that there would be a sunny dry month ahead, to give us the best of the flaming reds and rich golds as the leaves turned.
And a week later we were back to see how the colours were progressing …

across the loch at Fyvie Castle
Across the loch at Fyvie Castle, Aberdeenshire

This time with a Canon 70D and another old lens attached – a Russian Helios 44-2. The Canon is not my usual camera – I use mainly Sony. So I struggle with this 70D!
But the views of the loch and the trees are always beautiful and so calming. I think this year, more than before, we value the therapeutic effect of our trips out. Instead of thinking only in terms of exercise and photography, we now find the added value of reducing the stress levels, and refreshing our spirits.

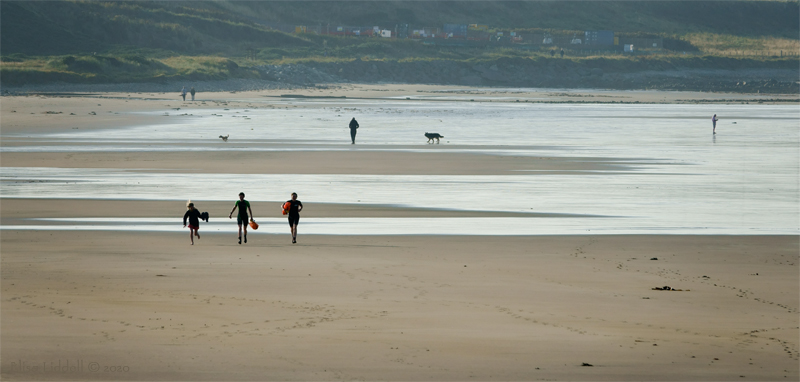
As we picked out more calm days with the promise of sunshine, we went adventuring up the coast twice during September – once to Banff Bay, and then further up the coast to Cullen, both favourite haunts we had missed through the long lock-down months!
We rarely have the luxury of choosing times when the tide is in or out … we need to go in the morning when our energy is ‘in’. By lunch-time it is most definitely ‘out’ and we need to head home for a siesta!
Banff Bay found us enjoying the sand as the sea retreated ……

The beach at Banff Bay
The beach at Banff Bay on a chilly September day

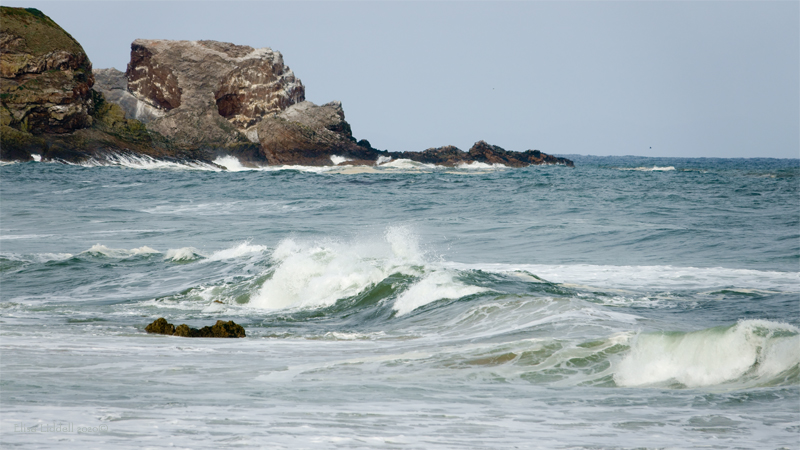
while Cullen found a wild (and very noisy) sea delighting us with crashing waves.

Cullen Bay stormy weather
Cullen Bay with the waves crashing. Wild and noisy!

We kept true to our plan, and visited the grounds of Leith Hall twice in September too. It was exactly a year since we were last there! This time entering the Walled Garden we met our first sign of Covid changes, with a one-way system to walk around and a reminder to ‘social distance’. On our second visit we found some of the gates we often use to access the top levels of the gardens were locked. We met almost no other people as we wandered around with our cameras … glad at least, and at last to be able to enjoy the fresh air and the gardens.

Leith Hall
Leith Hall nestling among the trees

The Hall looks as majestic as ever. I’m not sure if it is open to the public again, but our main delight lies in the tree walks, the flower gardens and the wonderful views.

Leith Hall autumn colours
The autumn colours at Leith Hall. Shot with the Lensbaby

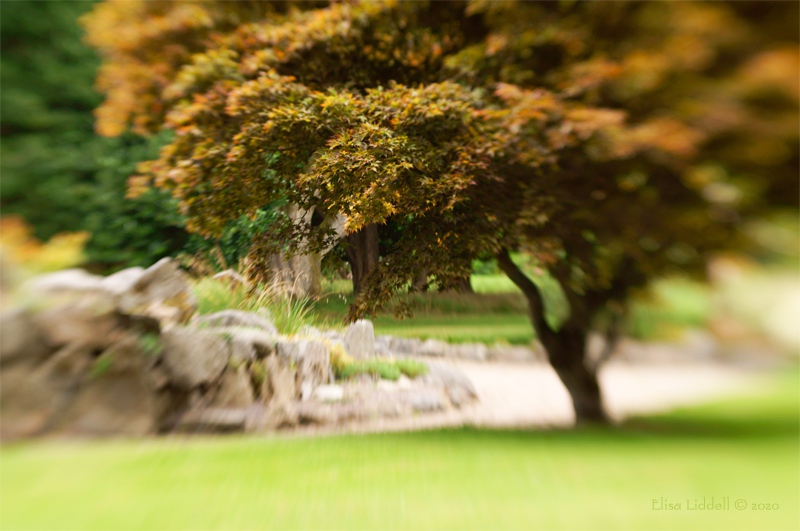
The autumn colours were showing in some of the trees. This one is close to the huge rock garden, which is being rescued, rebuilt and re-planted according to original plans recently found at the Hall.
So September had the feel of sunshine, the outdoors, visits to favourite haunts, and a whole lot of photographs!
But that was not all. At home we had a surprise with the best harvest of plums we’ve had for years.

the plum harvest
2020 has been a bumper year for our plums!

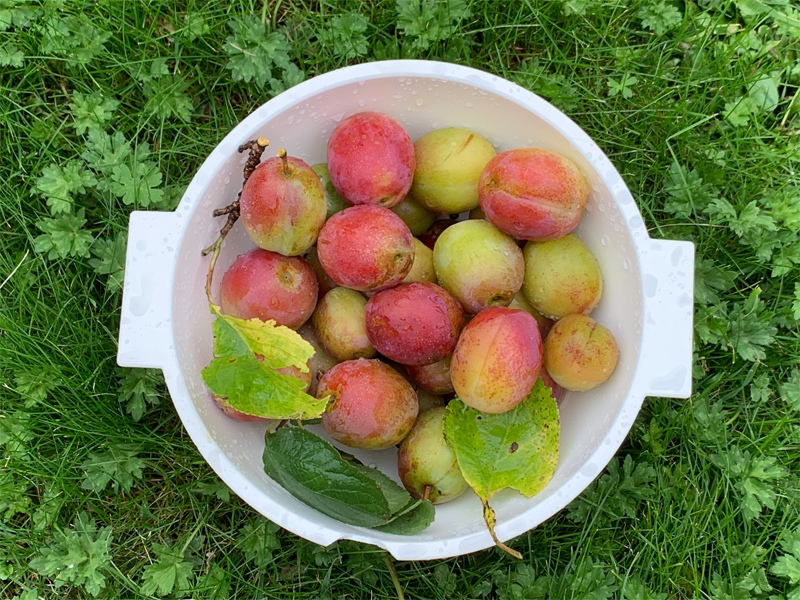
We are aware that the single Victoria plum tree we have is now over 20 years old, and maybe past its best in producing plums. Some years the frosts kill the flowers in Spring, some years there is not enough rain, or too much – not enough sun or too much. So a sudden bumper harvest was a great surprise and delight. Home grown plums, fresh from the tree, taste so good! We collected a bowl like this every day or two for about two weeks.

But of course I can’t look back on September without reference to the pandemic!

This month saw the biggest gamble, as it was decided that schools, colleges and universities had to open again. It began with schools. Here in Scotland we start the school year a few weeks before the rest of the UK, so we were the first to try out opening up our schools, both Primary and Secondary. Personally we looked on with sinking hearts, as young children are notorious spreaders of infections. Is coronavirus so different? And teenagers and college students are the least likely groups to follow the guidelines on social distancing and avoiding crowds! But the ‘science’ said differently … at least in September! But as the month ended there were signs of infection rates picking up. October might prove to be a difficult month!

On to October and autumn arrives.
Back to Journal Page
Back to Notebooks cover

Flickr holds Elisa’s online Photo Gallery
© 2020 Elisa Liddell

Let’s sit among the flowers….

Twist-60 Lensbaby at Fyvie Castle
First outing for the Lensbaby Twist 60, shooting the loch-side walk at Fyvie Castle

The kind of place you just want to sit and watch the world go by!
The rhododendrons are still blooming at Fyvie Castle. Too good to miss the chance to enjoy them! And a chance to try out my latest Lensbaby optic, the Twist 60.

Flickr holds Elisa’s online Photo Gallery
© 2019 Elisa Liddell

Infrared is so cool!

Infrared shot of Fyvie loch with bench.
Infrared shot of Fyvie loch with bench. Nikon D90 with 720nm filter

No, it’s not red! And it’s not winter here either! It is summertime at Fyvie loch, and I used a custom converted camera to take this shot.
I’m writing a series of articles about my adventures in the ‘Wonderland’ of Infrared (IR) photography – quite as exciting a world as Alice found through the looking-glass!
It starts here, and covers the three infrared filters that I have; the 720nm the 850nm and the 590nm (Super-Goldie) I’ve not finished it all yet, but the gentle 720nm was my very first infrared filter, and my way into the whole IR world. So I wrote about it first. It taught me about how the colours can be completely different and quite unexpected too. I looked at using it shooting still-life compositions, as well as the more familiar landscape shots. This is the section I have already completed. My first ever landscape shoot is followed back into the ‘studio’, with the post-processing here.
I have a gallery of all the infrared photographs I’ve posted online on Flickr

Flickr holds Elisa’s online Photo Gallery
© 2019 Elisa Liddell


Infrared third steps

Infrared shot of Fyvie loch with bench.
Infrared shot of Fyvie loch with bench. Nikon D90 with 720nm filter

“Adventures in the Infrared wonderland – part 3”

The best way to learn what any camera can do for you is, needless to say, to get out there and start shooting. And thanks to digital cameras that doesn’t have to be an expensive undertaking. Shoot as much as you can, and then ponder the results and see what works and what doesn’t. Then you can start figuring out how and why some things work and others don’t. You may waste a few shooting sessions – but only in discarded shots – they will be invaluable learning experiences!
So here’s a taste of my own first outing. I’d only managed a few shots of the house and garden and the field across the road with my converted Nikon D90 – nothing more daring! So this morning in July 2016 I set off to shoot one of my favourite local haunts – Fyvie Castle and the loch-side walk. Plenty of trees, water and sky – a place I am familiar with. That day I also had my little Sony RX100 in my pocket, taking a few shots of the lush greenery with it as I walked along. So here is the loch-side walk in full colour that July morning in 2016. The sky was bright, but overcast, with little or no blue at all.

Fyvie loch Sony RX100
Fyvie loch shot in full colour with the Sony RX100

And if I was to do a B+W conversion of the same shot, it would look something like this. (processed in Photoshop)

Fyvie loch converted to B+W
Fyvie loch full colour – converted to B+W in Photoshop

I like both versions, they both work for me. Here the lush eye-catching greens have gone, and the shapes of the trees and water irises are clearer. And the green algae floating on the surface is now an elegant white. There’s plenty of ‘punch’ to this B+W version – it is maybe even more dramatic than the colour version.
Now let’s have a look at how Infrared can give us a different view, a different landscape, a different visual world. I happened to take one shot quite close to where I stood when I took the RX100 one I’ve used. It is essentially the same scene but taken from a slightly different point along the walk.

Fyvie loch shot with the Nikon D90 Infrared converted camera.
Fyvie loch shot with the Nikon D90 Infrared converted camera. 720nm

The first impression is of a much softer and gentler image than either the full colour or the B+W version. Different things catch the eye. The trees blend into the overall image, as the tones are close to those of the sky and the water. The tonal progress through the image is simplified, it moves from a dark foreground to a white background sky. Look closer and the subtle gradations of grey begin to emerge. From this position there is more of the loch in the frame, so we can see the way the trees darken as the far point of the water is reached. There’s even a strip of the distant hills many miles beyond – and, look the infrared camera has caught the slight hint of clouds in the sky! In the foreground the reflections are much more prominent, while the left-hand mass of water irises is less distinct.
Now let’s take a step back and look at how this infrared image has reached this final state.

After 3 years I still find that shooting in infrared has the hit-and miss qualities that I found at the start. So let’s take a peek at some of the original infrared shots in their folder. A strange and bewildering mix of effects – some are blue, some have a distinctly yellow, slightly gold cast to the sky, and the final one is recognisably grey.

Photoshop Bridge showing Infrared shots
Photoshop Bridge showing part of the folder of Infrared shots

The very pale blue shots are pretty well blown out, and most probably destined for the bin! The others are all possible, with the slightly yellow sky, and white trees with a tinge of blue. Something I discovered during that first photoshoot is that it helps the composition and the shot a lot if you can:
a) shoot from shade towards light
b) have some darker areas such a stone, tree trunks and pathways in your scene.
These help define the scene, especially when there is a whole lot of green in the landscape you are shooting! As you can see there will be work to do in Photoshop – post-processing is definitely an integral part of the Infrared experience!
Let’s start with the shot I’ve selected in the preview pane. It looks promising. I think it will look good if I used a B+W treatment to remove those tints. So into Camera Raw first.

Infrared shot imported into Camera Raw

Here I can straighten the shot if needed and check the exposure. I can also try out options like de-saturating or converting to B+W. Personally I like to save everything except exposure and straightening until I’m in Photoshop. But if I open the photo into Photoshop as an ‘object’ rather than an ‘image’ it does mean that I can return to Camera Raw and make extra adjustments at any time.
So on to Photoshop ….

Infrared shot imported into Photoshop CS5

And here is where the real magic of post-processing happens. I want the image to be in pure B+W – to give me a range of tones that take me from deep black to almost pure white. The reflections of the trees in the water will be my guide for the blacks, together with the bottom left corner. If I get them correct I should also see more definition in the tree branches top left, and the near tree across the water. I finally choose B+W Neutral Density from the B+W options. The sky and the leaves are not as white as some other options, but there is a lovely range of greys in those branches and foliage.

Fyvie loch shot with the Nikon D90 Infrared converted camera.
Fyvie loch shot with the Nikon D90 Infrared converted camera. 720nm

So that is the final Infrared composition, that you saw alongside the colour and B+W versions. That is quite different to both the full colour shot and the B+W conversion. It and makes for a very different visual and emotional experience. I find that this camera and filter combination can give me the most delicate and ethereal images. And it definitely hooked me that day.

A few general observations before I continue looking into the folder of shots from that first outing. The first thing you realise is that what is green will turn out white with this Nikon + 720nm filter. Add to that anything that is already white and the effect of bright sunshine – and you have a heady mix of light in your shot. The blown-out shots in my folder show this! I had the Nikon set as it came, with Aperture Priority, and the ISO set at 200 and the White Balance pre-set for the filter. I’ve mainly left the settings that way, as they produce some wonderful effects, and I am no expert on how the camera sensors have been altered and adjusted. I admit I haven’t messed with the setting much at all – just to change the ISO a little on really bright days. I know I’ll have some dud shots, especially as the EVF shows me the full colour version as I take the shot. But for every dud I can find a shot that works like magic – so it can balance out.

The old cabin in the woods.
One of the shots showing in the folder is of an old storage shed that looks like it might be used as a wood store. The original shot looked really promising, with plenty of ‘dark’ objects – the path, tree trunks, gate, fence and the shed itself. After I had done the basic conversion to B+W in Photoshop I decided to try out a sepia effect, as it did already look like an old and abandoned shed. I sharpened the contrast, to give me deeper darks, and bring out the lovely definition in the trees,
The full version is on my Flickr site: the log cabin in sepia

Cabin in the woods Infrared and sepia
Fyvie Castle grounds. Cabin in the woods Infrared and added sepia tint

And now one that I have not worked on before. I recall thinking that the two strong tree trunks would frame the shot nicely – giving me a contrast between the shade and the bright sunlight beyond. I have used four stages or versions to show more of the process, and more of the options that are possible in post processing. Looking at the first shot here there is the original, which has a slight light blue tint to the sky, and a yellow tint to the water. There is a good strong variation of dark tones with the two trees, the branches arching over the top of the shot, and the actual bank at the bottom of the screen. When I took the shot into Camera Raw and applied ‘auto exposure’ there was almost no difference. The shot had not been either over or under exposed.

Fyvie loch through the trees. Two versions

I rather like the yellow tint to the water, it emphasises its difference – makes it stand out against both the shore and the trees. But I always like to see what effects I can achieve, before I settle on one interpretation of the image. My next stop was to apply a B+W conversion. Now the sky is whiter, which makes the branches and leaves clearer and a little darker against the new sky.

Fyvie loch through the trees. Two more versions

And as a final twist I applied a Faux colour action, which swaps some colour channels. I use this action mainly for the Goldie filter camera that I’ll be exploring next – but I thought I’d see what happened applying it to the original shot here. As I thought, the water is now a more ‘natural’ blue, and the pale blue tint is gone from the sky. I hope that this has given you a taste of what choices there are when it comes to processing your IR shots from the 720nm converted camera. Lots to play with!
I said earlier on “The very pale blue shots are pretty well blown out, and most probably destined for the bin!” But sometimes it is worth playing around and experimenting with the failed and blown out shots, before you finally give up on them. It’s always worth trying…
Here’s another shot from the folder

A blown out Infrared shot reclaimed

What I wanted to catch was the diagonal sweep of the leaves. The strong uprights of the trunks and the downwards diagonal sweep of the foliage really caught my attention. So I was disappointed that the result seemed past rescuing. I left it alone, reluctant to discard it completely. So I tried again with the knowledge I acquired over the last 3 years – and I think it was worth the effort and the wait. I first applied the FAUX action in Photoshop and was delighted at the increased definition it has uncovered. There are brown tints in some of the tree trunks, and gentle ‘blue rinse’ across the foliage that I really like. I then went on to take the FAUX version and convert that into B+W. It has kept the improved definition in the foliage nicely. Personally, I think there is more interest in the FAUX version, a greater sense of depth in the scene too.
So – that is a brief look into one folder – one morning spent with the IR converted old Nikon D90 – warts and all! I hope that it has been an interesting adventure for you, as it was for me.

The next article will take a look at the second IR converted Nikon I bought that year, which can produce quite amazing images that show that ‘infrared’ doesn’t necessarily mean B+W.
On to the Super Goldie

Back to the start of the IR section
My photography articles Talking Digital Photography
Flickr holds Elisa’s online Photo Gallery
© 2019 Elisa Liddell