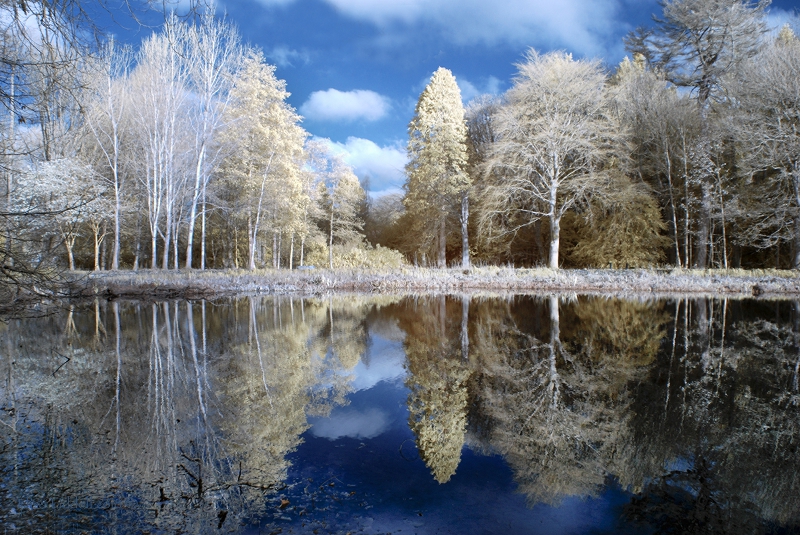
Trees reflected in the loch at Fyvie Castle. Infrared FAUX
My Adventures in the IR Wonderland
Infrared (IR) photography first really caught my attention in 2015, through looking at IR groups on Flickr. I loved the different ‘view’ it offered, making even familiar places and subjects fresh and new to my eyes. I began by using Photoshop, and trying the B+W adjustment layer, which offered infrared as an option. Disappointed I turned to the internet, and found a wealth of information, most of it too technical to help a complete beginner. I though about using a screw-on filter as the simplest way to experiment, but soon learned that Sony cameras were the least successful for IR shooting. I’m a Sony fan, so I had an additional problem!
Then in 2016 I learned about IR converted cameras. These are usually old cameras that have been modified to shoot ONLY in IR. I found an old Nikon D90 on eBay, and the adventure began.
The pages here follow roughly the stages or steps that I have followed as I gradually learned more, and experimented. The first 6 pages cover the 2 converted Nikons – a D90 with a 720nm filter, and a D80 with a Super Goldie 580nm
Infrared first steps The start of my adventure, from Photoshop disappointment to Nikon delight. First experimental shots.
Infrared second steps The next step in the adventure, learning what IR does to the colours we see with our eyes. A still life experiment with colour, B+W and IR versions of the same set-up.
Infrared third steps Taking my ‘new’ Nikon and its 720nm filter out and about shooting landscape, sky, trees and water. And comparing full colour, B+W and infrared shots of the same scene.
Infrared fourth steps Enter the Super Goldie! I buy a second Nikon, a D80 with the 590nm Super Goldie filter. This allows more of the colour spectrum in, and moves from the B+W realm into a fantasy land of surreal colour.
Infrared fifth steps FAUX post processing. Moving from the SOOC shots with a little Photoshop to tweak the shot to using a Photoshop Action (free to download) to apply colour inversions, and refinements to Goldie shots. I use the Khromagery action.
Infrared sixth steps FAUX processing taken even further with the Photoshop Supply action (free to download) which includes 9 separate action that you can use, mix and experiment with to create a range of surreal effects.
The next pages will be about using converted Sony A5000 cameras.
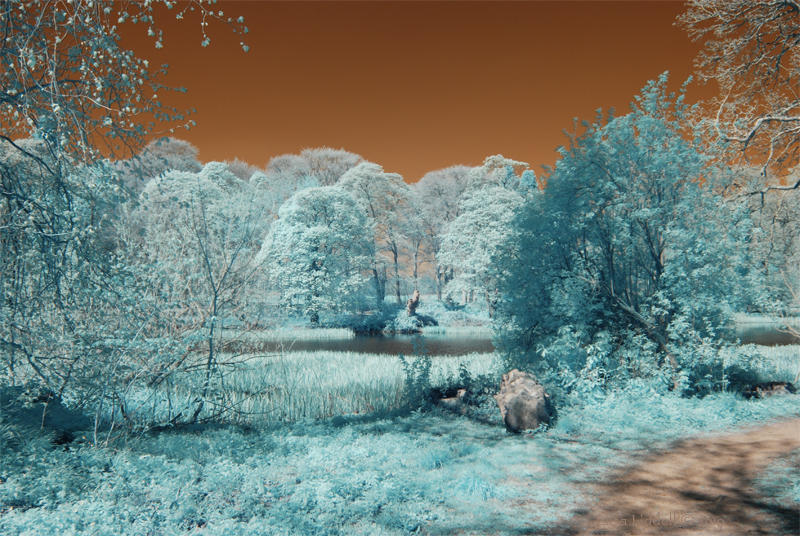
Walking beside the loch at Fyvie Castle, shot with the Super Goldie filter
Adventures in the IR Wonderland 4 – Enter the Goldie!
My adventures in the photographic and visual ‘Wonderland’ that is Infrared (IR) had begun. As I have described in the previous articles, the very first converted camera I found on eBay was an old Nikon D90 and the IR filter was the gentle 720nm. I had jumped in without knowing much about the range of filters that are available, and how wide the spectrum of infrared light is. It didn’t stop me taking some lovely shots, and thoroughly enjoying the results. So don’t be dismayed, you don’t need to study a whole lot to have immense fun with IR; and like me, you can pick up what you need to know as you go along!
I discovered with the 720nm filter that some slight colour did appear in the photos I took, and I learned how to use Photoshop to manipulate the colour casts to produce images that I really enjoyed. But my adventures were only just beginning! As I posted shots to IR Flickr groups, and looked at images online I saw that there was a whole range of colours represented. They were definitely shot in the infrared spectrum, but how did the photographers achieve such dazzling results? I saw red trees, blue trees, orange skies – I wanted to discover how to get such wonderful colour combinations! Folks on Flickr are often very kind and will post the EXIF details of the shots they take and add in text or tags what filters and settings they use. It is a wonderful resource!
I began to collect the knowledge I needed to take the next step. I decided that the filter I wanted next was the 590nm IR Filter (Super Colour or Goldie). I call it my Goldie for short! The lower the nm number, the more colour is let in to the camera sensor. 590 is very low so there’s plenty of colour coming in. Once again I decided to go with a dedicated camera that had been converted to only shoot in the IR range – this time I was after the 590nm part of the IR spectrum. The Nikon I found was even older – a D80. But this time I had some experience with the converted D90, so I was reasonably confident that I was on the right track to find that elusive and magical shot that would take my breath away ;o)
I guess that the Goldie filter is named after the way it renders the sky – which is a deep golden colour. The trees, instead of being white (like the 720nm filter) are blue – reminiscent of the blue-rinse hair colour that used to be so popular with older women!
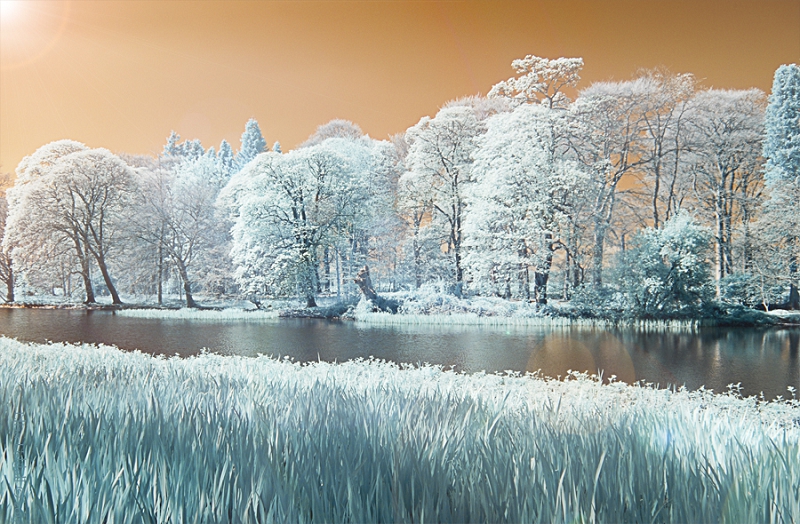
The loch-side at Fyvie Castle, with the water iris beds in the foreground and the trees across the loch
I was not disappointed. The shimmering golden sky and blue trees were so beautiful! And the blues were nicely graded in tone. I had added another complete ‘world’ to my Adventures in Wonderland! As with the 720nm I found that there was a way to compose the shots that helped a whole lot. Include something that is going to show up as dark – natural stone, tree trunks, and water can do the job perfectly. In this shot the tree trunks and the water of the loch help to define and frame the pale blues that edge into white. Shadows can do the same job, just as they did with the 720nm. Shooting from shade into light can be very helpful. Here the shadows in the foreground come from the water irises and their leaves. And there’s a nice dark shadowy patch on the right side across the water, caused by the strong sunshine coming in from top left. The golden sky also deepens towards the top of the frame. So I started taking my new Goldie out and about and shooting more of the familiar local places that I visit regularly. I found it helped to know the locations, as there was plenty to learn about the camera and how the filter responded to the light etc. Here is the medieval kirkyard at Banff Aberdeenshire.
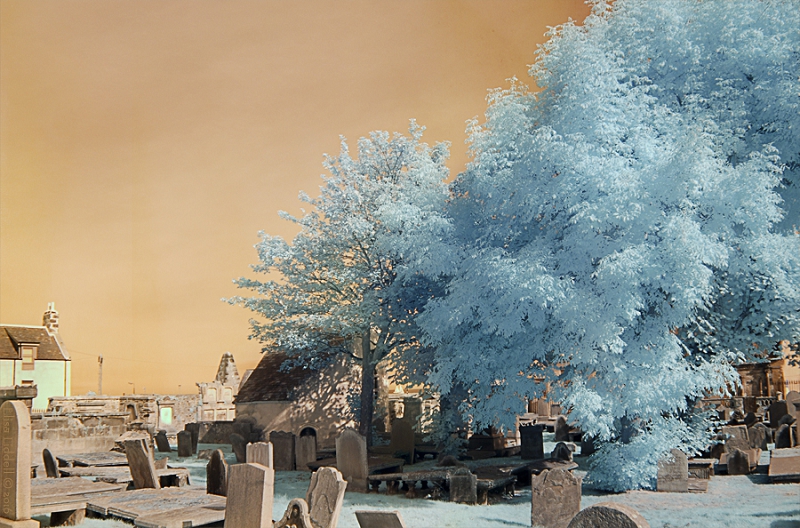
The medieval kirkyard at Banff Aberdeenshire – Super Goldie filter
Here the light has caught the towering mass of trees well, showing many tints and tones, shadows and detail. Again the golden sky (not so bright as the sun was not so strong) and the more ‘natural’ colours of the gravestones and buildings. Next is the bridge between Banff and Macduff, Aberdeenshire, Scotland.
The bridge across the Deveron estuary at Banff, Aberdeenshire, Scotland.
The bridge across the river Deveron estuary at Banff, Aberdeenshire, Scotland. Shooting here I tried to use the stonework of the bridge to frame the image. The sun was high and bright, and the lens caught a sun flare. I hoped that the stone of the bridge together with the shadows it cast would balance the bright background, that otherwise could be bleached out! See a larger-pixel version here on Flickr, where you can look much closer: Deveron Bridge Now back to Fyvie loch – this time showing more of the water.
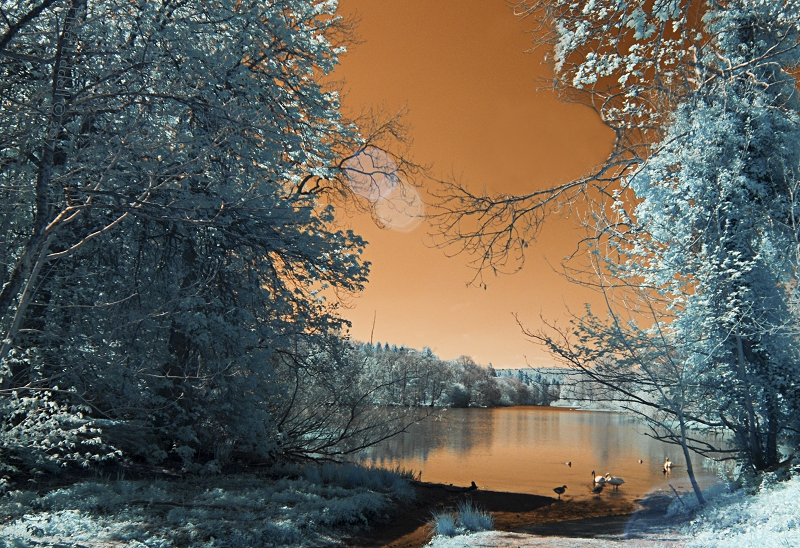
Fyvie loch where a small burn feeds into the loch
Here I have a clearer view of the water, and the reflections of the sky and the trees are lovely and clear. A golden sky, and ‘on golden pond’ too, with gold water! The foreground offered some good tree shade to frame the scene, which is almost completely surrounded by the light blue of the grass and foliage. And again there is a light flare, pale blue, coming in almost like a double moon in the sky! And finally the ducks, geese and swans that congregate where the burn opens into the loch add a sense of scale. Again, you can see a larger-pixel version here on Flickr: Golden Pond
It soon became a firm favourite and I took it everywhere! If I could only have one IR camera (and I now have 5!) it would be this old Nikon with its Super Goldie 590nm filter. It is so versatile. As I’m about to show, with a computer you can manipulate the shots you take to produce a whole range from B+W infrared through a range of colour effects. There’s more scope for experimenting and refining stunning images using this Goldie filter than the other filters I have.
So, on the next page I’ll explore just what you can do with Photoshop and a brilliant FAUX free action. On to the FAUX adventure Some more information on the the Goldie: “”The Super Color IR filter is our most colorful filter, its 50% pass frequency is 590nm and its closest equivalent would be the Wratten 29 filter. This filter passes the most visible red light along with IR and therefore the resulting images have the most saturated colors. Which can further be manipulated in Photoshop to produce a dizzying array of effects.” [thanks: https://www.lifepixel.com]