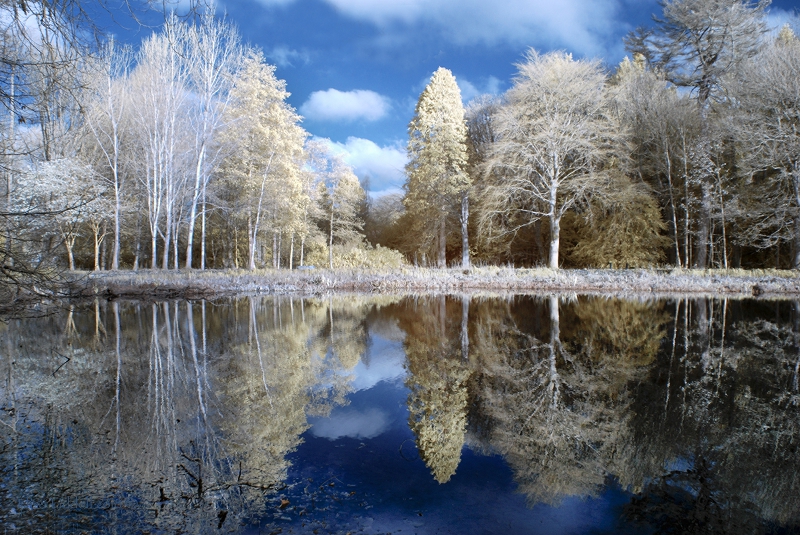
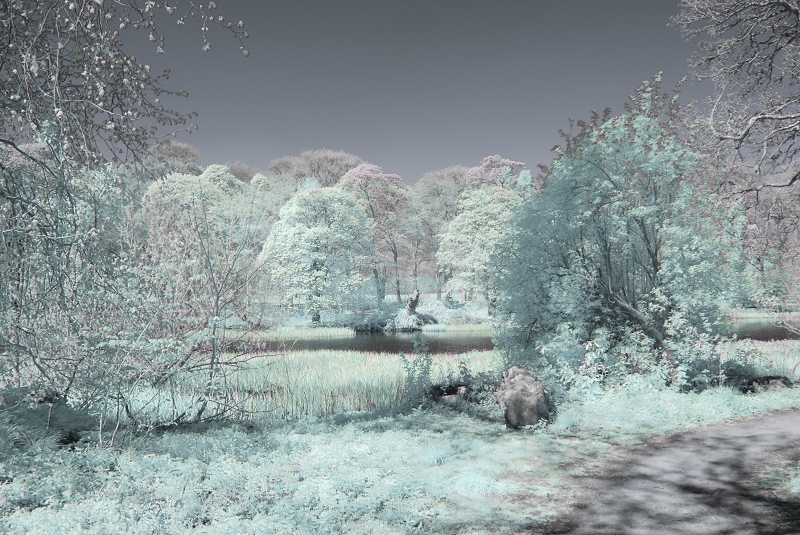
Trees reflected in the loch at Fyvie Castle. Infrared FAUX
My Adventures in the IR Wonderland
Infrared (IR) photography first really caught my attention in 2015, through looking at IR groups on Flickr. I loved the different ‘view’ it offered, making even familiar places and subjects fresh and new to my eyes. I began by using Photoshop, and trying the B+W adjustment layer, which offered infrared as an option. Disappointed I turned to the internet, and found a wealth of information, most of it too technical to help a complete beginner. I though about using a screw-on filter as the simplest way to experiment, but soon learned that Sony cameras were the least successful for IR shooting. I’m a Sony fan, so I had an additional problem!
Then in 2016 I learned about IR converted cameras. These are usually old cameras that have been modified to shoot ONLY in IR. I found an old Nikon D90 on eBay, and the adventure began.
The pages here follow roughly the stages or steps that I have followed as I gradually learned more, and experimented. The first 6 pages cover the 2 converted Nikons – a D90 with a 720nm filter, and a D80 with a Super Goldie 580nm
Infrared first steps The start of my adventure, from Photoshop disappointment to Nikon delight. First experimental shots.
Infrared second steps The next step in the adventure, learning what IR does to the colours we see with our eyes. A still life experiment with colour, B+W and IR versions of the same set-up.
Infrared third steps Taking my ‘new’ Nikon and its 720nm filter out and about shooting landscape, sky, trees and water. And comparing full colour, B+W and infrared shots of the same scene.
Infrared fourth steps Enter the Super Goldie! I buy a second Nikon, a D80 with the 590nm Super Goldie filter. This allows more of the colour spectrum in, and moves from the B+W realm into a fantasy land of surreal colour.
Infrared fifth steps FAUX post processing. Moving from the SOOC shots with a little Photoshop to tweak the shot to using a Photoshop Action (free to download) to apply colour inversions, and refinements to Goldie shots. I use the Khromagery action.
Infrared sixth steps FAUX processing taken even further with the Photoshop Supply action (free to download) which includes 9 separate action that you can use, mix and experiment with to create a range of surreal effects.
The next pages will be about using converted Sony A5000 cameras.
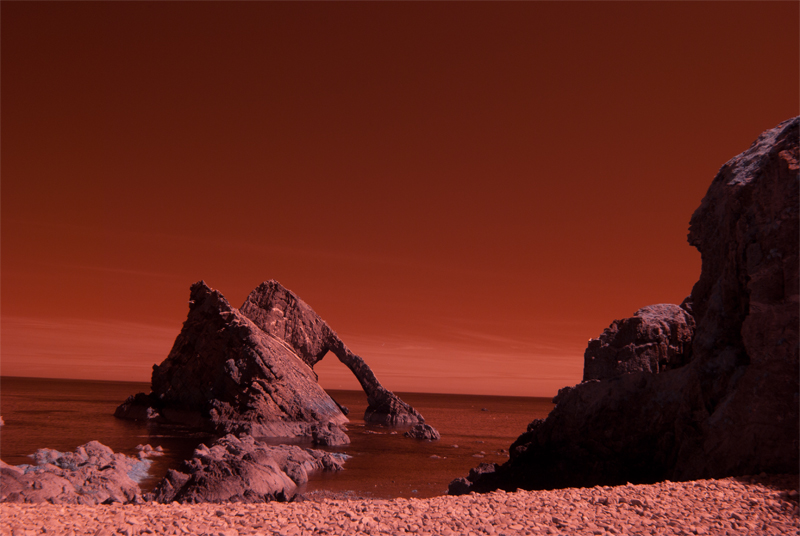
The Bow Fiddle rock shot in Infrared, with a FAUX action applied in Photoshop
Adventures in IR Wonderland 6 – the Goldie 8 FAUX
As I mentioned at the end of the previous section, I have recently found a second FAUX action for Photoshop. I couldn’t leave the subject of how to handle your Super Goldie shots at the post-processing stage without taking a look at this option. The action is free, and you can download it from the Photoshop Supply website. The actual page where you’ll find the zip download is here . There’s lots of information on installing an .atn file, colour channels, inversions, and what you can do with your IR shots. I thought I would experiment with the action and see what it could add to the range of processing that I currently use with my Goldie IR shots.
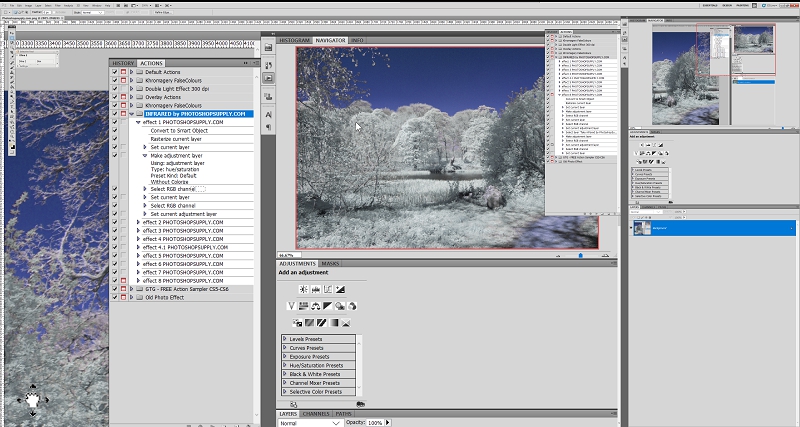
Photoshopsupply 8-action loaded and ready to run
This shows the range of FAUX processing options inside this single .atn file. There are 9 options as number 4 has two options. You can import your image (for me a Nikon D80 Jpeg here) and then run each action. You end up with a file containing each action as a separate file. The original is there at the bottom, unchanged. I quickly found it was most useful to name each action to avoid confusion! Then you can turn them on and off and use the opacity slide to mix colours and effects.
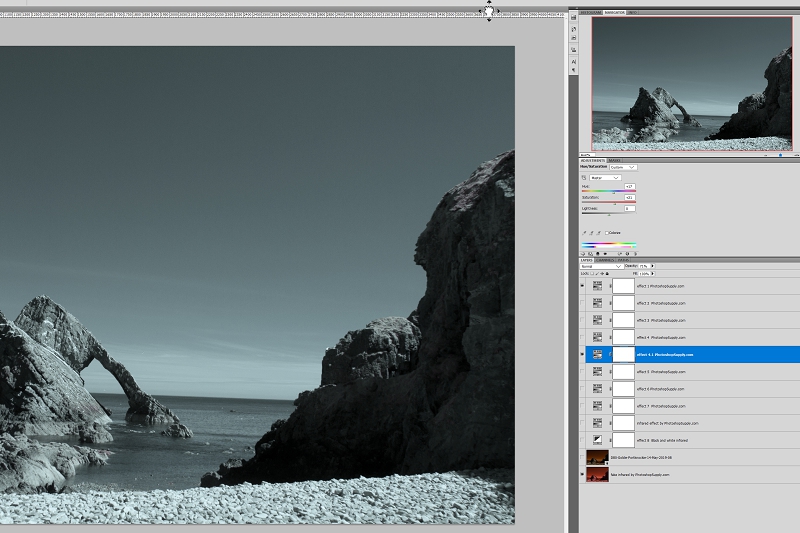
The FAUX 8-action with all 8 actions run
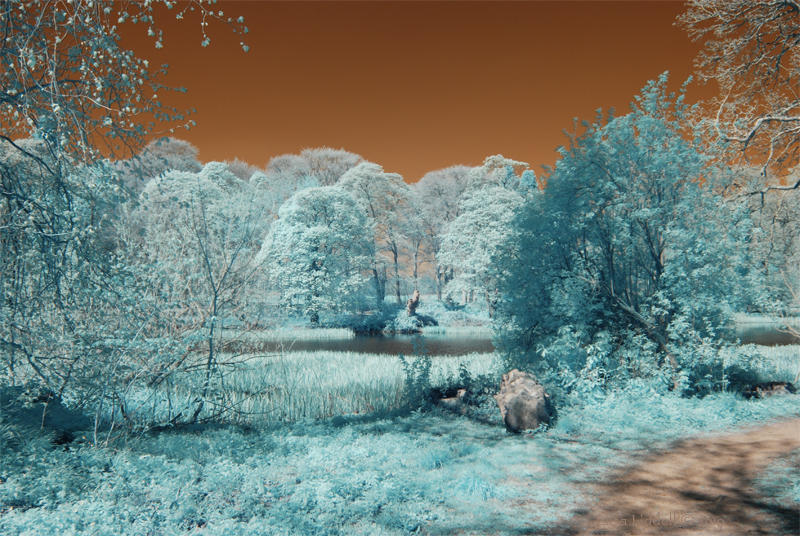
This shows the complete range of FAUX actions once they have all been run and numbered. Here I wanted to try both the NEF (RAW file) and Jpeg versions of a shot of the Bow Fiddle rock at Portknockie. I chose actions 1 and 4.1 and lessened the opacity of 4.1 to 71%. Each action has a layer mask, which means you can remove portions of that layer effect too, just as you would with a Quick Mask. It makes for an impressive array of tools to create an original and exciting image! So back to the Fyvie walk shot. Here is the original shot converted into FAUX using the Khromagery action I demonstrated on the previous page.
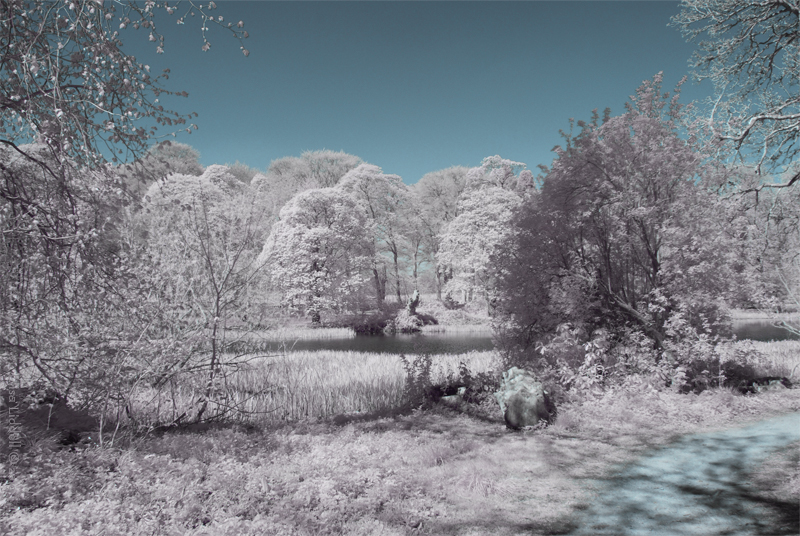
The cover shot of page 4 with the FAUX action applied
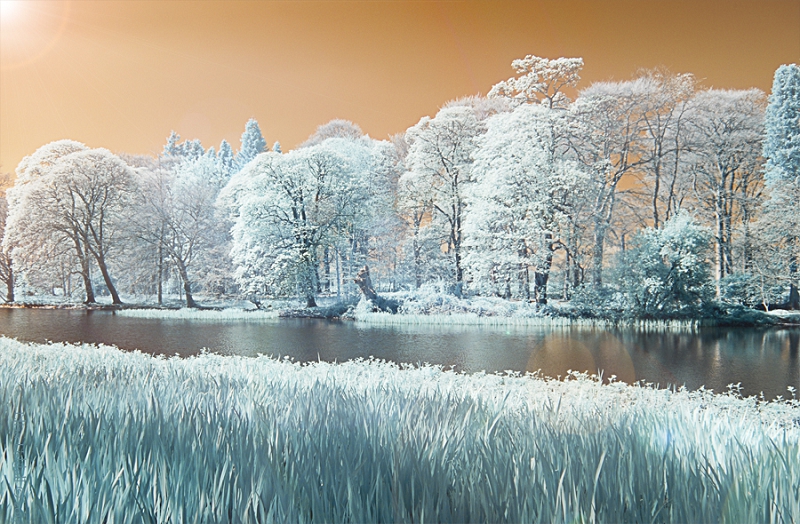
And here is the same conversion using the Photoshop Supply action.
The same shot processed using the Photoshopsupply FAUX action
Here the sky is darker and slightly more purple. But the big difference is in the treatment of the trees. Instead of white and gold/ochre tints, you have a blue/grey range of tints. I like them both, so this action is a definite addition to my processing tool kit! Note: All of these shots are just as they look when applied. I would most probably brighten them before completing .. as I did with the Khromagery image.
Select another Photoshop Supply action and …. how about a pink sky?
A pink effect using one of the 8-action choices
Again you have the sky colour reflected in the path and the rock. Maybe it’s the visual effect of the pink sky, but there seems to be a slight green tone to the foliage now.
Next you have another choice, a more turquoise tint to the sky ….
A turquoise effect using one of the 8-action choices
And here there is a definite pink tint to the grass and the near trees.
Or how about duck egg blue to the trees, and a grey sky …..
Blue tree effect mixing 2 of the 8-action choices
That particular effect was created by combining 2 effects – using numbers 5 +6. But you can play with the options and make your own mix.
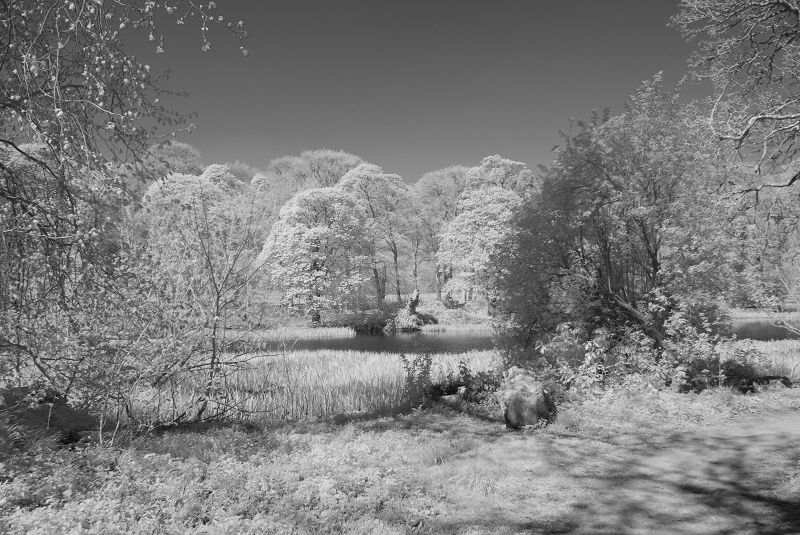
The final action is a straight B+W
Black and White effect using the final of the 8-action choices
I wondered if there was any difference if I chose to desaturate rather than choose B+W
Choose to desaturate the colour. Is the effect different?
Here I’ve used that technique to the max, and apart from being a little darker it seems the same, though I haven’t studied both versions closely. With the desaturating route you can simply slide move the desaturate slider and fade the colours rather than remove them. Again there is a whole range of options!
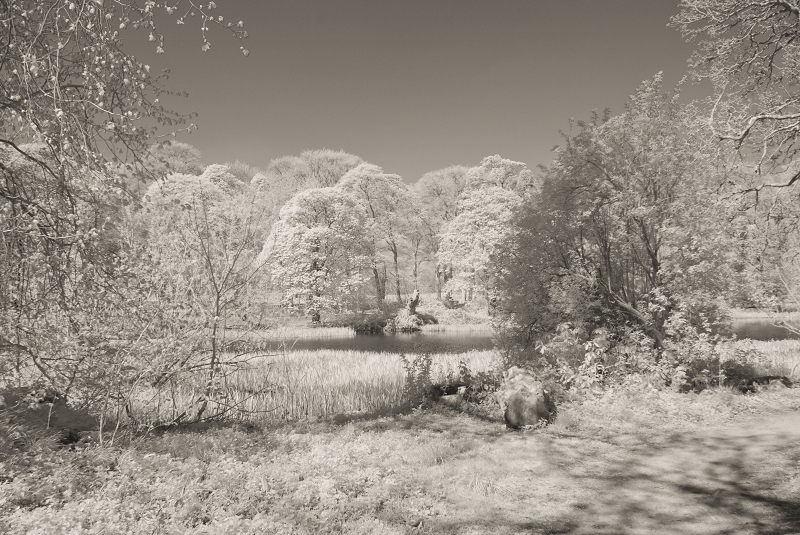
Apply a sepia tint to the Black and White version of the infrared shot
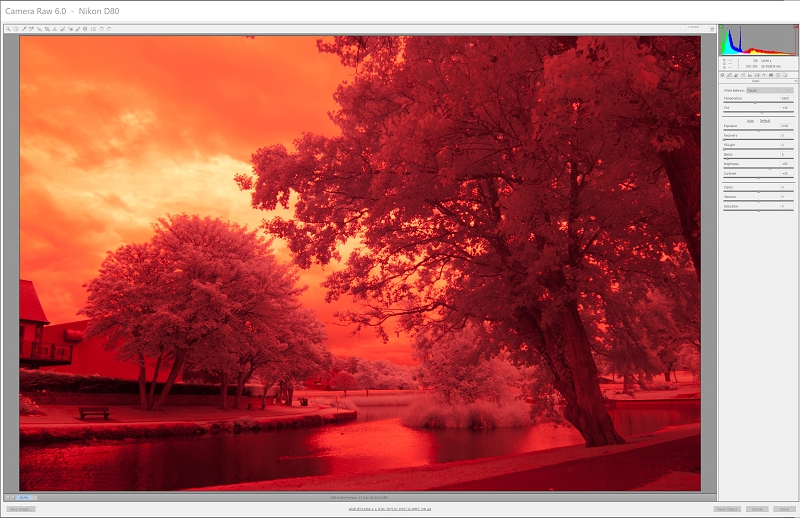
Once you are into B+W it is easy to work a sepia version as well, as my final take on this one shot. These are just a handful of ways that you can develop the image using this single action. I have found it a great addition to the post processing. It is particularly helpful with handling the NEF files, which are the Nikon version of RAW. When you bring a NEF file into Camera Raw there is a disconcerting effect – the images all turn red
Nikon NEF file from my infrared converted camera displays as red
And the effect can be even more intense if you try to adjust the colour using the White Balance – here is the effect of choosing ‘Cloudy’
Nikon NEF file from my infrared converted camera displays as intense red
It needs to be a problem to adjust in Photoshop itself, and not Camera RAW!
The whole point of shooting in NEF (or any RAW format) is that the file in not compressed, so you have the maximum file size to work with. Any post processing will inevitably remove some pixels, and the image will gradually degrade each time you affect it. So using my Jpeg I start with a file size between 4.5-5 MB – if I work with the NEF of the same image I will have between 9-9.5MB of data. That difference in file size really matters. So, returning to the image of the Bow Fiddle rock.
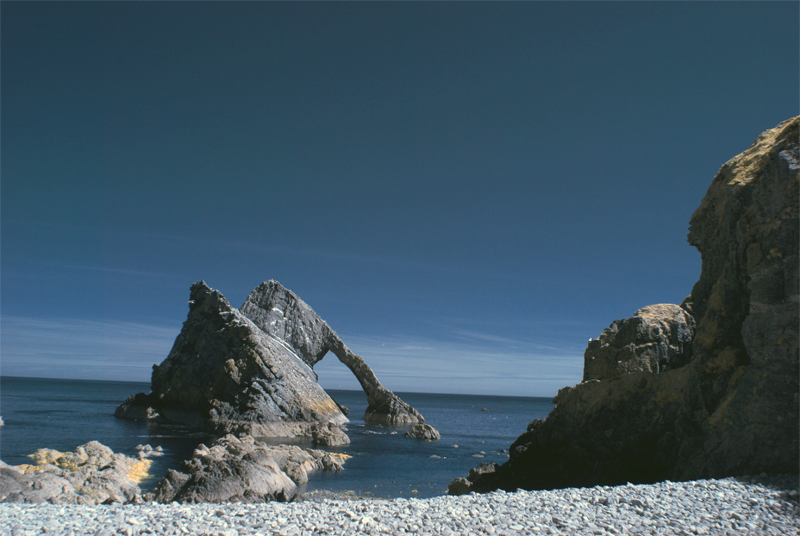
The original Nikon NEF of Bow Fiddle rock
This is the NEF file, giving my the biggest file size to work with, but also the problem of a whole lot of red to contend with.
If I use the Khromagery FAUX conversion I get a pleasing image
The simpler single action Khromagery FAUX conversion
But essentially it looks almost like a normal colour photo.
If I use the versatility of the Photoshop Supply FAUX and run all nine options and simply mix and match the results, I can get something quite different!
The Bow Fiddle rock shot in Infrared, with a FAUX action applied in Photoshop
So I think that the Photoshop Supply FAUX action is a definite for my processing of Nikon Goldie shots … and I guess for a whole lot more besides.
Trees reflected in the loch at Fyvie Castle. Infrared FAUX
Adventures in IR Wonderland 5 – the Goldie FAUX action
So we have met the new Super Goldie filter, and seen what it can do straight out of the camera. A golden sky and lovely soft blue trees are the hallmarks of the shots you can get. My shots are taken on an old Nikon D80 which has been modified to ONLY shoot in the Super Goldie (590nm) range – there will be variations with different cameras and different ways of applying the filter. I usually shoot in both RAW and Jpeg format across all my cameras. RAW means the NEF format in the Nikon – but the results I have been showing you are all taken from the Jpegs. Working with the NEF throws up some problems that I’ll look at later. I wanted to start as simply as possible – and that meant using the Jpeg shots. Once I was confident with the results the Goldie filter was giving me, I decided to go looking online for way to transform my original shots into the amazing and colourful shots I saw in Flickr and on the internet. The words that kept coming up was FAUX (or false) colours – so I began to investigate. Colour ‘inversions’ were frequently mentioned, and I struggled to find out what that meant and how to do ‘inversions’. Then I found David Burren’s website Khromagery which has a lot of helpful material – though it was written quite a while ago, and we have more advanced computer-based assistance now! But one gem that you can download from his site page: here is a Photoshop Action that I have found to be invaluable. I use Photoshop CS5 and it is my go-to starting point for playing with my Goldie Jpeg images. To quote from his page: “A long time ago I wrote a Photoshop action (well, I built upon a technique I saw demonstrated by someone else) to help with this, and apparently, it’s still in use by many folks today. For anyone looking for the FalseColoursAction, a ZIP file can be downloaded here (this article was prompted by a reader searching for the old action). Do note however that the processing in that Photoshop action is purely “by the numbers”, and the visual results will be different depending on the colour space (ProPhoto, AdobeRGB, etc) you’re using.” So I installed the action and began to run it on my Goldie Jpegs. I’ll take you through the process with just one shot – the cover shot from the previous page.
Running the FAUX action in Photoshop
Here the image is in Photoshop and ready for the steps in the Action to be applied. I run the action and …
The cover shot of page 4 with the FAUX action applied
Wow! That is quite a transformation!
The IR FAUX conversion, the final stage
If you look at the information that is on-screen the first thing you notice is that the Hue/Saturation window is left open in the middle of the image. This is so you can do a quick adjustment to the overall colour and intensity before you close/complete the action. To start with I just ticked OK. Then down the side panel in PS you see that the action steps are all showing but placed inside a folder. So you can collapse the folder neatly, and simple turn the action on or off – the original image is still there at the bottom of the Layers window. Neat and simple, and quite magical!
Here I was working with the Fine Jpeg, so the pixel size is only 3872×2592 – but the results are so good and so quick that I haven’t ventured into the trickier region of working with the larger NEF version of the shot until quite recently. I’ll be looking at that move later on. For the moment let’s stick with the FAUX action and the Jpeg image. So let’s try a few more conversions using the action on the default settings and see how they turn out.
The bridge across the Deveron estuary at Banff, Aberdeenshire, Scotland.
Lens flares and trying to integrate them and use them.
One additional thing to mention about infrared converted cameras, and maybe infrared filters in general, is the tendency to create lens flares. I find that sometimes the flare can add a special touch to the image. Here it works well, though I did have to tone down the final large flare in Photoshop.
The bridge at Banff with the FAUX action applied
Here the Faux conversion works well, though the lens flare in orange may not be to everyone’s taste. I think I would tone down the brightest one just a little in post-processing!
The next bridge shot was taken from a slightly different angle. It clearly shows the lens flare you can get from the converted cameras IR filter.
A second shot of the bridge at Banff using the Super Goldie filter
The large blue flare in the foreground needs to be damped down, as I did in the previous shot that I posted on Flickr. And the green tint to the sky is stronger in this shot than in the previous one too.
And after the initial Faux conversion …..
The bridge at Banff shot with the Super Goldie IR filter with a FAUX conversion.
I like the tones of the tree and the scene beyond the bridge … but there is some post-processing playing to adjust this. So I copy the original image/layer and place one above and one below the FAUX action. Then I can use a quick mask to reveal the FAUX colours. Then I can choose what to do. Maybe keep the blue lens flares? And I prefer the original orange tones of the actual bridge, so maybe I’ll keep them too. The FAUX is better in handling the acid green of the sky top right of the shot …. and now I can proceed to mix and combine the colours, replacing some, and blending others.
Using two versions of the IR bridge capture and merging the colours.
Here you can see the process as it is happening. I hope that this gives you some idea of how the FAUX action works, and how you can use it to make quite subtle adjustments to the image, and make it a personal result, rather than just what comes out of the camera, or what the FAUX action produces. I admit that I love this ‘messing about’ stage most of all. It really does make it personal.
And of course you can always opt to remove the FAUX effect altogether and have a simple IR black and white image – and again, play with the tonal values in Photoshop too!
The bridge at Banff. Super Goldie IR filter processed in B+W
So that is the basic range of possibilities that lie in the Super Goldie 590nm filter. And the sheer range of possibilities on offer, the versatility of the filter, is why it is my favourite of the 3 filters that I use. I had intended to stop at this point, but in my online research for this article, checking facts, and generally scouting out points, I came across a second FAUX action – and I have begun playing about with it. So, on the next page I’ll share what I have discovered so far. But I figure that this is maybe a big enough chunk of information and examples for an introduction to FAUX here. And you might like a pause to digest ;o)
On to the second FAUX action and a look at the 8 ways it can apply to your initial shot.
Walking beside the loch at Fyvie Castle, shot with the Super Goldie filter
Adventures in the IR Wonderland 4 – Enter the Goldie!
My adventures in the photographic and visual ‘Wonderland’ that is Infrared (IR) had begun. As I have described in the previous articles, the very first converted camera I found on eBay was an old Nikon D90 and the IR filter was the gentle 720nm. I had jumped in without knowing much about the range of filters that are available, and how wide the spectrum of infrared light is. It didn’t stop me taking some lovely shots, and thoroughly enjoying the results. So don’t be dismayed, you don’t need to study a whole lot to have immense fun with IR; and like me, you can pick up what you need to know as you go along!
I discovered with the 720nm filter that some slight colour did appear in the photos I took, and I learned how to use Photoshop to manipulate the colour casts to produce images that I really enjoyed. But my adventures were only just beginning! As I posted shots to IR Flickr groups, and looked at images online I saw that there was a whole range of colours represented. They were definitely shot in the infrared spectrum, but how did the photographers achieve such dazzling results? I saw red trees, blue trees, orange skies – I wanted to discover how to get such wonderful colour combinations! Folks on Flickr are often very kind and will post the EXIF details of the shots they take and add in text or tags what filters and settings they use. It is a wonderful resource!
I began to collect the knowledge I needed to take the next step. I decided that the filter I wanted next was the 590nm IR Filter (Super Colour or Goldie). I call it my Goldie for short! The lower the nm number, the more colour is let in to the camera sensor. 590 is very low so there’s plenty of colour coming in. Once again I decided to go with a dedicated camera that had been converted to only shoot in the IR range – this time I was after the 590nm part of the IR spectrum. The Nikon I found was even older – a D80. But this time I had some experience with the converted D90, so I was reasonably confident that I was on the right track to find that elusive and magical shot that would take my breath away ;o)
I guess that the Goldie filter is named after the way it renders the sky – which is a deep golden colour. The trees, instead of being white (like the 720nm filter) are blue – reminiscent of the blue-rinse hair colour that used to be so popular with older women!
The loch-side at Fyvie Castle, with the water iris beds in the foreground and the trees across the loch
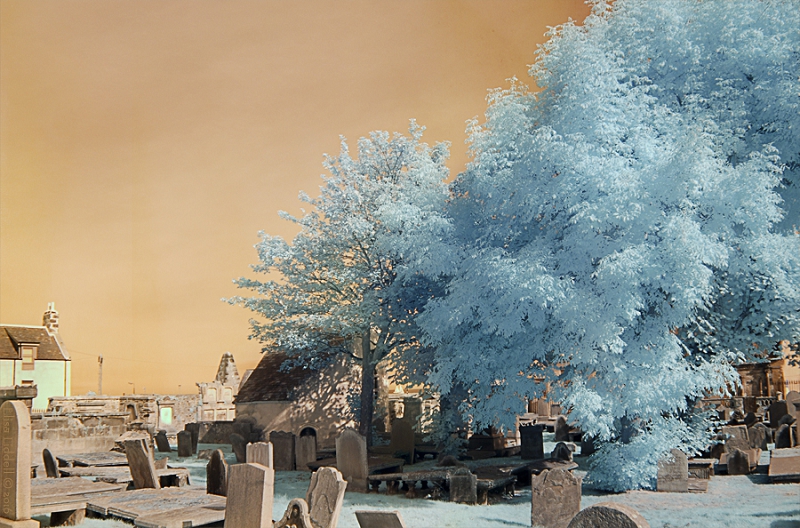
I was not disappointed. The shimmering golden sky and blue trees were so beautiful! And the blues were nicely graded in tone. I had added another complete ‘world’ to my Adventures in Wonderland! As with the 720nm I found that there was a way to compose the shots that helped a whole lot. Include something that is going to show up as dark – natural stone, tree trunks, and water can do the job perfectly. In this shot the tree trunks and the water of the loch help to define and frame the pale blues that edge into white. Shadows can do the same job, just as they did with the 720nm. Shooting from shade into light can be very helpful. Here the shadows in the foreground come from the water irises and their leaves. And there’s a nice dark shadowy patch on the right side across the water, caused by the strong sunshine coming in from top left. The golden sky also deepens towards the top of the frame. So I started taking my new Goldie out and about and shooting more of the familiar local places that I visit regularly. I found it helped to know the locations, as there was plenty to learn about the camera and how the filter responded to the light etc. Here is the medieval kirkyard at Banff Aberdeenshire.
The medieval kirkyard at Banff Aberdeenshire – Super Goldie filter
Here the light has caught the towering mass of trees well, showing many tints and tones, shadows and detail. Again the golden sky (not so bright as the sun was not so strong) and the more ‘natural’ colours of the gravestones and buildings. Next is the bridge between Banff and Macduff, Aberdeenshire, Scotland.
The bridge across the Deveron estuary at Banff, Aberdeenshire, Scotland.
The bridge across the river Deveron estuary at Banff, Aberdeenshire, Scotland. Shooting here I tried to use the stonework of the bridge to frame the image. The sun was high and bright, and the lens caught a sun flare. I hoped that the stone of the bridge together with the shadows it cast would balance the bright background, that otherwise could be bleached out! See a larger-pixel version here on Flickr, where you can look much closer: Deveron Bridge Now back to Fyvie loch – this time showing more of the water.
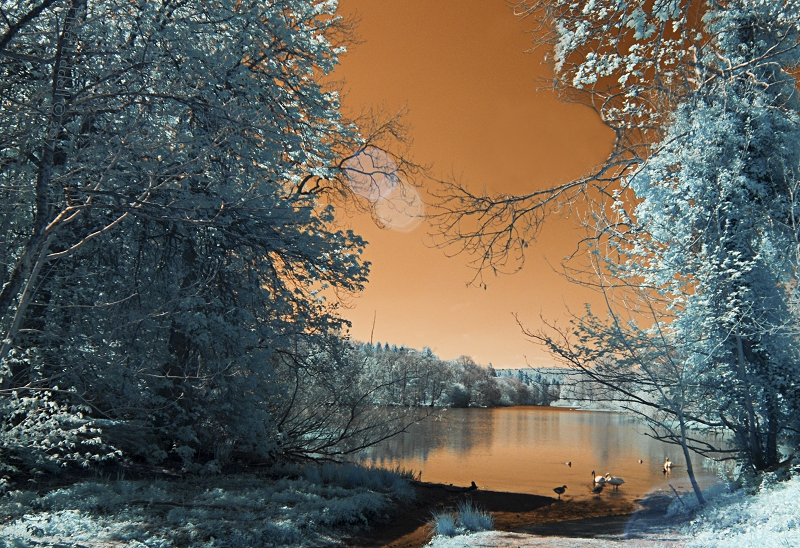
Fyvie loch where a small burn feeds into the loch
Here I have a clearer view of the water, and the reflections of the sky and the trees are lovely and clear. A golden sky, and ‘on golden pond’ too, with gold water! The foreground offered some good tree shade to frame the scene, which is almost completely surrounded by the light blue of the grass and foliage. And again there is a light flare, pale blue, coming in almost like a double moon in the sky! And finally the ducks, geese and swans that congregate where the burn opens into the loch add a sense of scale. Again, you can see a larger-pixel version here on Flickr: Golden Pond
It soon became a firm favourite and I took it everywhere! If I could only have one IR camera (and I now have 5!) it would be this old Nikon with its Super Goldie 590nm filter. It is so versatile. As I’m about to show, with a computer you can manipulate the shots you take to produce a whole range from B+W infrared through a range of colour effects. There’s more scope for experimenting and refining stunning images using this Goldie filter than the other filters I have.
So, on the next page I’ll explore just what you can do with Photoshop and a brilliant FAUX free action. On to the FAUX adventure Some more information on the the Goldie: “”The Super Color IR filter is our most colorful filter, its 50% pass frequency is 590nm and its closest equivalent would be the Wratten 29 filter. This filter passes the most visible red light along with IR and therefore the resulting images have the most saturated colors. Which can further be manipulated in Photoshop to produce a dizzying array of effects.” [thanks: https://www.lifepixel.com]
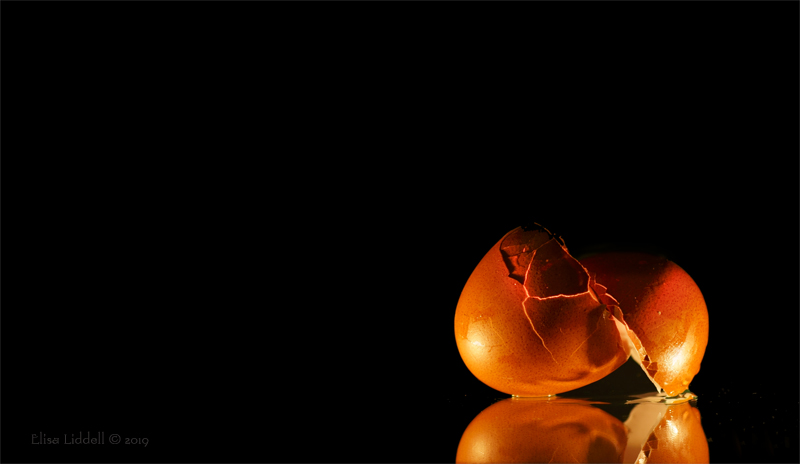
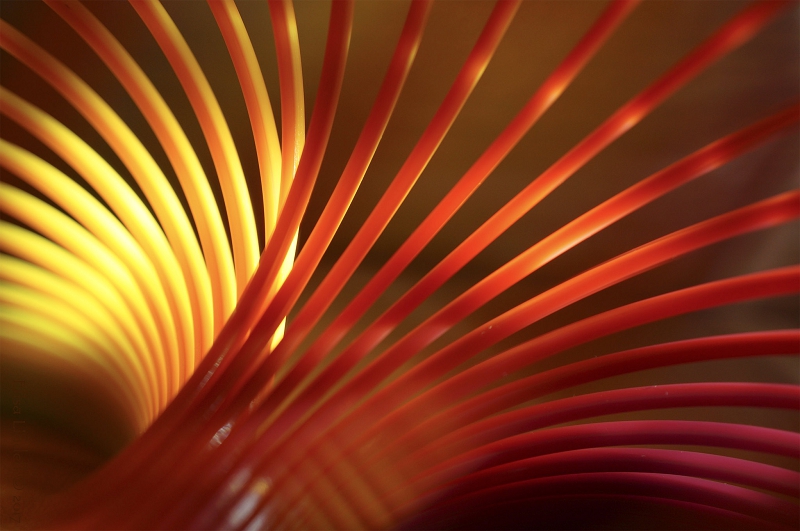
Following on from yesterday’s post of a discarded eggshell. I was looking for something more playful and experimental to make from the original image. Some photo-manipulation is called for – which means more play time in Photoshop! Here I chose to add a macro shot of the inside of a plastic, multi-coloured slinky…
The original macro shot of a coloured slinky
But the full colour version would take the eye away from the egg. So I needed to make something more in tune with the existing dark background, but adding another dimension to the image.
The Eggstra-ordinary combination of design shapes and colours
Hopefully it works – giving some visual interest to the black areas, and using the curves of the slinky to echo the natural curves of the eggshell. The original slinky shot is on Flickr: here The larger version of the photo-manipulation is on Flickr: here
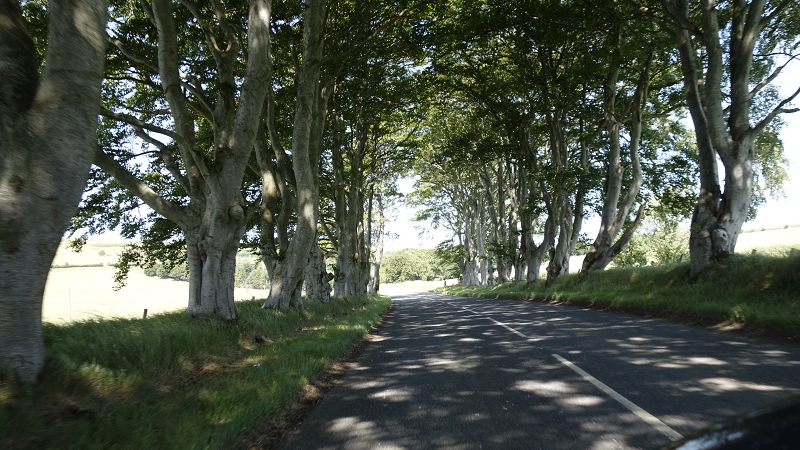
The camera can do a wonderful job, but sometimes it needs a little help to capture what your eye and brain together can see. One of those conditions is when there are extremes of light and dark in the same shot. I use the amazing Sony RX100 to shoot when we are driving along (maybe at 50 mph) to capture the journey. We’ve a lot of beautiful countryside locally, but with no places to stop and carefully frame shots! In this frame you can see the bonnet of the car in the bottom right corner. Shooting at speed in ever changing conditions I just have to point and click – and set the camera to Auto, and let it make the second-by-second decisions. In this shot the camera has evaluated the extremes of light and shadow, and chosen a middle point as the best compromise.
The original shot captured through the windscreen at 50 mph
What I wanted to capture was the amazing, bright sunshine shining through the canopy of the trees, and dappling the road. The camera has made a good starting point. I’ve got the essence, and the bones of the image I saw and wanted – but the camera can’t adjust to the brightness of the landscape beyond the avenue of trees and to the shadows under the tree canopy – not at the same time. BUT the information is all in there – it just needs a little help to bring it all together So I started work on the original image. I don’t crop or straighten at all at this point, as I want to take several versions of the shot and overlay them exactly … The technique I use is one that doesn’t damage the actual image, but places Layer Masks over the image. You can then adjust or delete the mask, and start again with the underlying image intact.
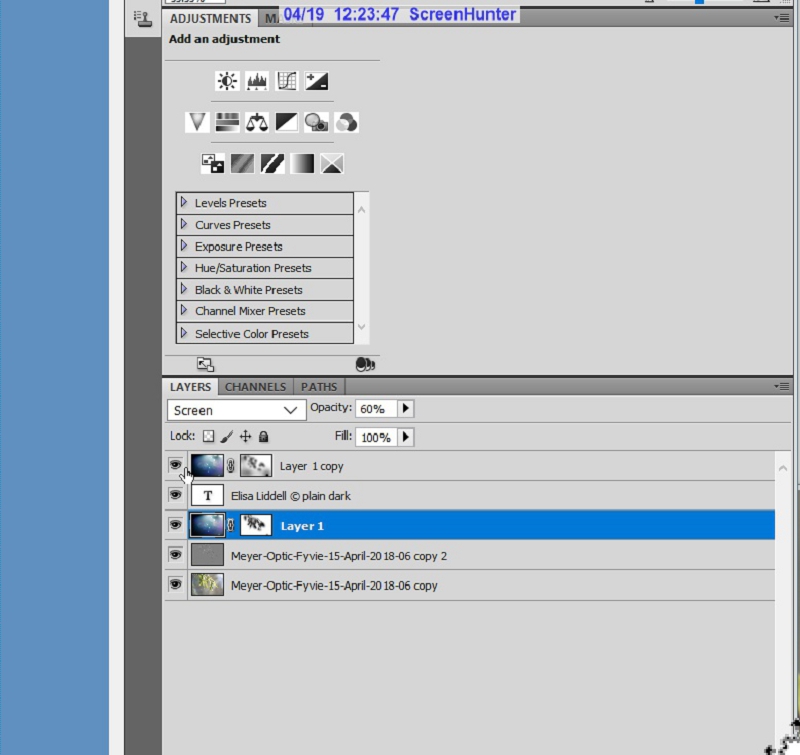
In Photoshop I opened up the image and called it Layer 1 – the original ‘middle value’ shot which will be the base layer. Next I wanted to add a layer with the exposure lowered, in order to see what has been bleached out in the land beyond the avenue of trees. So I loaded a second version of the original image into Camera Raw, and lowered the exposure and/or brightness levels until I could see the detail in the landscape beyond the avenue. Then I took this 2nd version into Photoshop – where I can then drag the darker version and place it exactly over the original (hold the shift key while dragging). This layer I called Layer Dark. It sits on top of Layer 1 and completely obscures it. So then you need to choose from the top menu in Photoshop Layer -> Layer Mask -> Hide All . The layer disappears from view. But you can then gently paint in the darker values of the far bushes and trees
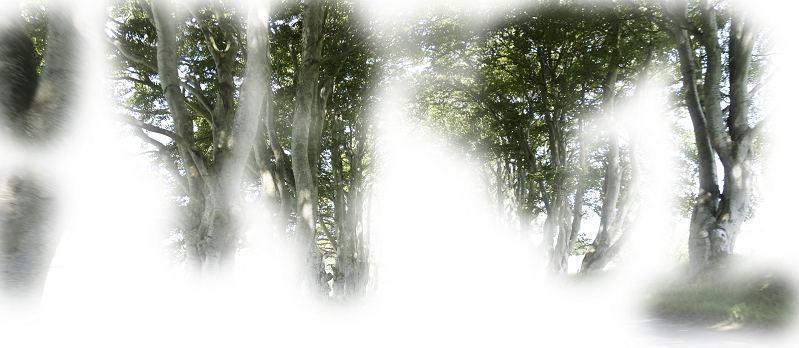
Areas that need darkening
These are the areas in the distance that have been bleached out in the shot. The information is there in the shot the camera took, but it needs a lower exposure level to bring it out! You can adjust how dark you want them to be, so that they seem natural, as what the eye might see.
Then I usually save the PSD file; so my next step was to name and save the PSD file. This means I can return and adjust this first step at any time. The alternative would be to flatten the image and continue. I prefer to save the changes as a new Jpeg or Tiff and use it as the new base layer in another PSD file. So in my new PSD file the next step was to deal with the dark area of the image. So I took a second version of image-2 into Camera Raw. This time I over-exposed the image in Camera Raw, looking for the lighter tones and shades that I wanted to use to highlight the luminosity that there was under the canopy. Again I imported this lightened image, and placed it exactly over the image-2 base layer. Again I chose a Hide All layer mask. and again painted in the areas that I wanted to lighten
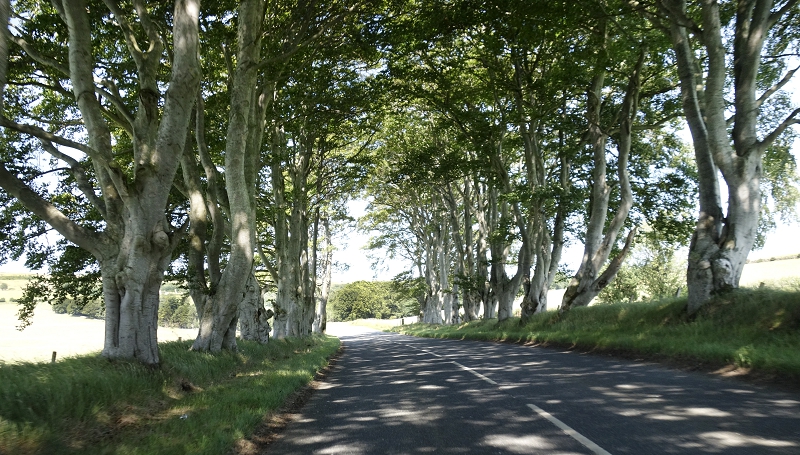
Areas that need a lighter tone
I used this stage to brighten and lighten the tree trunks and some of the leaves Now I had the adjusted version, with both darks and lights added to the original ‘compromise image’. This image was much closer to what I saw as we drove along. Again, I saved the PSD file and then saved the complete, edited image.
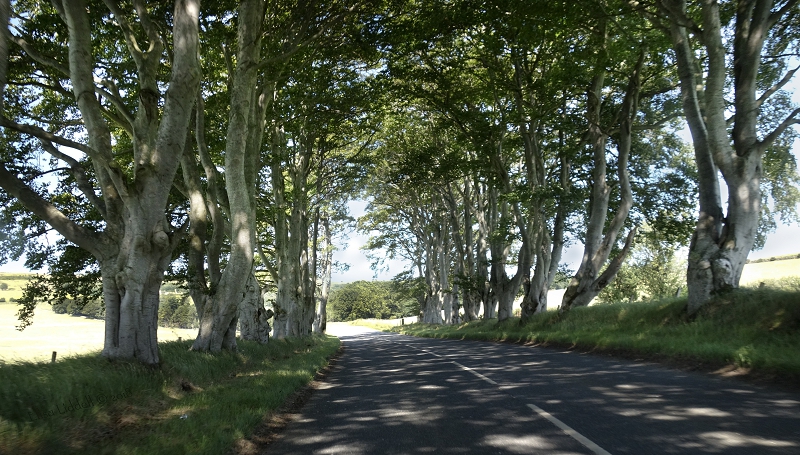
After both light and dark adjustments have been made
Then all that remained was to do some cropping, and straightening to give the composition I wanted. I wanted to remove the large tree-trunk at the extreme left of the shot – it unbalances the picture. And of course I wanted to remove the car bonnet too. I could just clone stamp it out, but I preferred to crop it out, as that crop brought the avenue closer. And finally there was a small strip down the right side that was bleached out and empty, so a small slice was cut down that side too.
Trimming the shot to improve the composition
Now we have the final image. Or is it? Now I could see the composition and the balance of elements. Yes – that’s what I wanted. But there was something still niggling at me, and it had become clearer now. There were areas around some of the tree canopy where the camera has been able to capture the blue of the sky – and the areas away from the leaves were still pretty bleached out. Could I somehow paint in a blue tint to soften the sky a bit? This was a bit of an experiment – but I created a new layer and made a diagonal gradient fill based on the blue tints in the photograph. I placed the layer above the image, chose a Hide All layer mask and gently tried to paint in some blue…. just to hint to the eye that the sky WAS blue! Looked at now, the blue halo effect that the camera had created was not so noticeable. But somehow the tree trunks seemed a bit too bright … so as a final touch I darkened a few of the tree trunks. It was a minor after-thought, and I often make two or more slight variations on the final image, so I can set them aside and come back to them before making a final selection.
The final image, ready to upload
Note: I always struggle, and try to view the ‘finished’ image through several monitors and screens (iPad, laptop, desktop). It’s an area where painting is much simpler, as colour values shift from monitor to monitor. Hopefully the end result will be ‘true to life’ and closer to what the eye actually saw in that fleeting moment – but there has been extensive post-production to create the nuances, details, shades and tones that the human eye can see, and the camera cannot duplicate (yet!) I posted the original image on Flickr with a little more about taking the shot here
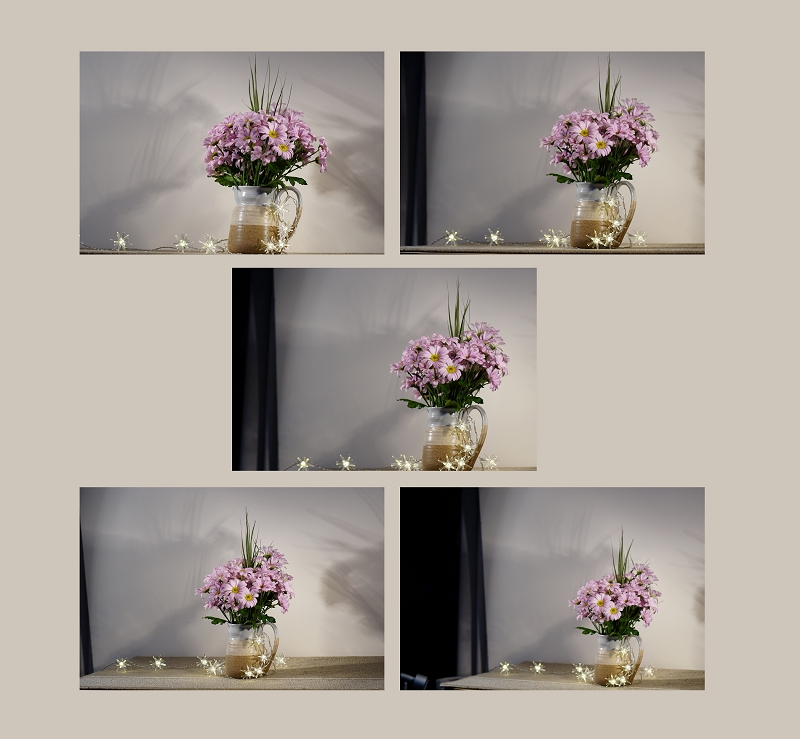
I have so many folders that I mentally label as “Failed shoot”. It’s a product of my habit of taking a few shots ‘just in case’ … just in case I later regret that I didn’t! I came across a folder from January 2018 just called ‘Pinks’. I was curious, it rang no bells, triggered no memories. Inside were just 5 shots. Then I remembered. I was putting away Christmas lights that we hadn’t used. And I thought I’d turn them on and maybe take a few shots before they vanished back into the cupboard for another year. In a hurry to finish the tidying up I put them together with a jug of flowers that was close by – and took a few shots. The results didn’t impress me when I looked at them later on. The lights didn’t sparkle at all, they added nothing. The wall I’d placed the jug against was nicely neutral, but in my haste I’d overlooked the cast shadows. Rather disappointed I mentally stamped the folder “Failed”. Only 5 shots in all, so I didn’t delete them at once.
Later that year I brought the folder out of mothballs, and took another look. I wanted something to play with, to experiment with the newly installed suite of Photoshop plug-ins called NIK. And if I liked the image that emerged, I could use it with my Sunday group that specialises in post-processing to transform a photographic image.
All 5 shots that I took that day, and marked as ‘failed’
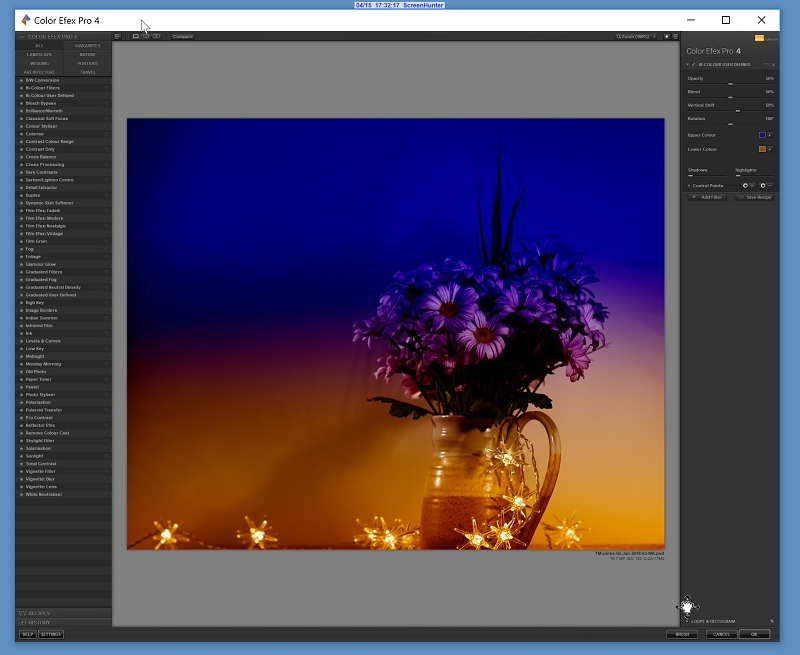
step 1 Looking at the originals, I decided to try number 3. I didn’t want too many cast shadows, and I didn’t want too much of the table surface either … I might want the jug to feel like it was free-floating. step 2 was to take it into Camera RAW, straighten it slightly, lighten it, and crop off the dark band on the left side. Then into Photoshop to play and see what might work to make something visually interesting out of the image! step 3 was to launch the NIK panel. What might work? I selected Color Efex Pro 4 panel and then Bi-colour, as I wanted something to jazz the image up and bring it to life.
Choosing Color Efex Pro 4Bi Color applied in NIK
That looked like a promising start to making something new.
step 4 the top colour looked nice and rich, but it was a solid blue-purple block. Maybe it needed something subtle to break it up? I’ve been collecting texture layers for a long while now. Flickr users are so generous, and make lots of beautiful texture layers available to fellow Flickr members. I also started to look at commercial collections for added effects. Design Cuts was the place that I began, as they offer bundles of discounted graphics and files, and I could try out different suppliers and see what suited me. My big favourite is 2 Lil Owls and from Denise I have some amazing effects, like light flares. So I looked in my 2LO collection called Crazy Flares, which mixes light flares with all manner of textures. And I selected this one
2 Lil Owls Crazy flares
These light flares needed to be overlaid, and then used in Screen mode for the best effect.
2 Lil Owls Crazy flares applied as an overlay
That’s better! beginning to shape up! step 5 was to save that image as a jpeg. I needed a single layer for my next idea. So I saved the PSD file as it is, then saved the layered image to start again. I opened the newly saved image as a Smart Object into a new PSD file as this allowed me to easily play with the Photoshop’s inbuilt filters … I wanted yet more light effects ;o) step 6 was to apply the Filter -> Render -> Lens Flare effects. Because the image is a Smart Object I could access the effects window and adjust it easily to get the intensity, direction and actual lens simulation that looked best.
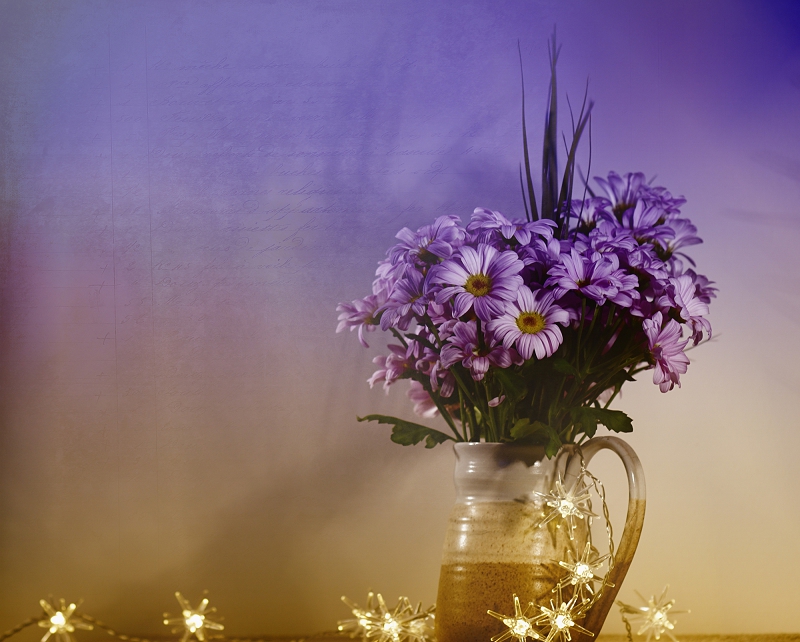
The final transformation – does it work?
Yes – that looked OK, and better than my starter image! step 7 was to gently wipe out a little of the bleaching effect of the light falling on the petals – a little more intensity for the petals, please! So I highlighted the mask, and removed a little of the glare.
And at last I am happy with the result.
And now I have something that has more interest than the original – there’s more going on visually. Colour-wise there’s an interesting play with the bi-colour division set up in the NIK. The final lens flare has added to the ochre tints in the lower half. The light flares and text texturing has lightened and added interest to the upper blue-purple half. And the flowers in the jug are the vertical that joins the two horizontal planes. Finally, the petals towards the top right of the image are balanced by the lens flare circles in the bottom left. Maybe I’ll post it and see what happens … now I just need a name for it ;o) So I posted it on Flickr to see what people thought – here
Early in 2018 we were just emerging from from a long and extremely harsh winter when I made my first visit of the the year to Fyvie Castle and loch. It’s my favourite local haunt, for walking, sitting and relaxing, and of course photography. So I took a camera or two, just to familiarise myself with the ‘outdoor’ lenses. Most of the winter I shoot indoors, which means macro, close-up or medium lens still-life. So I needed to flex the muscles and re-learn or remember the individual personalities of the lenses I use for landscape and outdoor shooting.
My newest outdoor lens is the Meyer-Optik Orestor 135mm f/2.8 (1966) which arrived just before the winter closed in. So I’d not had much chance to get to know the lens and what it can offer. I’ve collected a few ‘vintage’ lenses from Eastern Europe, and been impressed with the quality of shots modern digital cameras can produce using them. The rich and vibrant range of colour values is striking – and this particular lens is nicknamed “the bokeh monster”, which strikes an appreciative chord with me too! [More about it here, and a further link to the album of shots I’ve taken using it are on my Flickr site.]
So I set out with low expectations, both for the beauty of the location at the end of winter, and for my technical expertise. We had some sunshine, which is so essential, as we strolled along the sunny banks beside the loch. Being a lens from way before the digital age, it needs to be used in full Manual mode, which means setting White Balance, ISO, Shutter speed and Aperture (F stop) on the fly. I want full control over the focus too, as often my interest is not on the closest subject (which is what auto-focus selects). Also there is no IS (image stabilising) so a tripod may come in handy too. I knew from my first experiments last autumn, that F4 or even F2.8 would give me the best bokeh chances. So finding a focal point close by was what I had in mind.
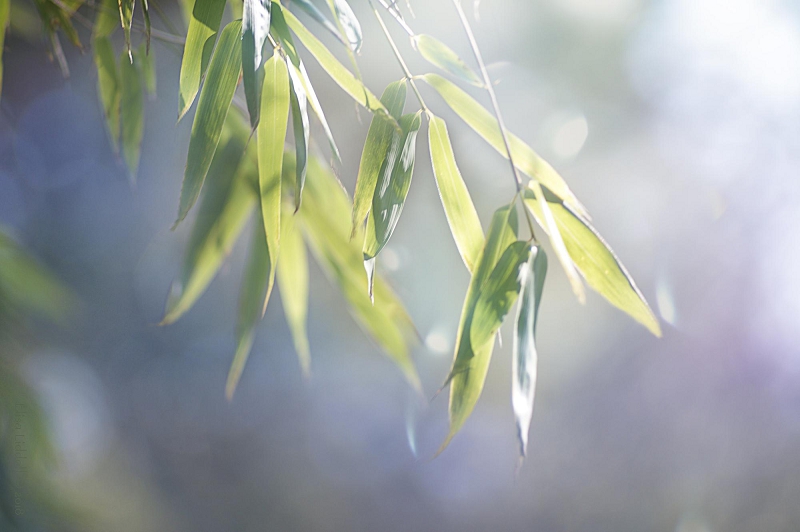
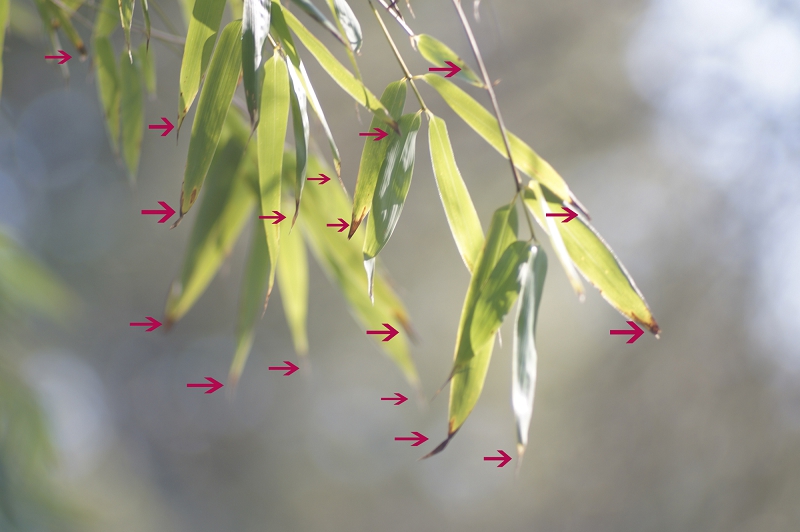
So – on to the actual shot I’m discussing here. A small frond of leaves lit by the sun caught my eye. Beautiful, simple, and great for a bokeh effect. But closer inspection on the computer screen showed just how much damage the winter freeze had done to the leaves.
Leaves in the sunlight – the original shot
The composition is there, the light streaming in from the top right is lovely, and the bokeh is great – not distracting, but giving a texture to the background. But the damage is so evident – it distracts the viewer! So, if I was to make anything of the photo, I needed a lot of patient work in Photoshop with the Clone Stamp tool. I identified at least 17 places that needed attention.
Leaves, searching out the points to work on
I set to work. The clone stamp tool is a miracle-worker. Used carefully it can transform an image. Here I needed to work with a brush size of between 20-100 pixels. I took the sample from as close to the damaged leaf area as I could, and used a strength of between 40% and 60% most of the time. With a soft brush that leaves little visible trace of the pixel overwriting. I didn’t want to remove all traces of damage, just most of them!
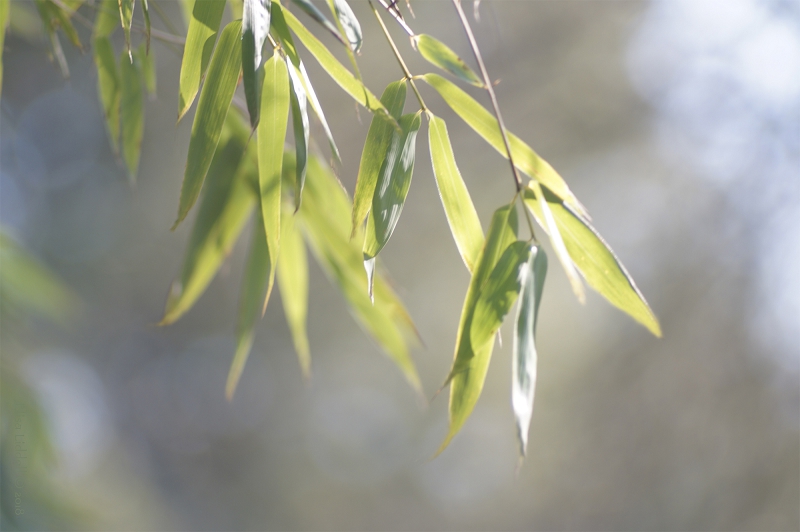
Leaves in the sunshine, cleaned up with Clone Stamp
The image was now usable – and what I wanted to do was to enhance the image without destroying what was already there. I thought I could enhance the bokeh, and add some more colour interest to the background. My choice for this was a great favourite of mine – Mix Pix Box – There is a wonderful collection “Light Bokeh Overlays” that would be perfect for the shot.
Light Bokeh overlay from MixPixBox
I used this overlay TWICE in different ways. The first layer I applied using the Screen option at 60%. The second time I chose Soft Light setting at 83%. The first offered most light, the second offered most colour. Combined they worked well. I used a Quick Mask on both to bring the leaves forward by gently removing some of the overlay.
Using the MixPixBox overlay on the cleaned image.
And the final result
The final image of Leaves in the sunshine
The ‘bones’ of a good shot were there in the original. But it took some post processing work to let them shine through!